【vue3-element-admin 】基于 Vue3 + Vite4 + TypeScript + Element-Plus 从0到1搭建后台管理系统(前后端开源@有来开源组织)
vue3-element-admin 是基于 vue-element-admin 升级的 Vue3 + Element Plus 版本的后台管理前端解决方案,技术栈为 Vue3 + Vite4 + TypeScript + Element Plus + Pinia + Vue Router 等当前主流框架。
相较于其他管理前端框架,vue3-element-admin 的优势在于一有一无 (有配套后端、无复杂封装):
配套完整 Java 后端 权限管理接口,开箱即用,提供 OpenAPI 文档 搭配 Apifox 生成 Node、Python、Go等其他服务端代码;
完全基于 vue-element-admin 升级的 Vue3 版本,没有对框架(Element Plus)的组件再封装,上手成本低和扩展性高。
前言
本篇是 vue3-element-admin v2.x 版本从 0 到 1,相较于 v1.x 版本 主要增加了对原子CSS(UnoCSS)、按需自动导入、暗黑模式的支持。
阅读前的两条声明:
博客有时效性,源代码会一直更新,本篇源码
tag版本 vue3-element-admin v2.2.0 ;各章节会有先后顺序依赖关系,例如:安装 Element Plus 需要先安装自动导入等,建议按照顺序完成0到1,当然也可各取所需。
项目预览
在线预览
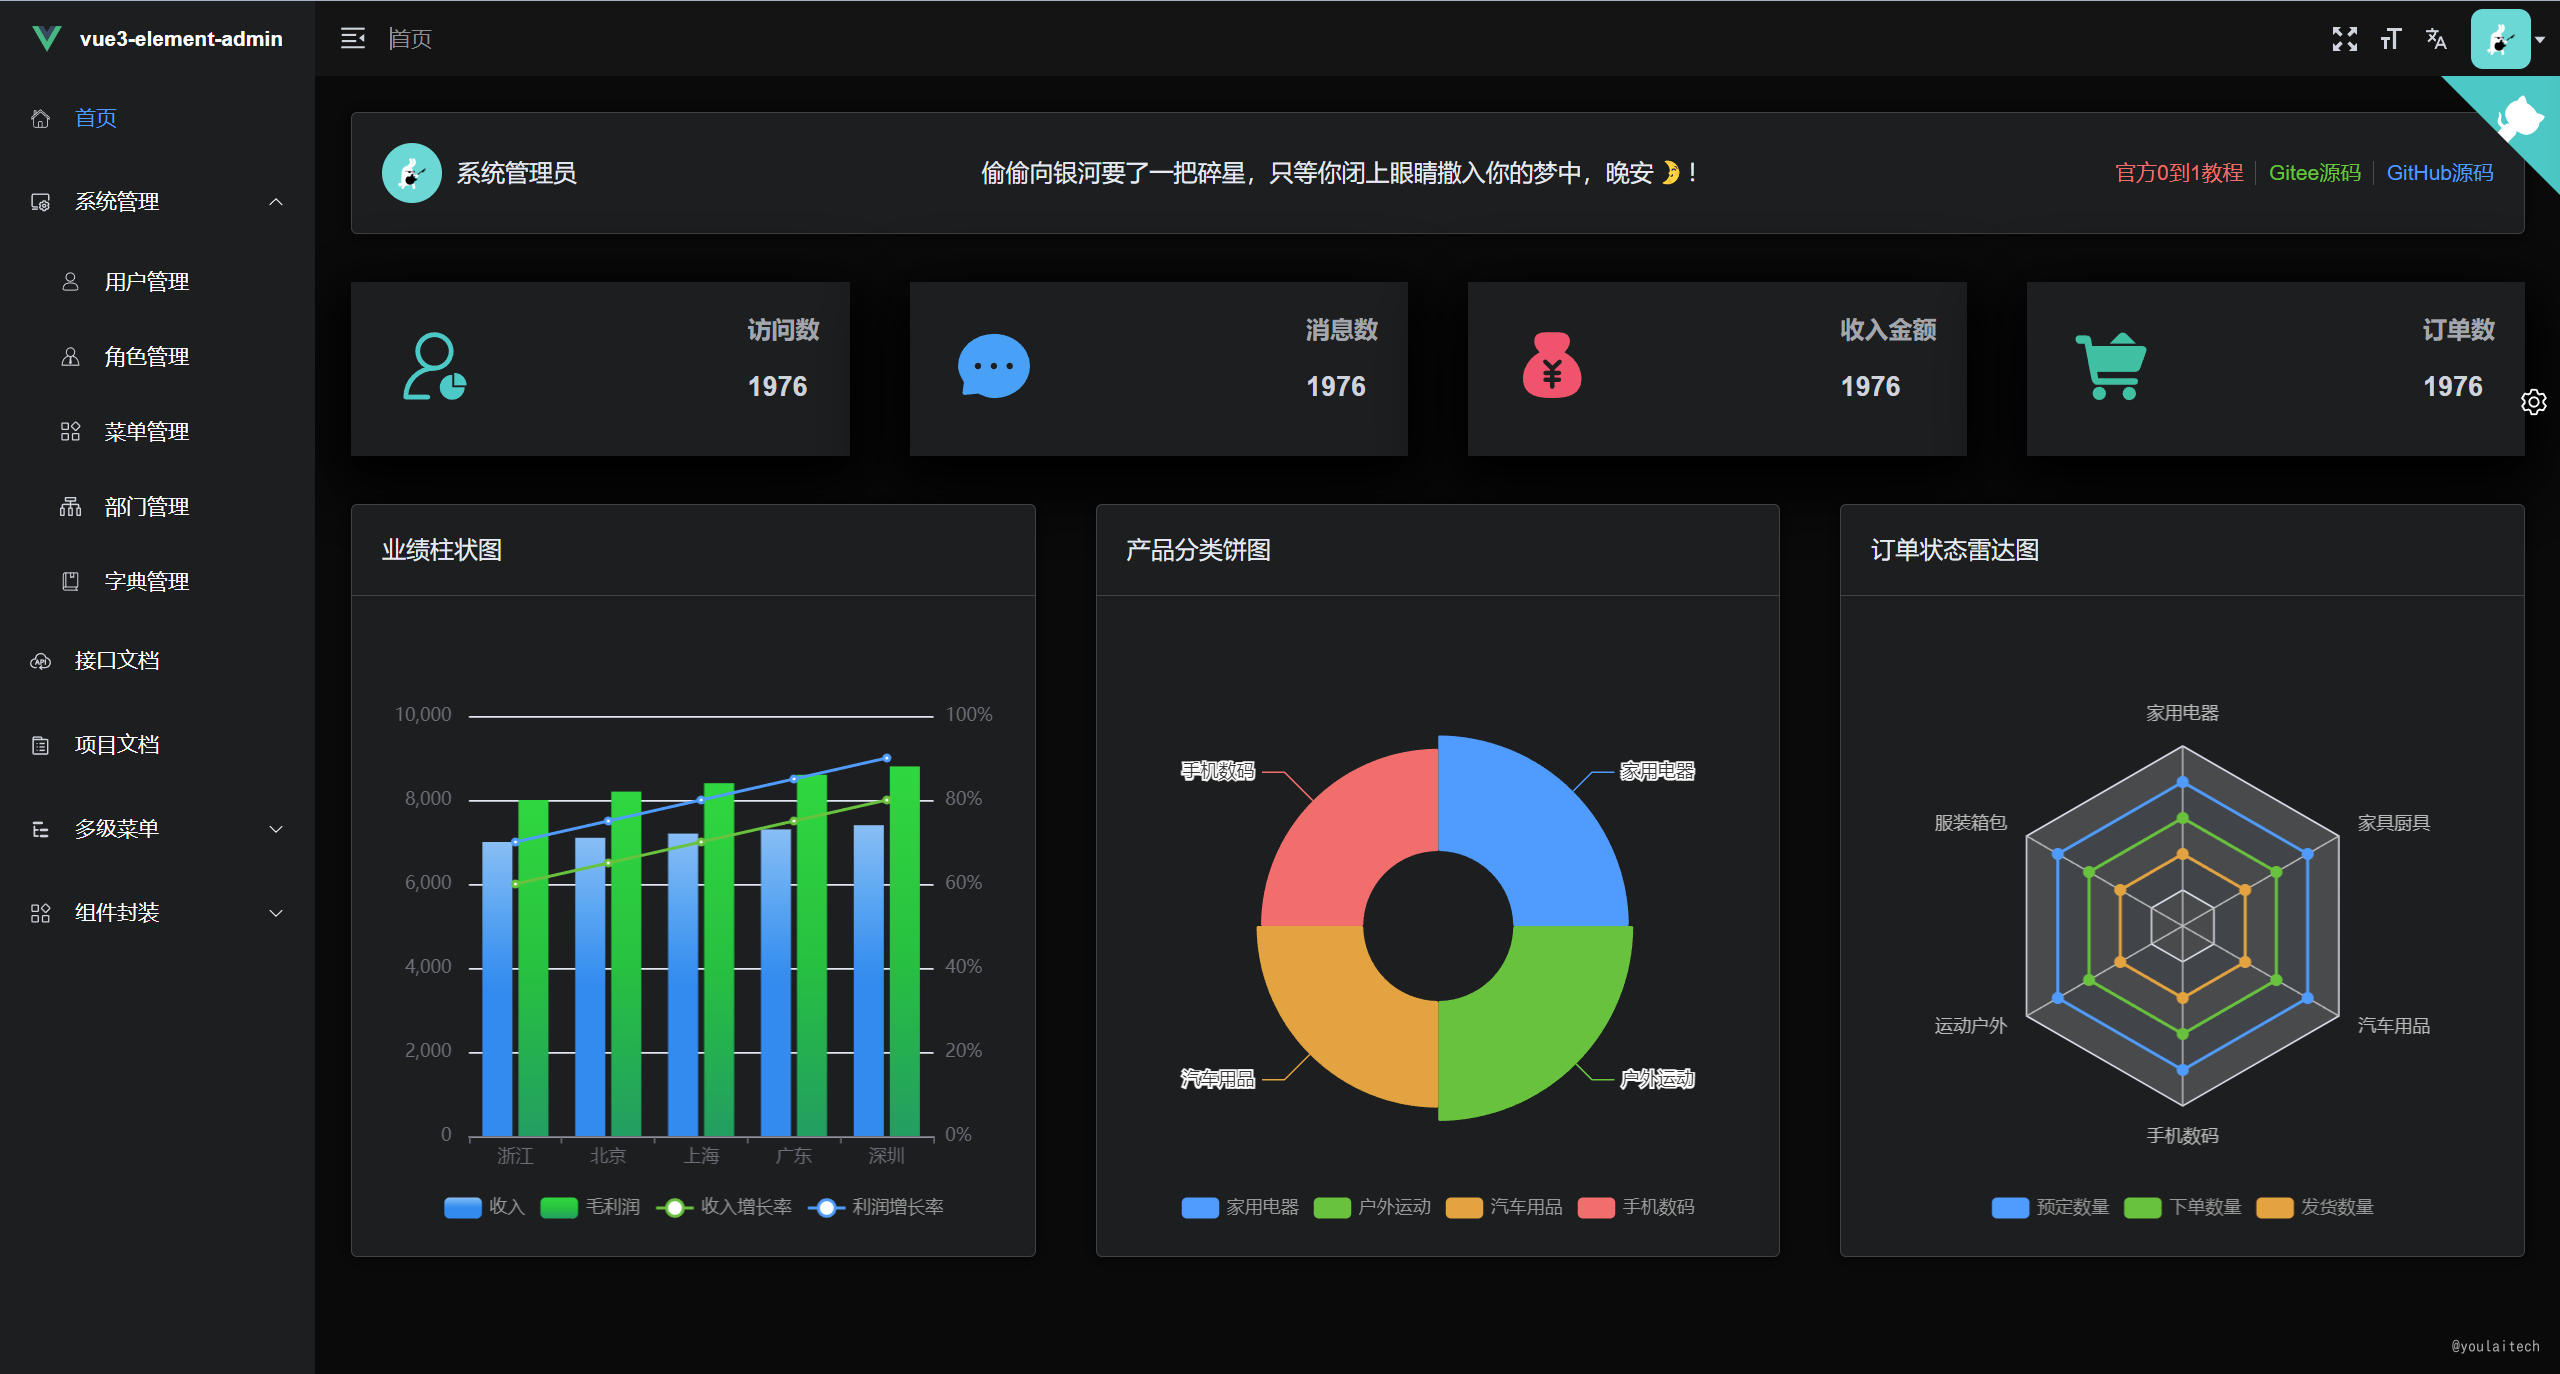
首页控制台
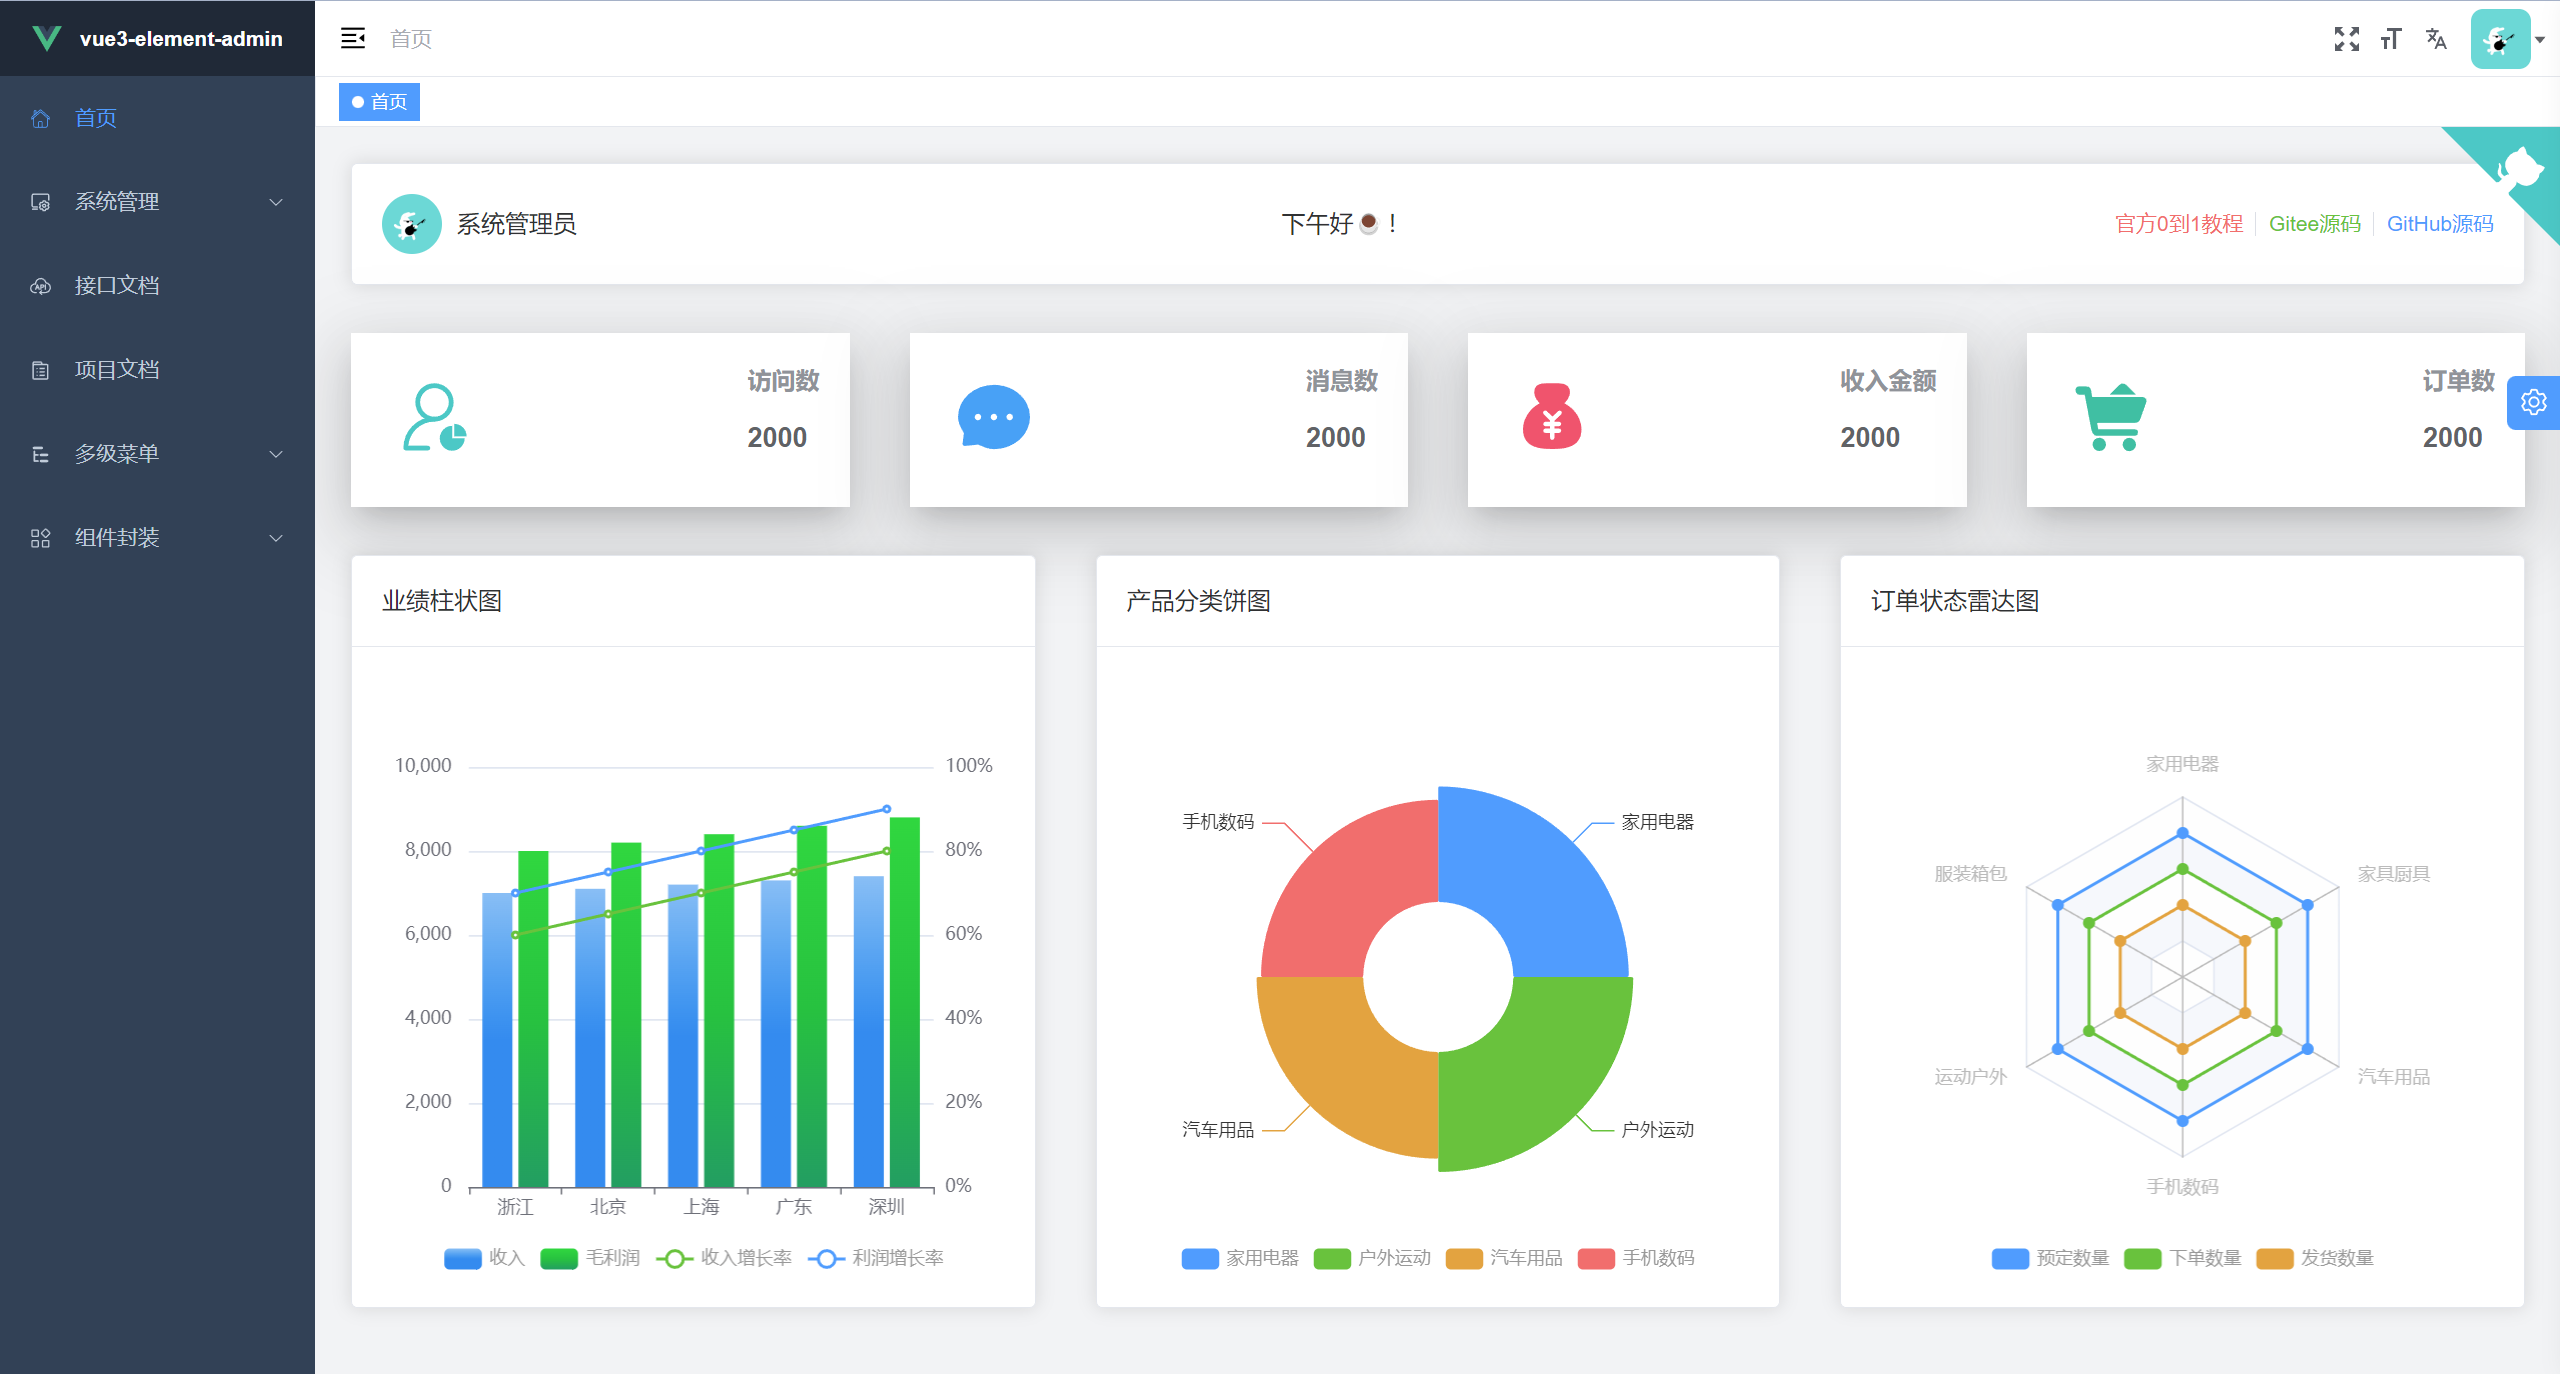 |
|---|
 |
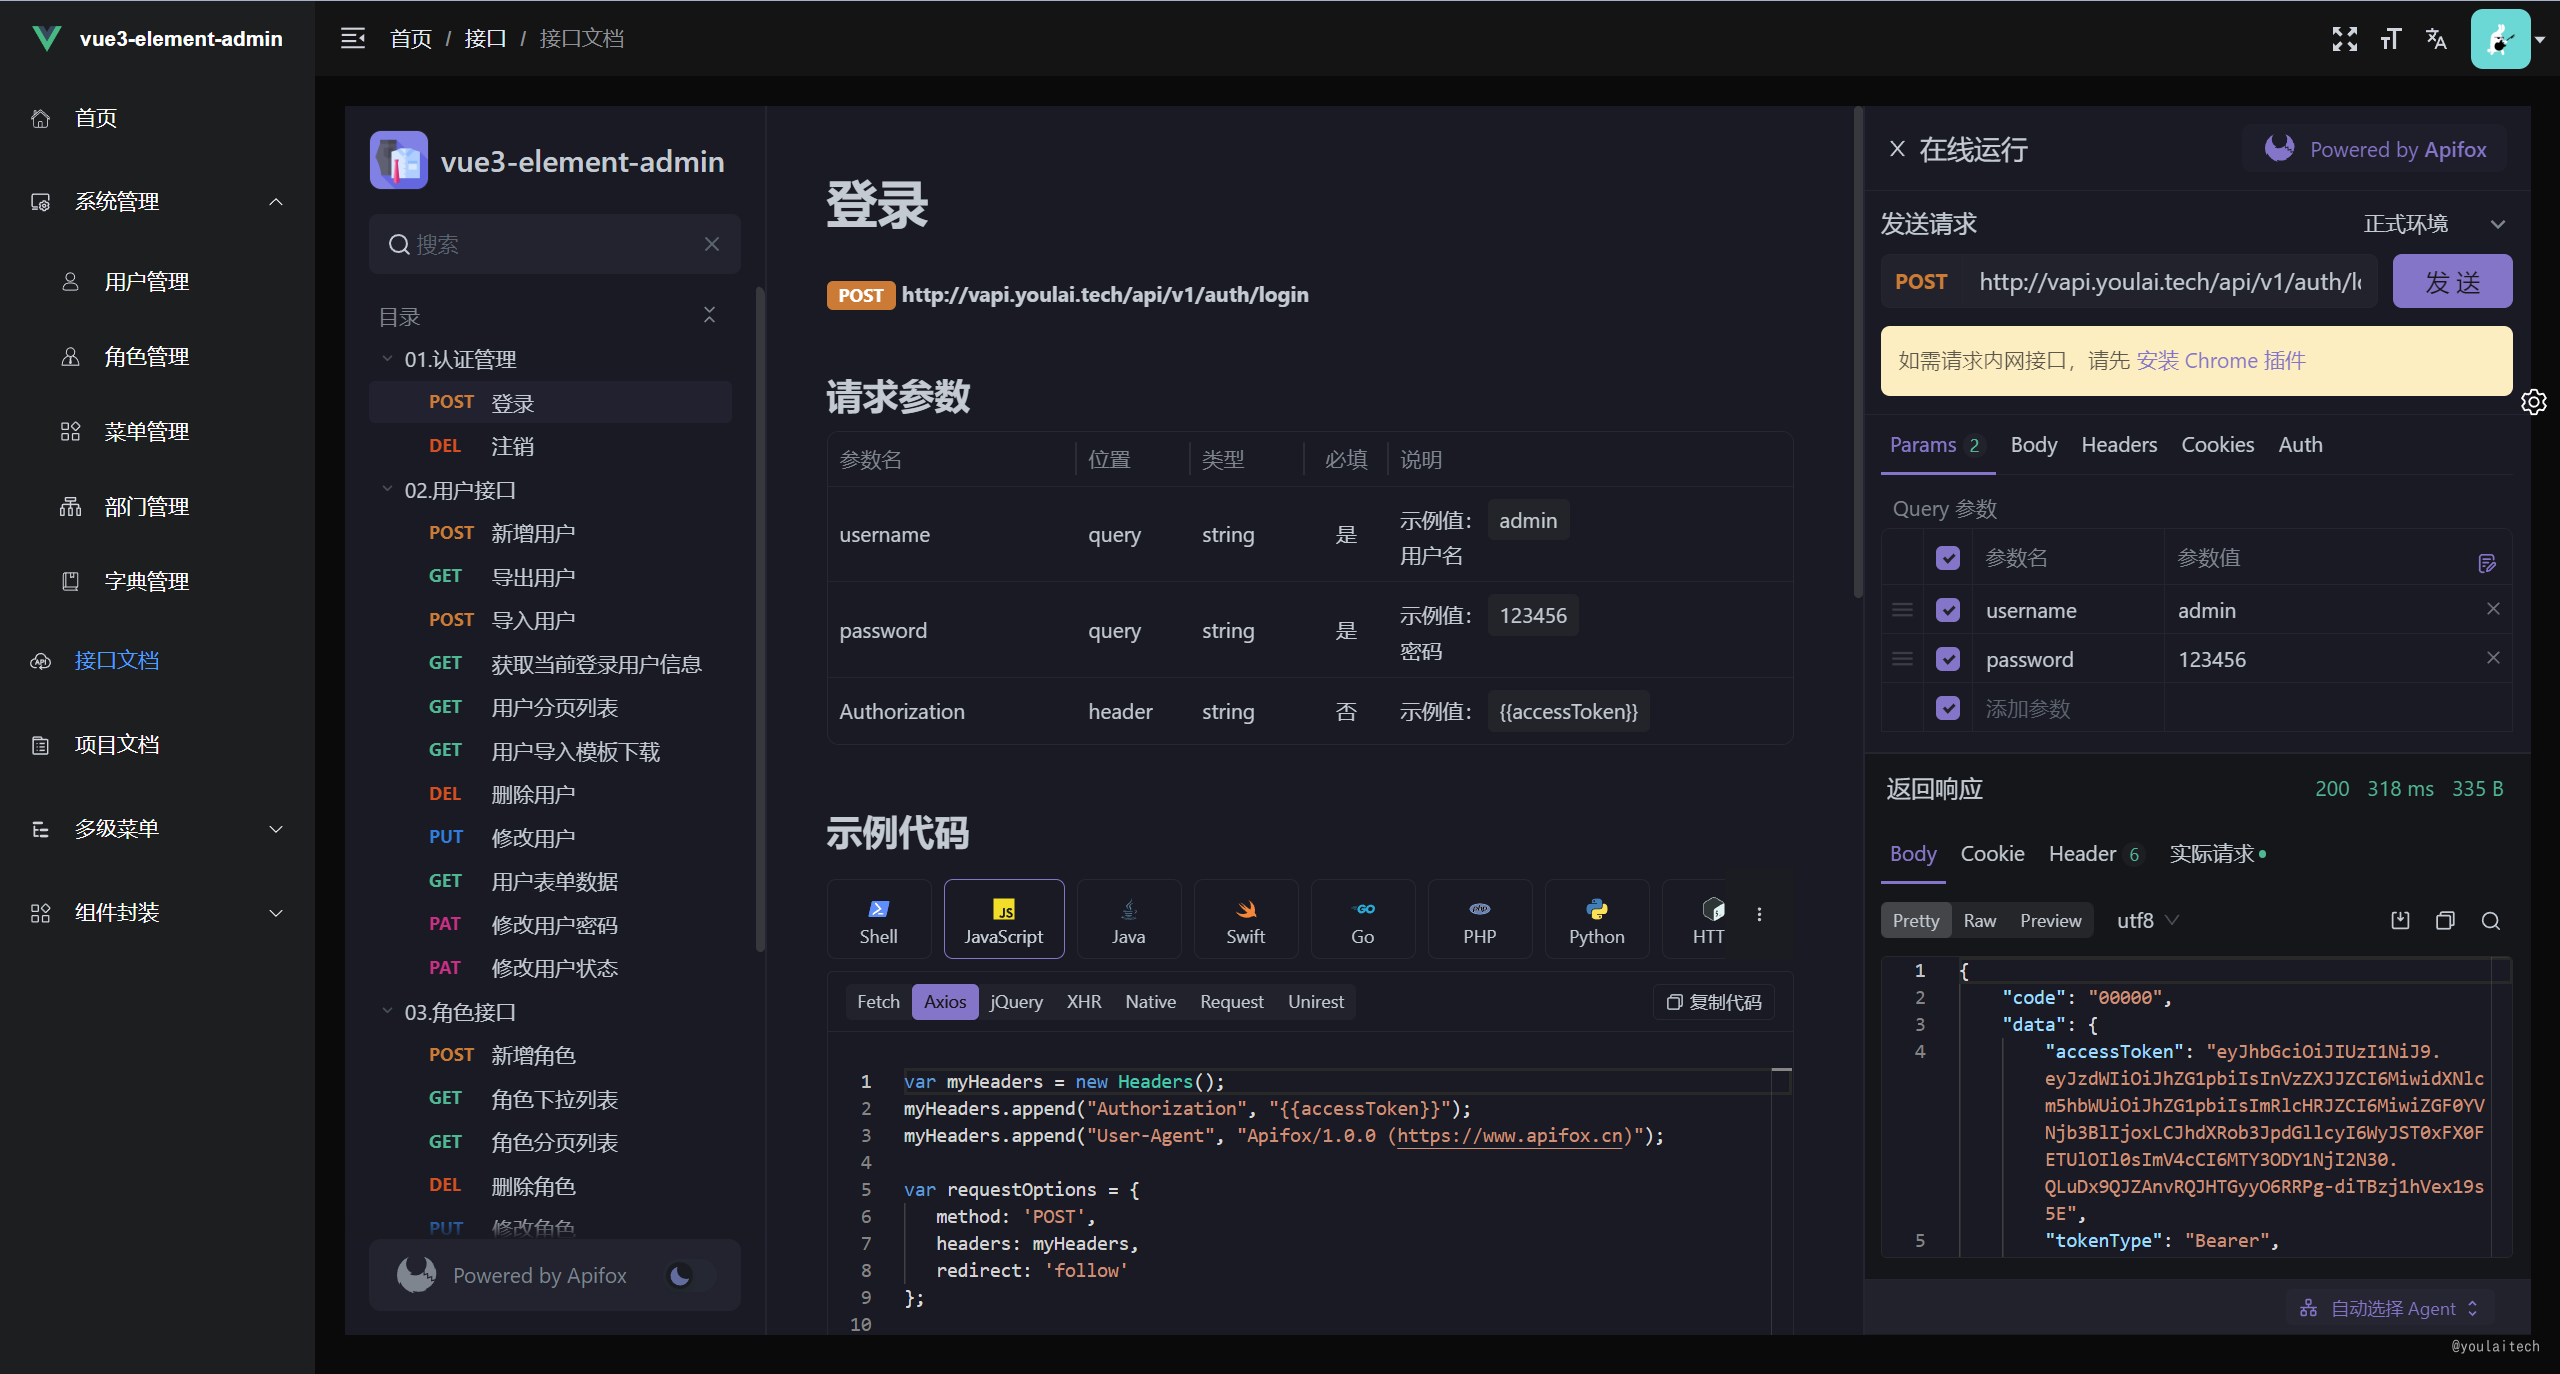
接口文档
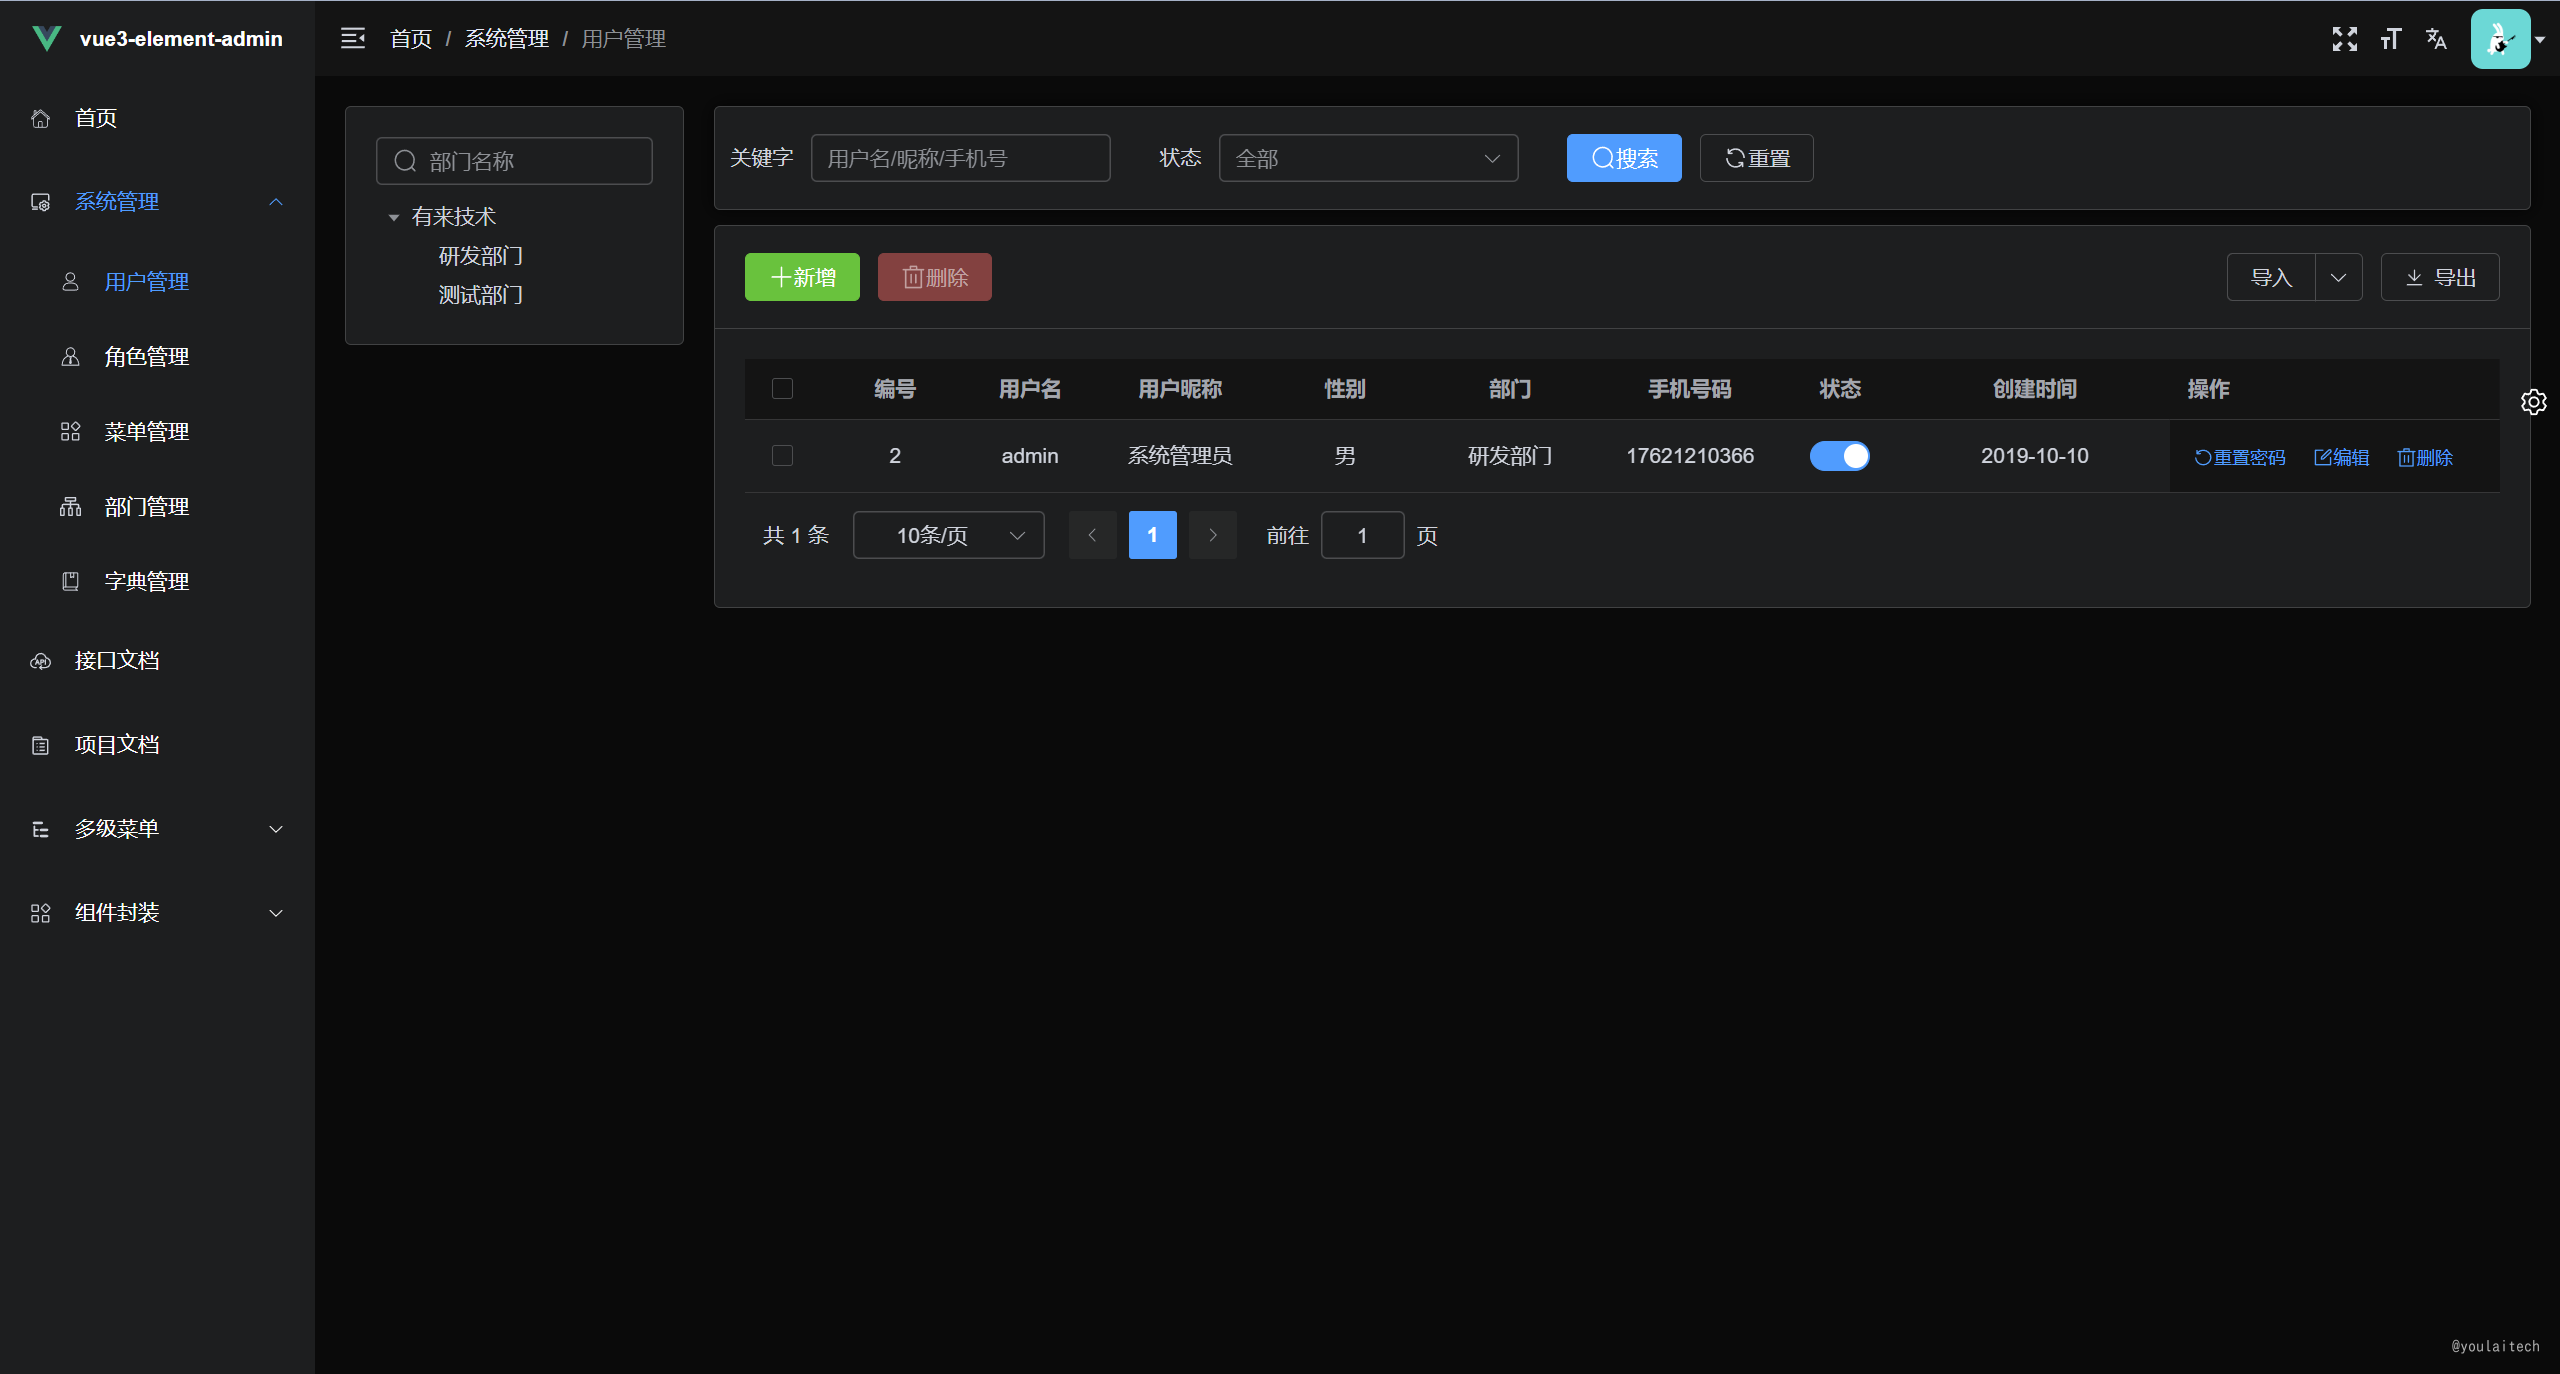
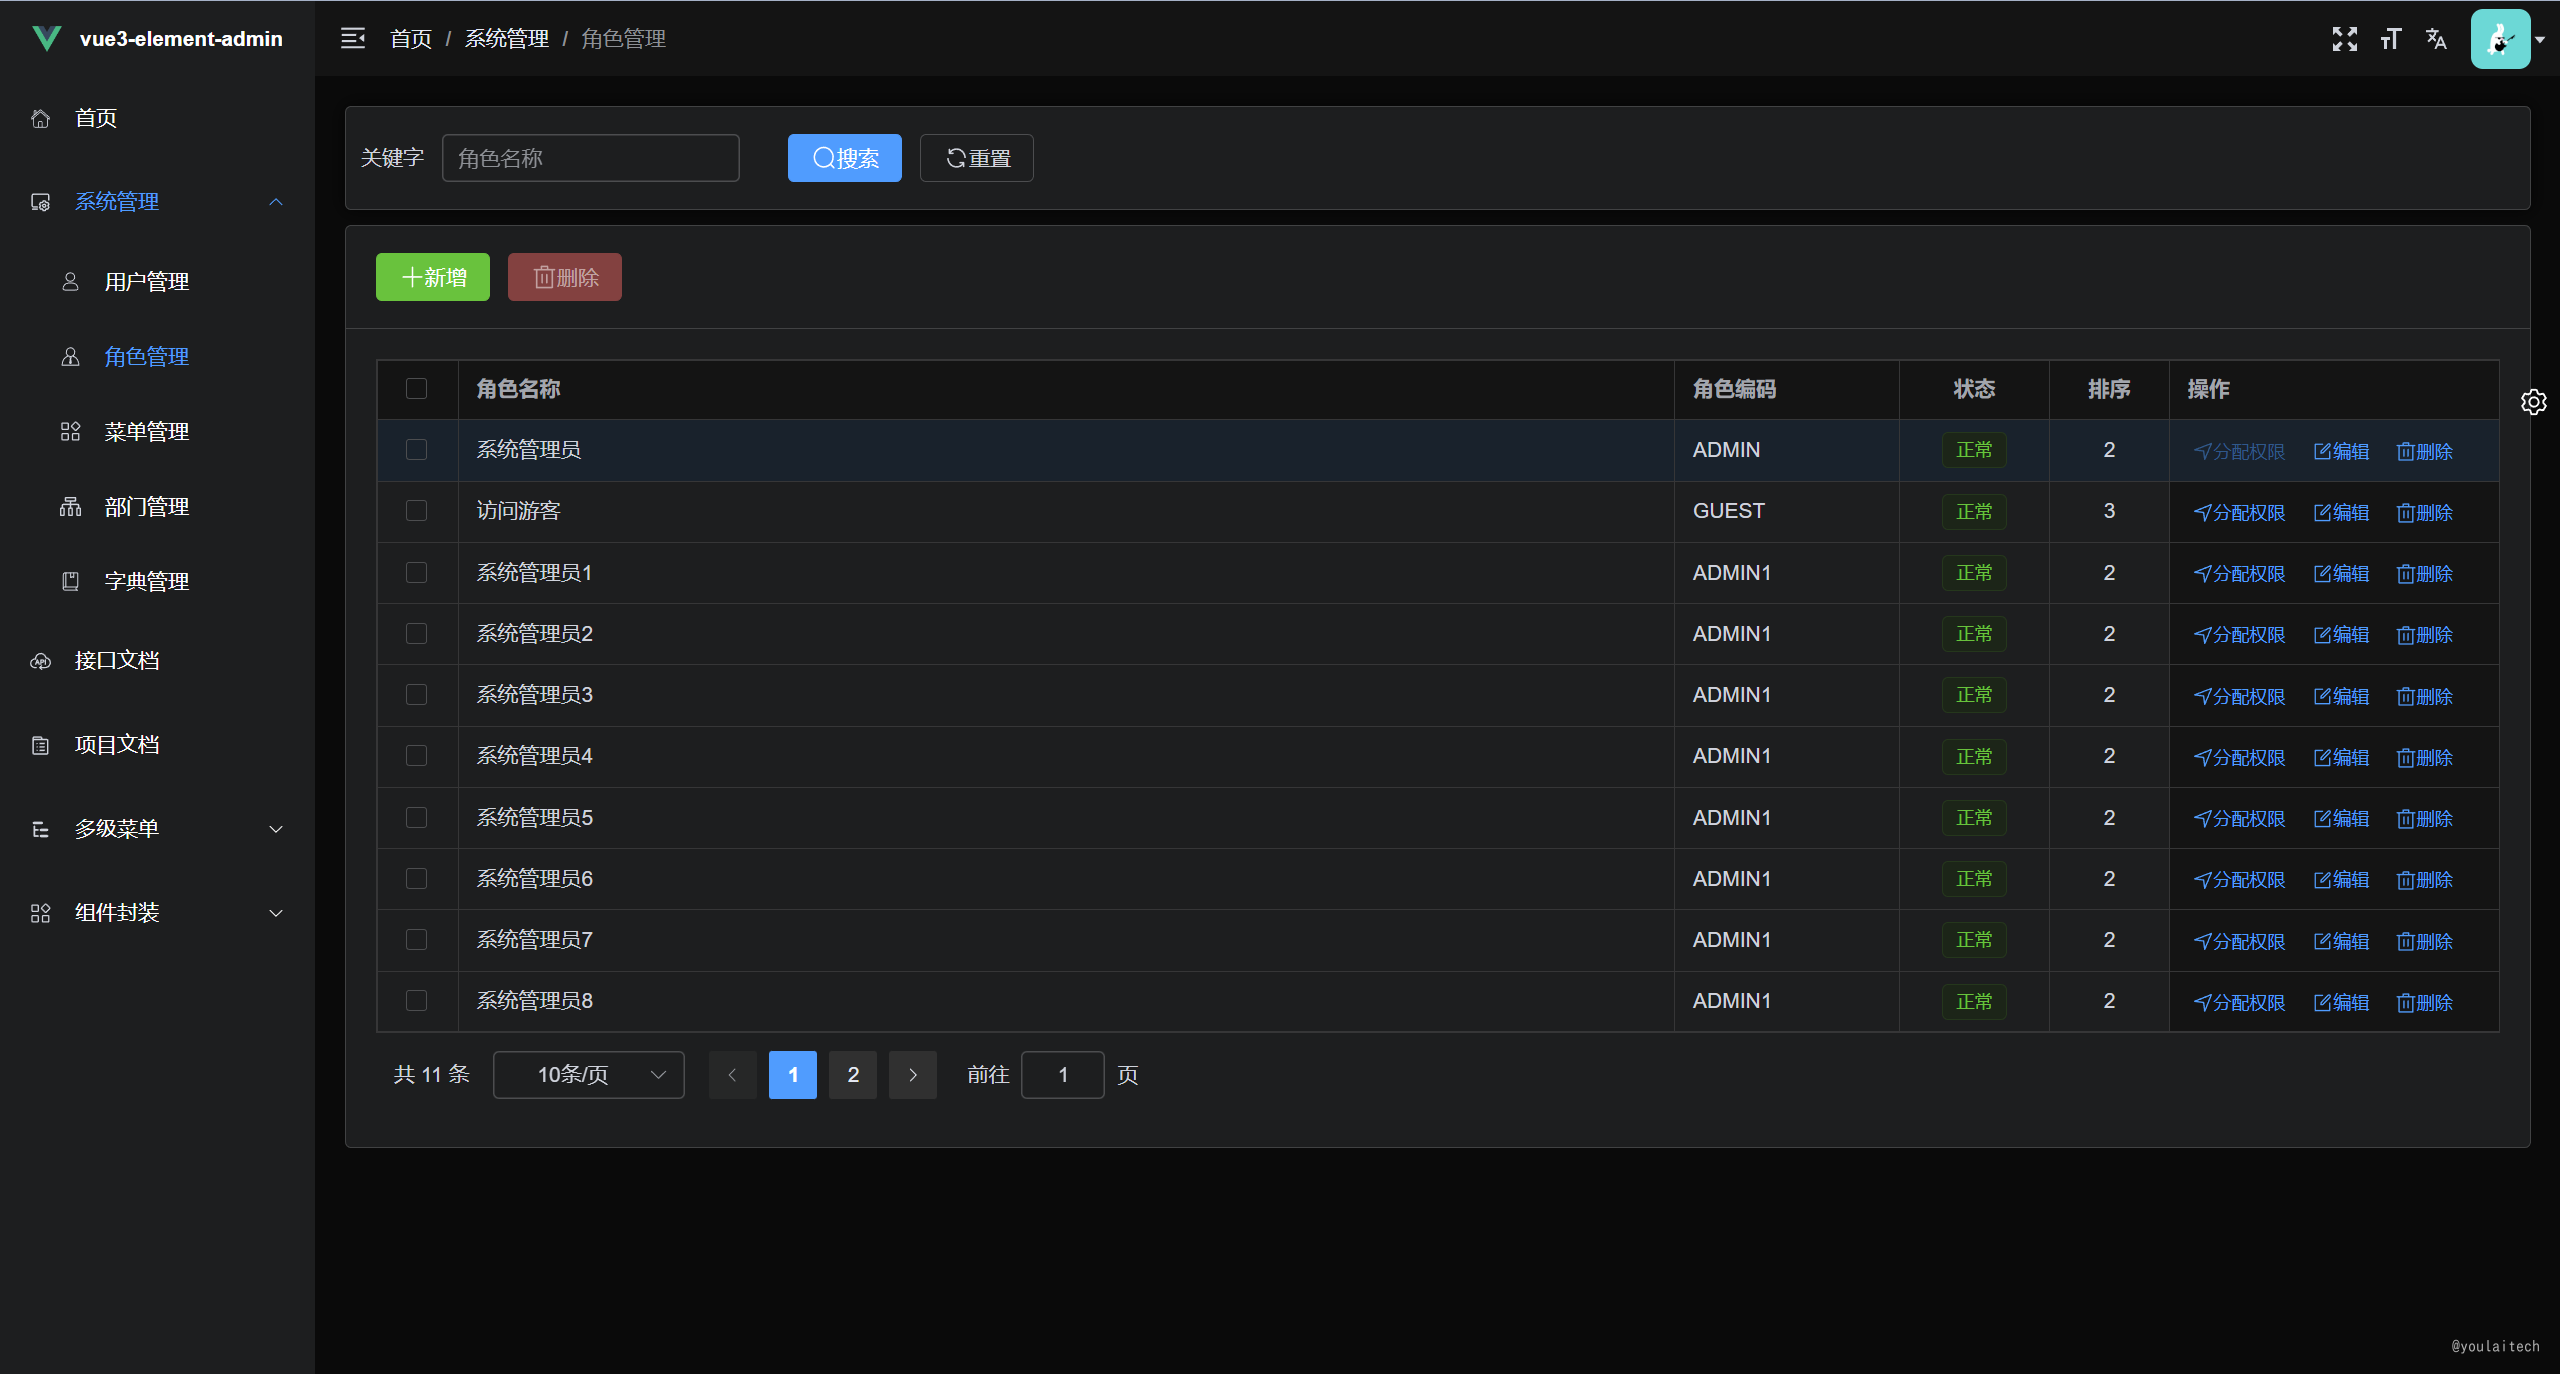
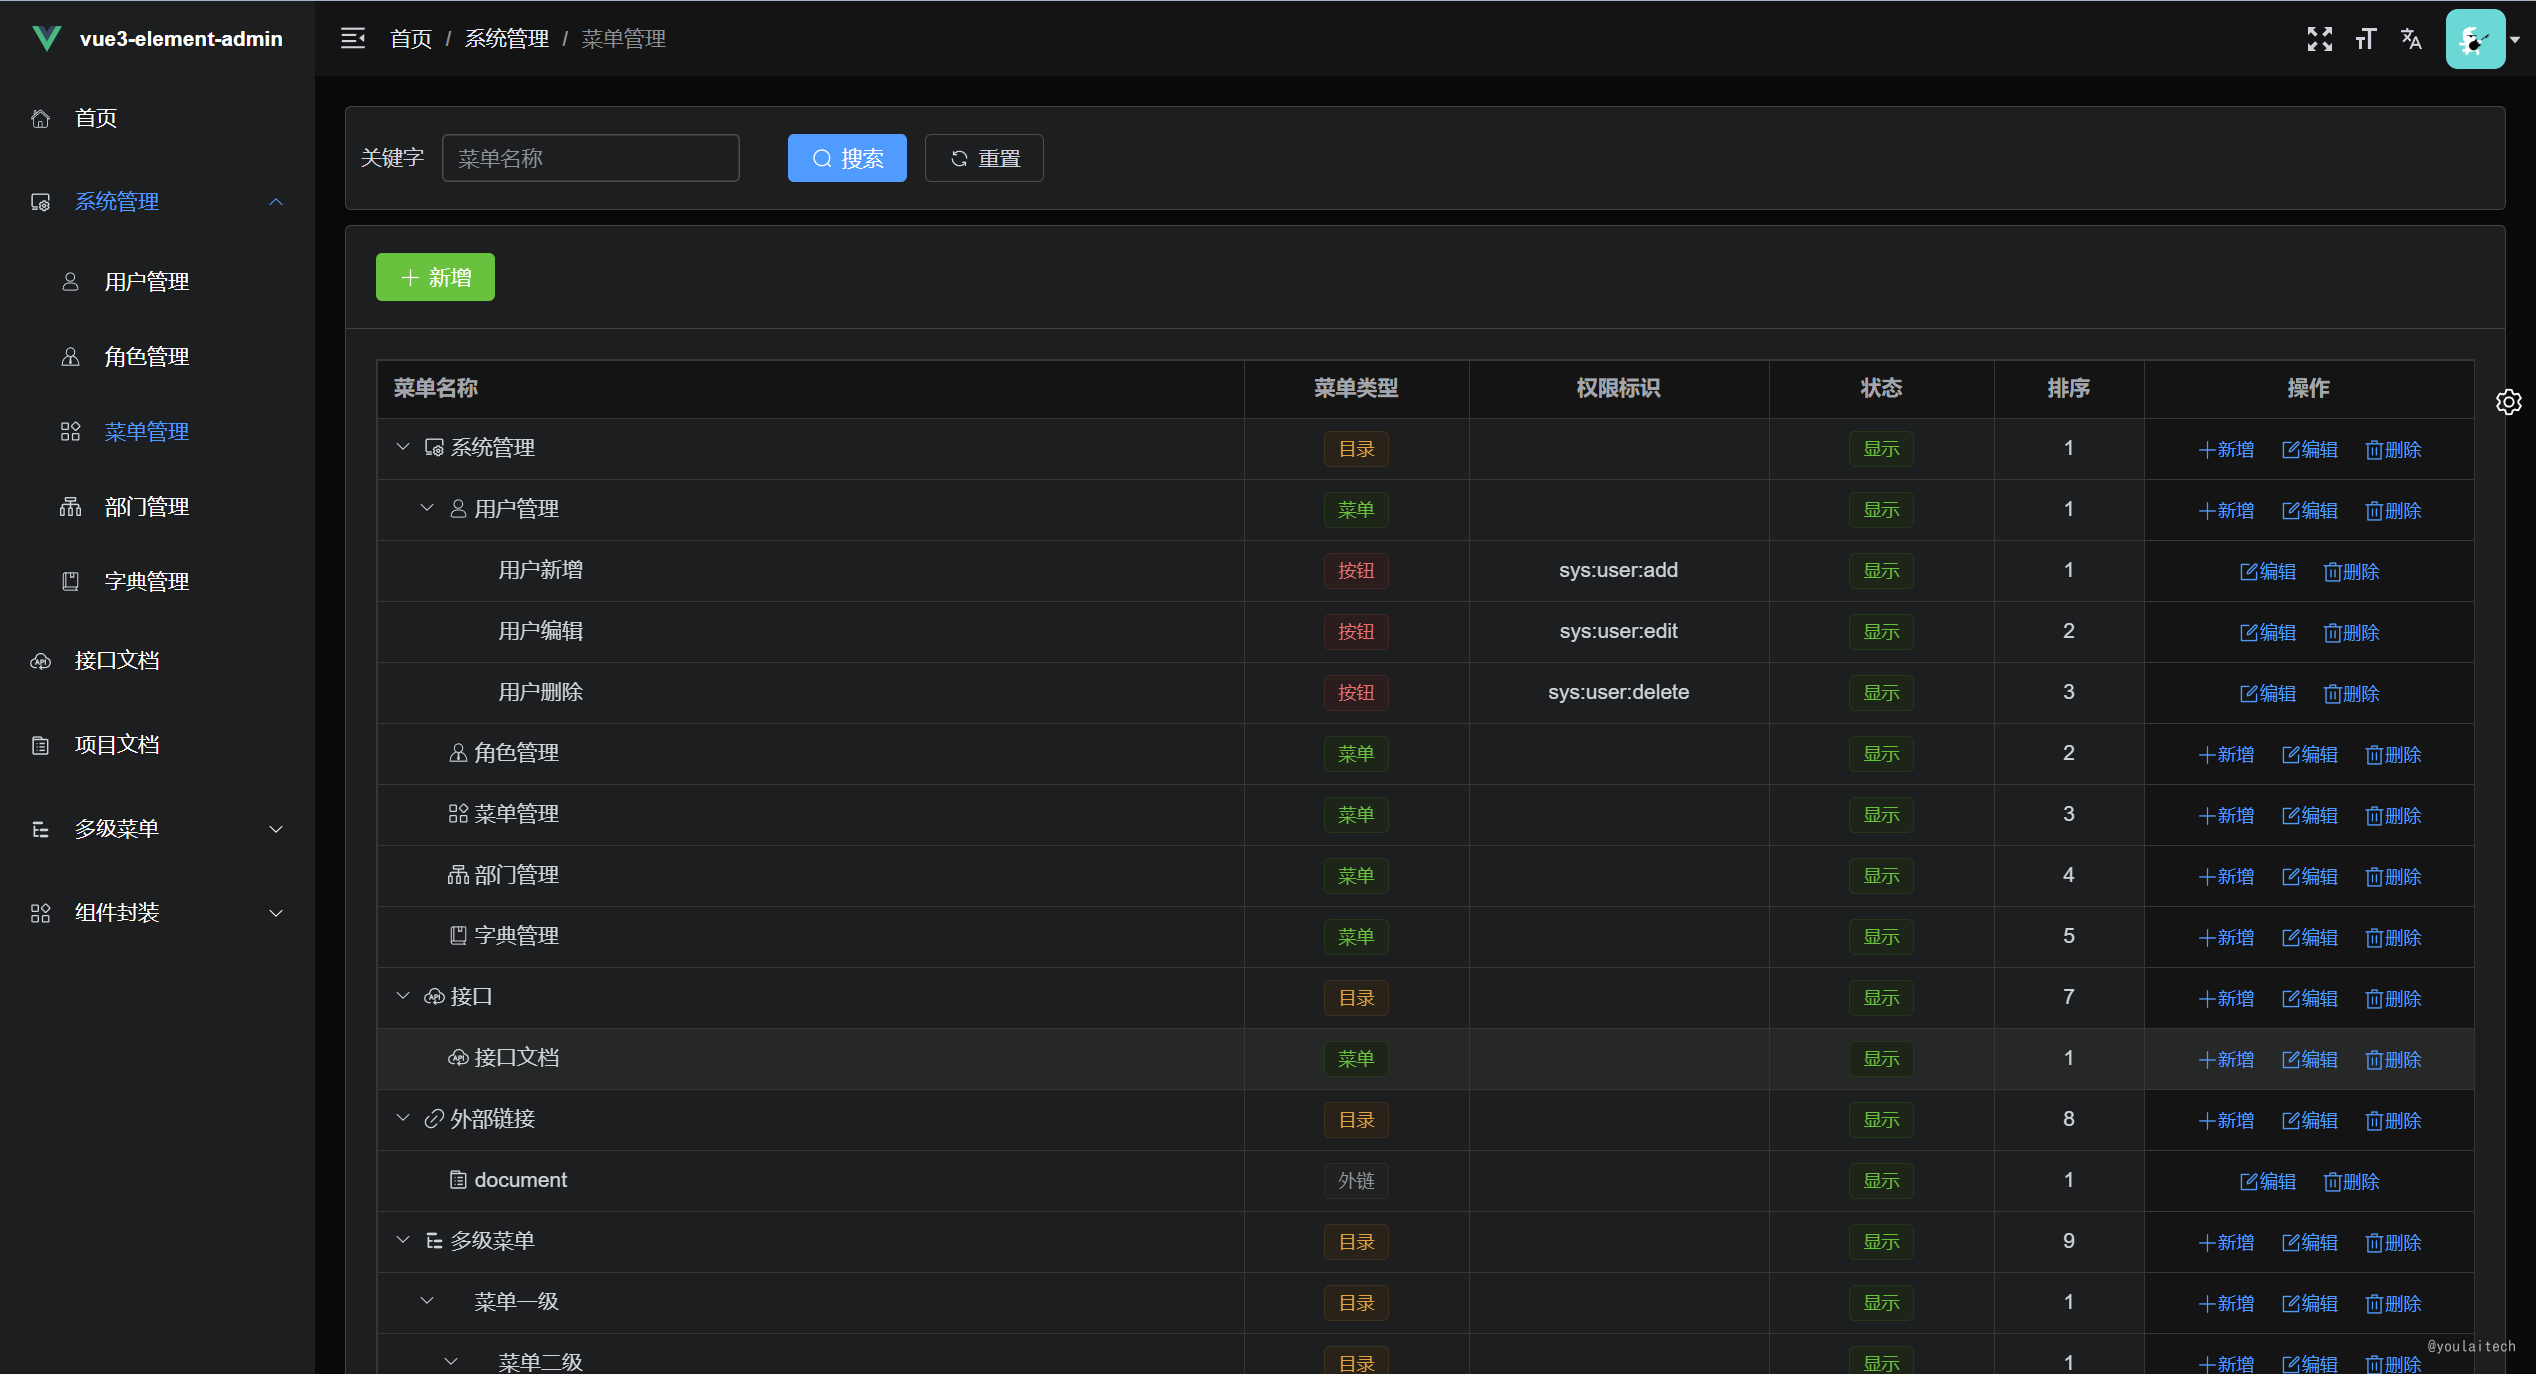
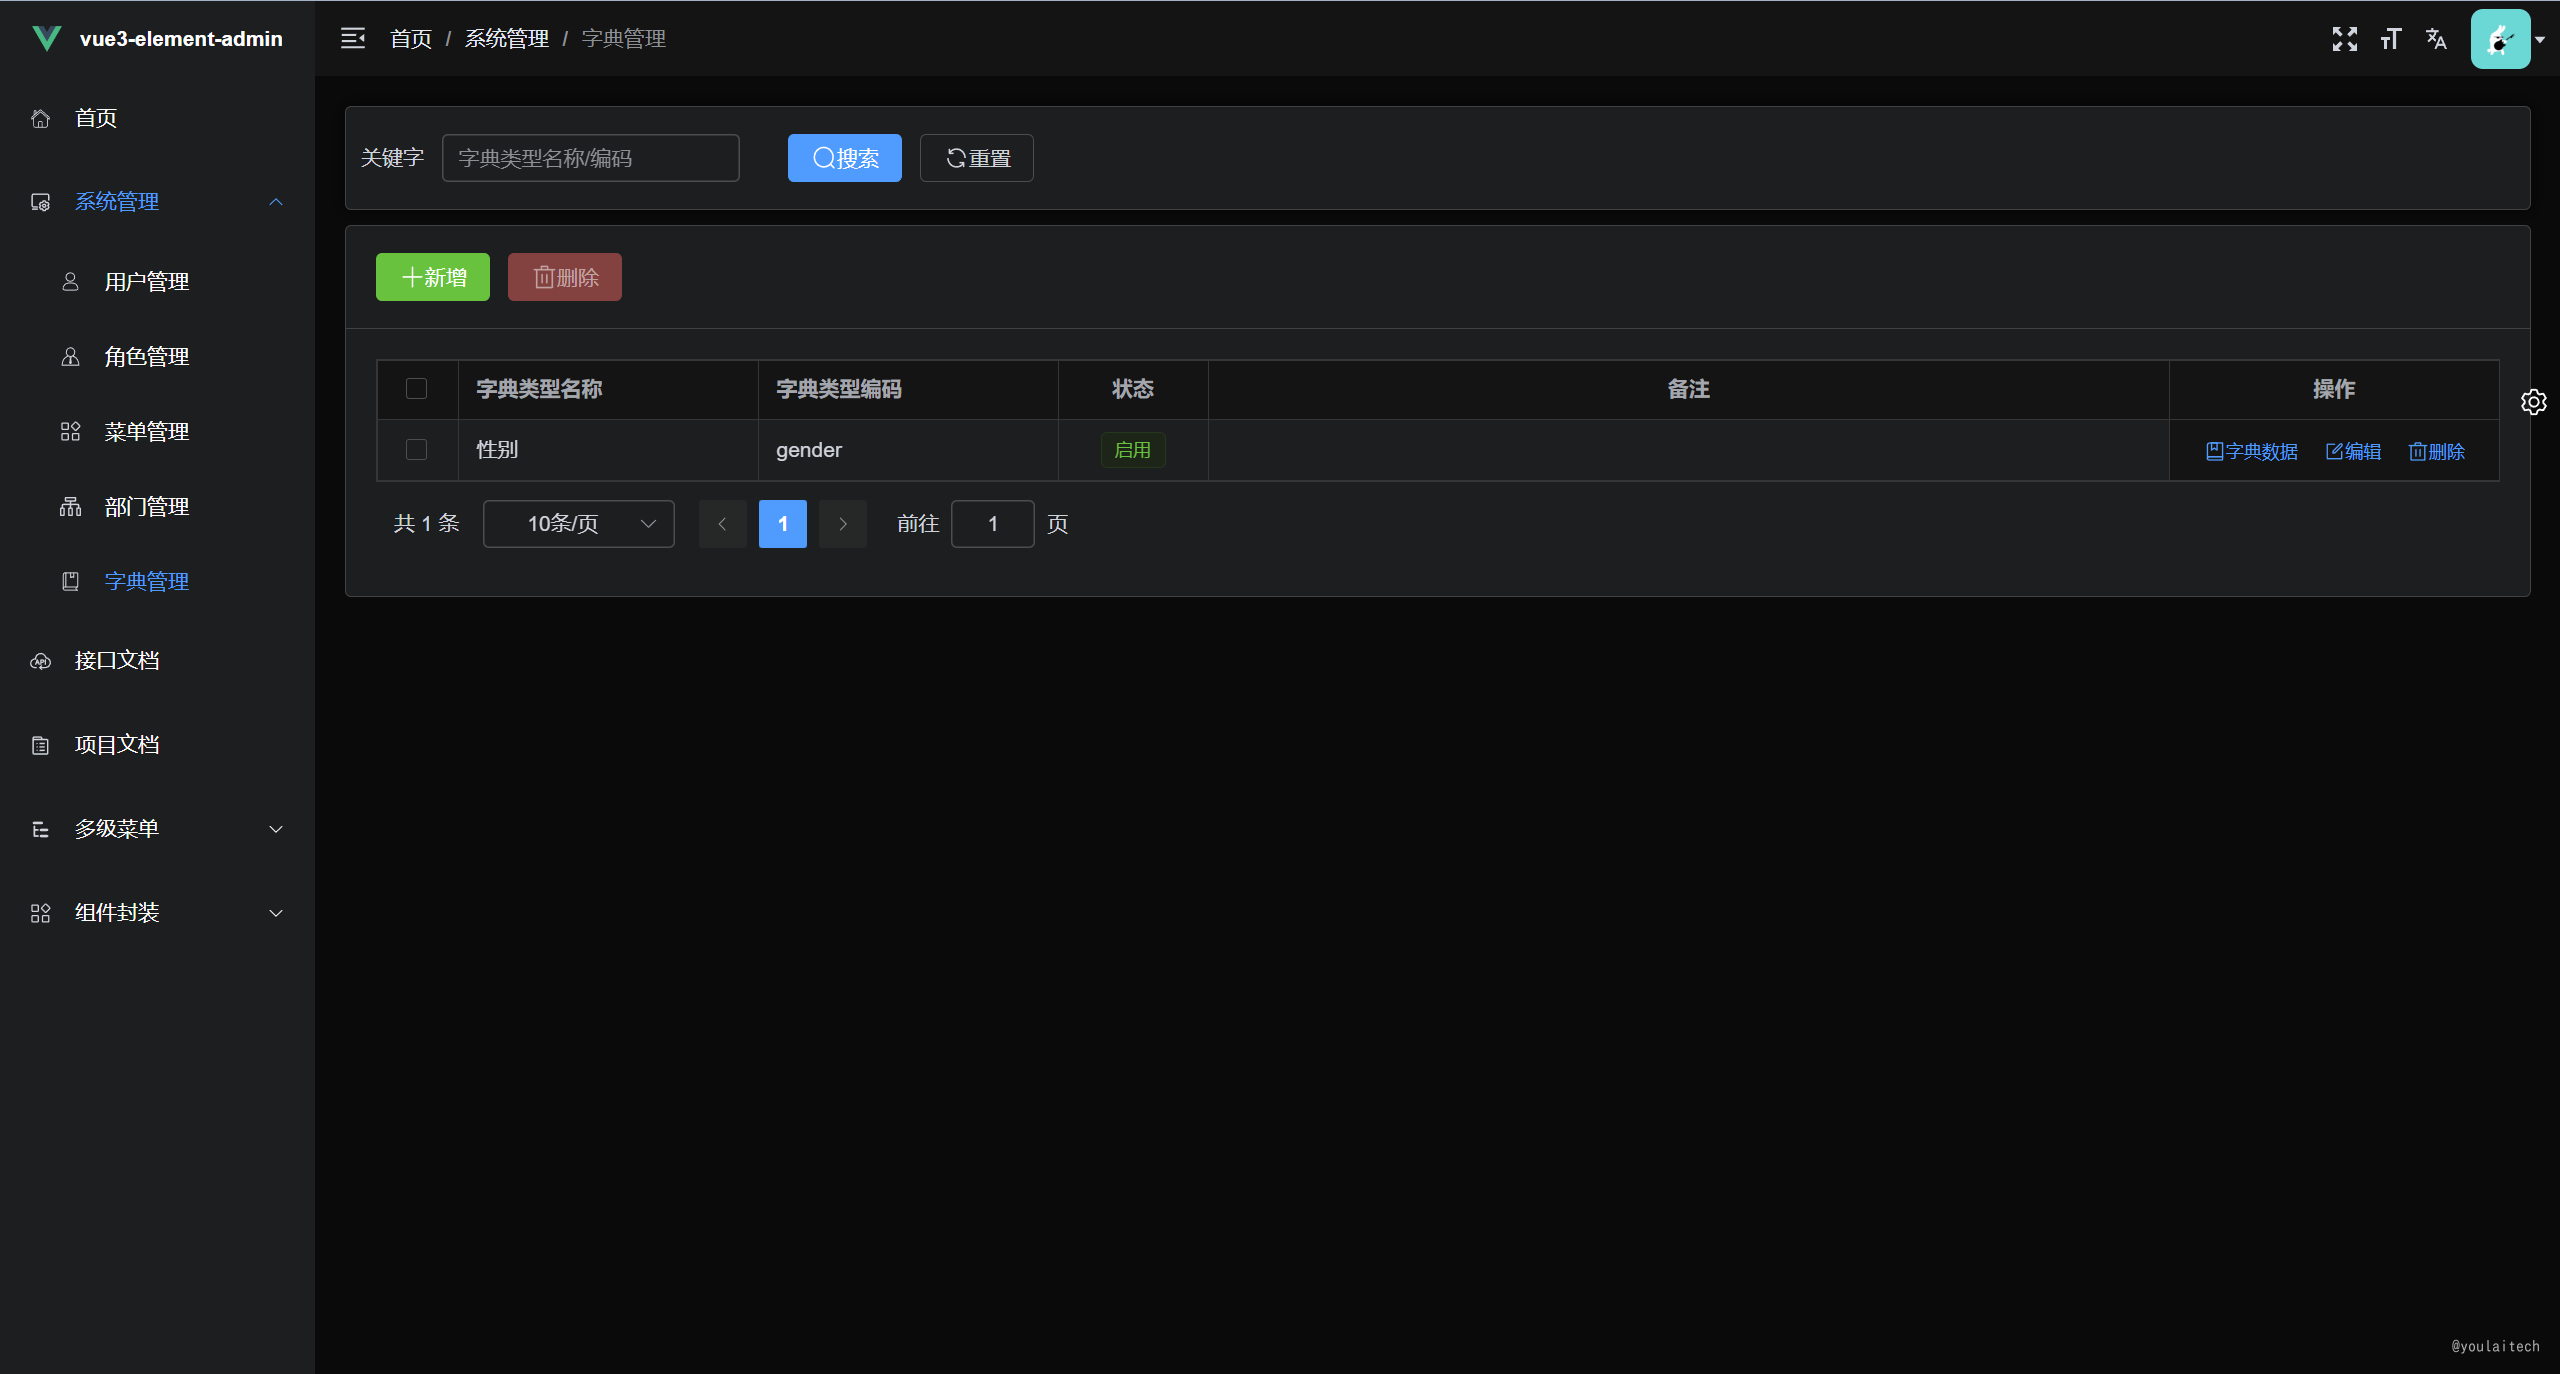
权限管理系统
 |  |
|---|---|
 |  |
扩展生态
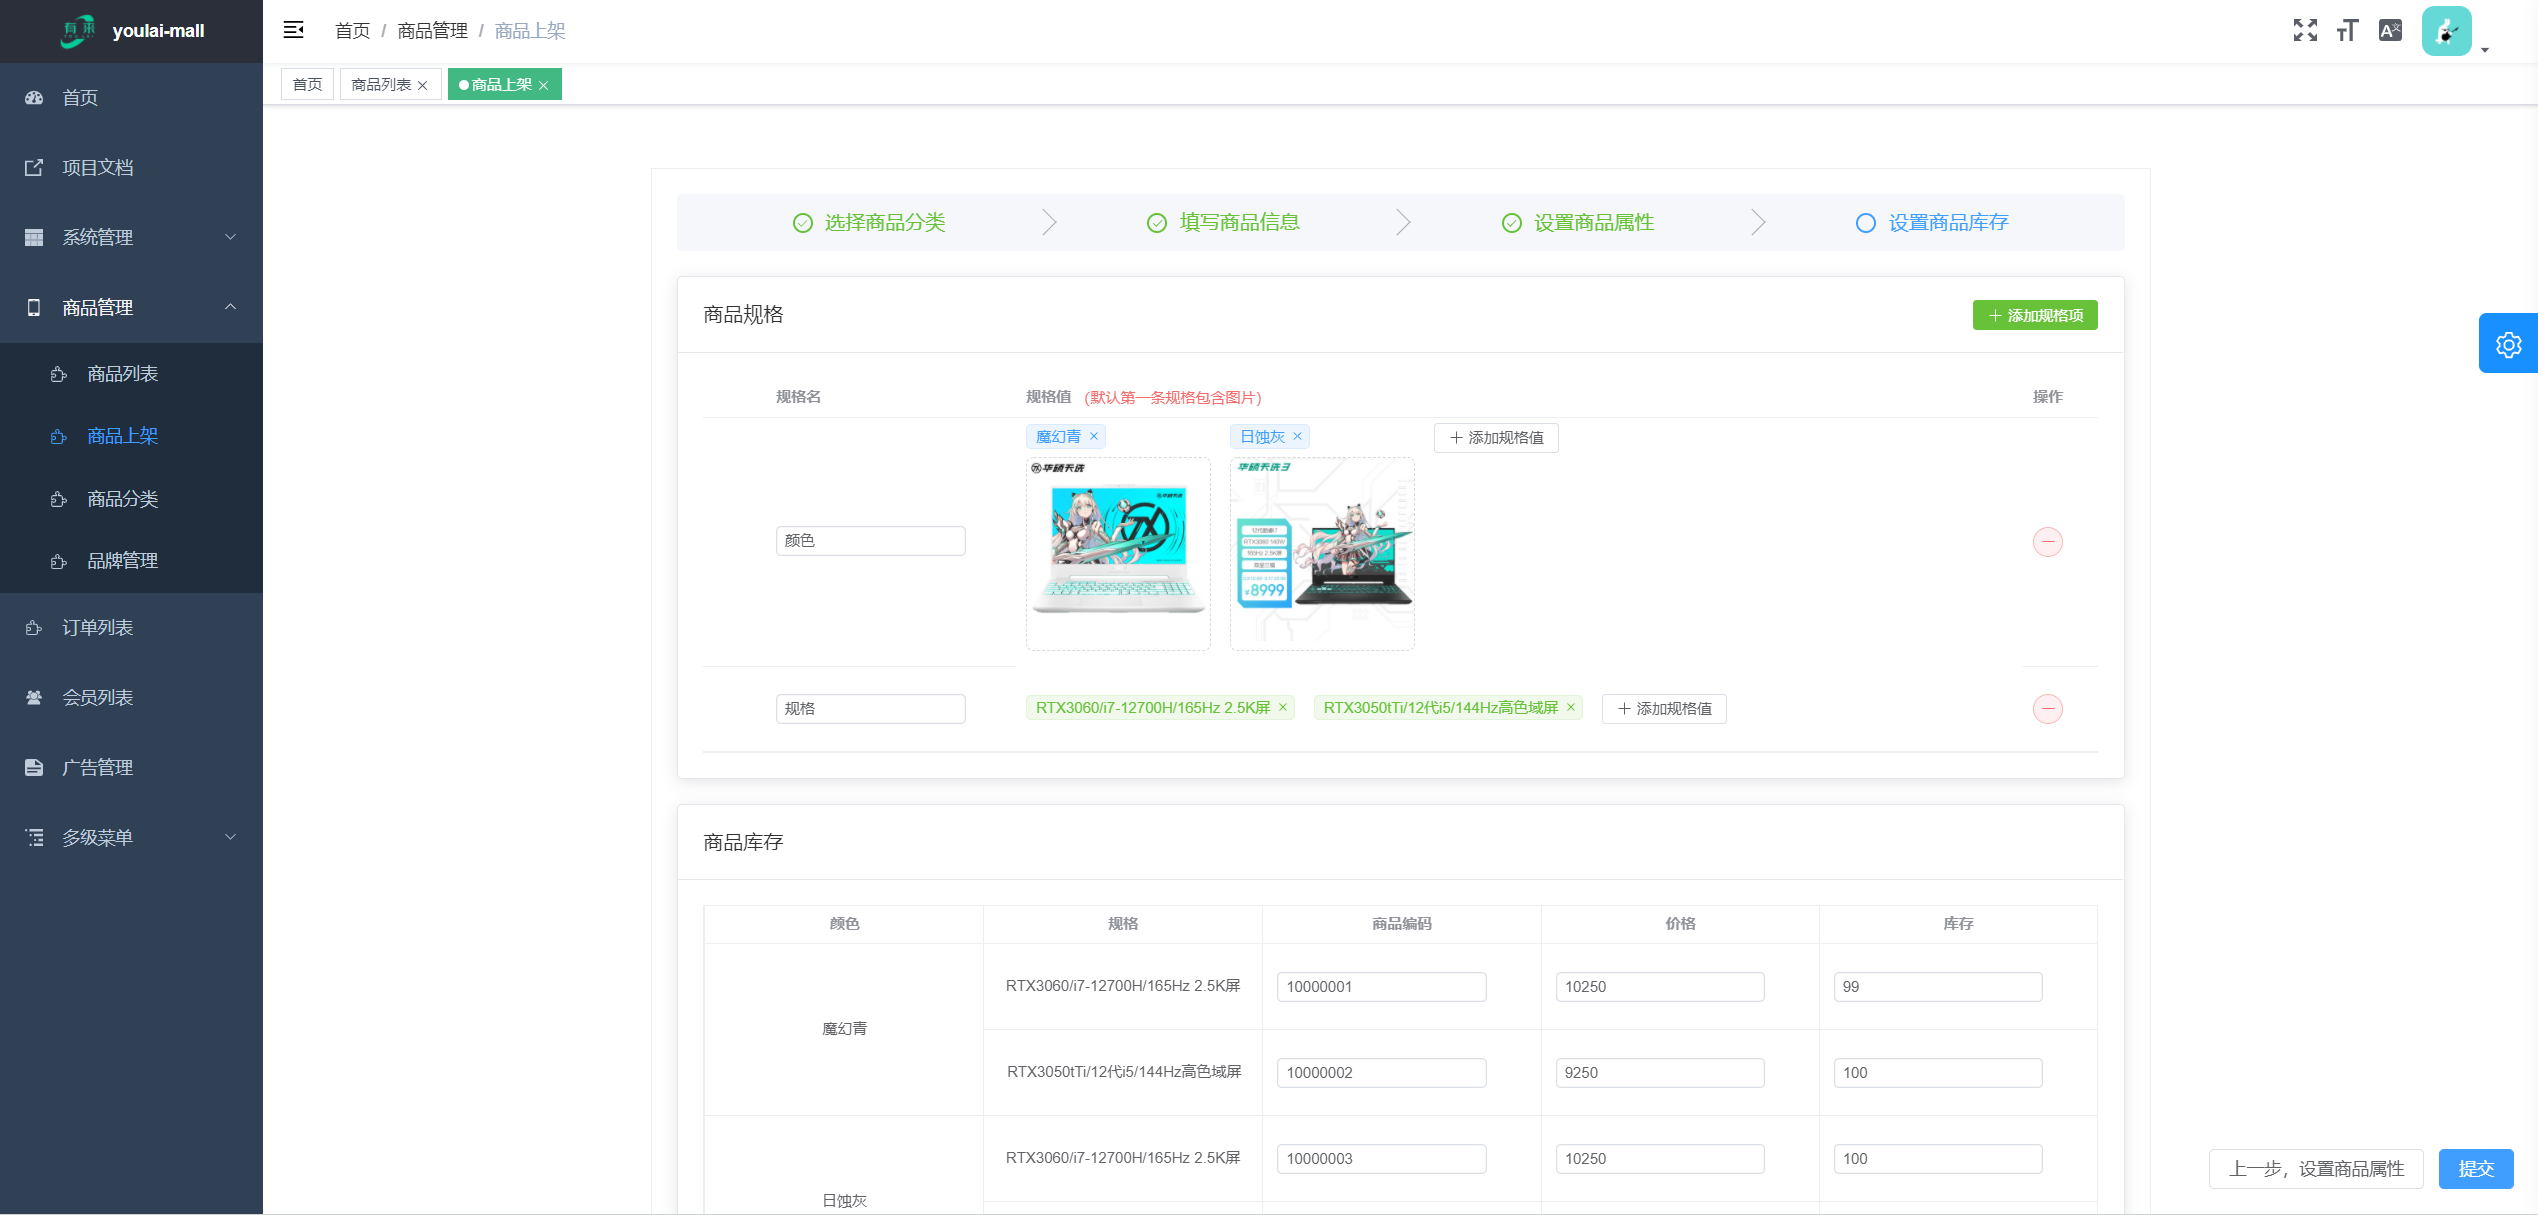
youlai-mall 有来开源商城:Spring Cloud微服务+ vue3-element-admin+uni-app
| youlai-mall 商品管理 | mall-app 移动端 |
|---|---|
 |  |
项目指南
功能清单
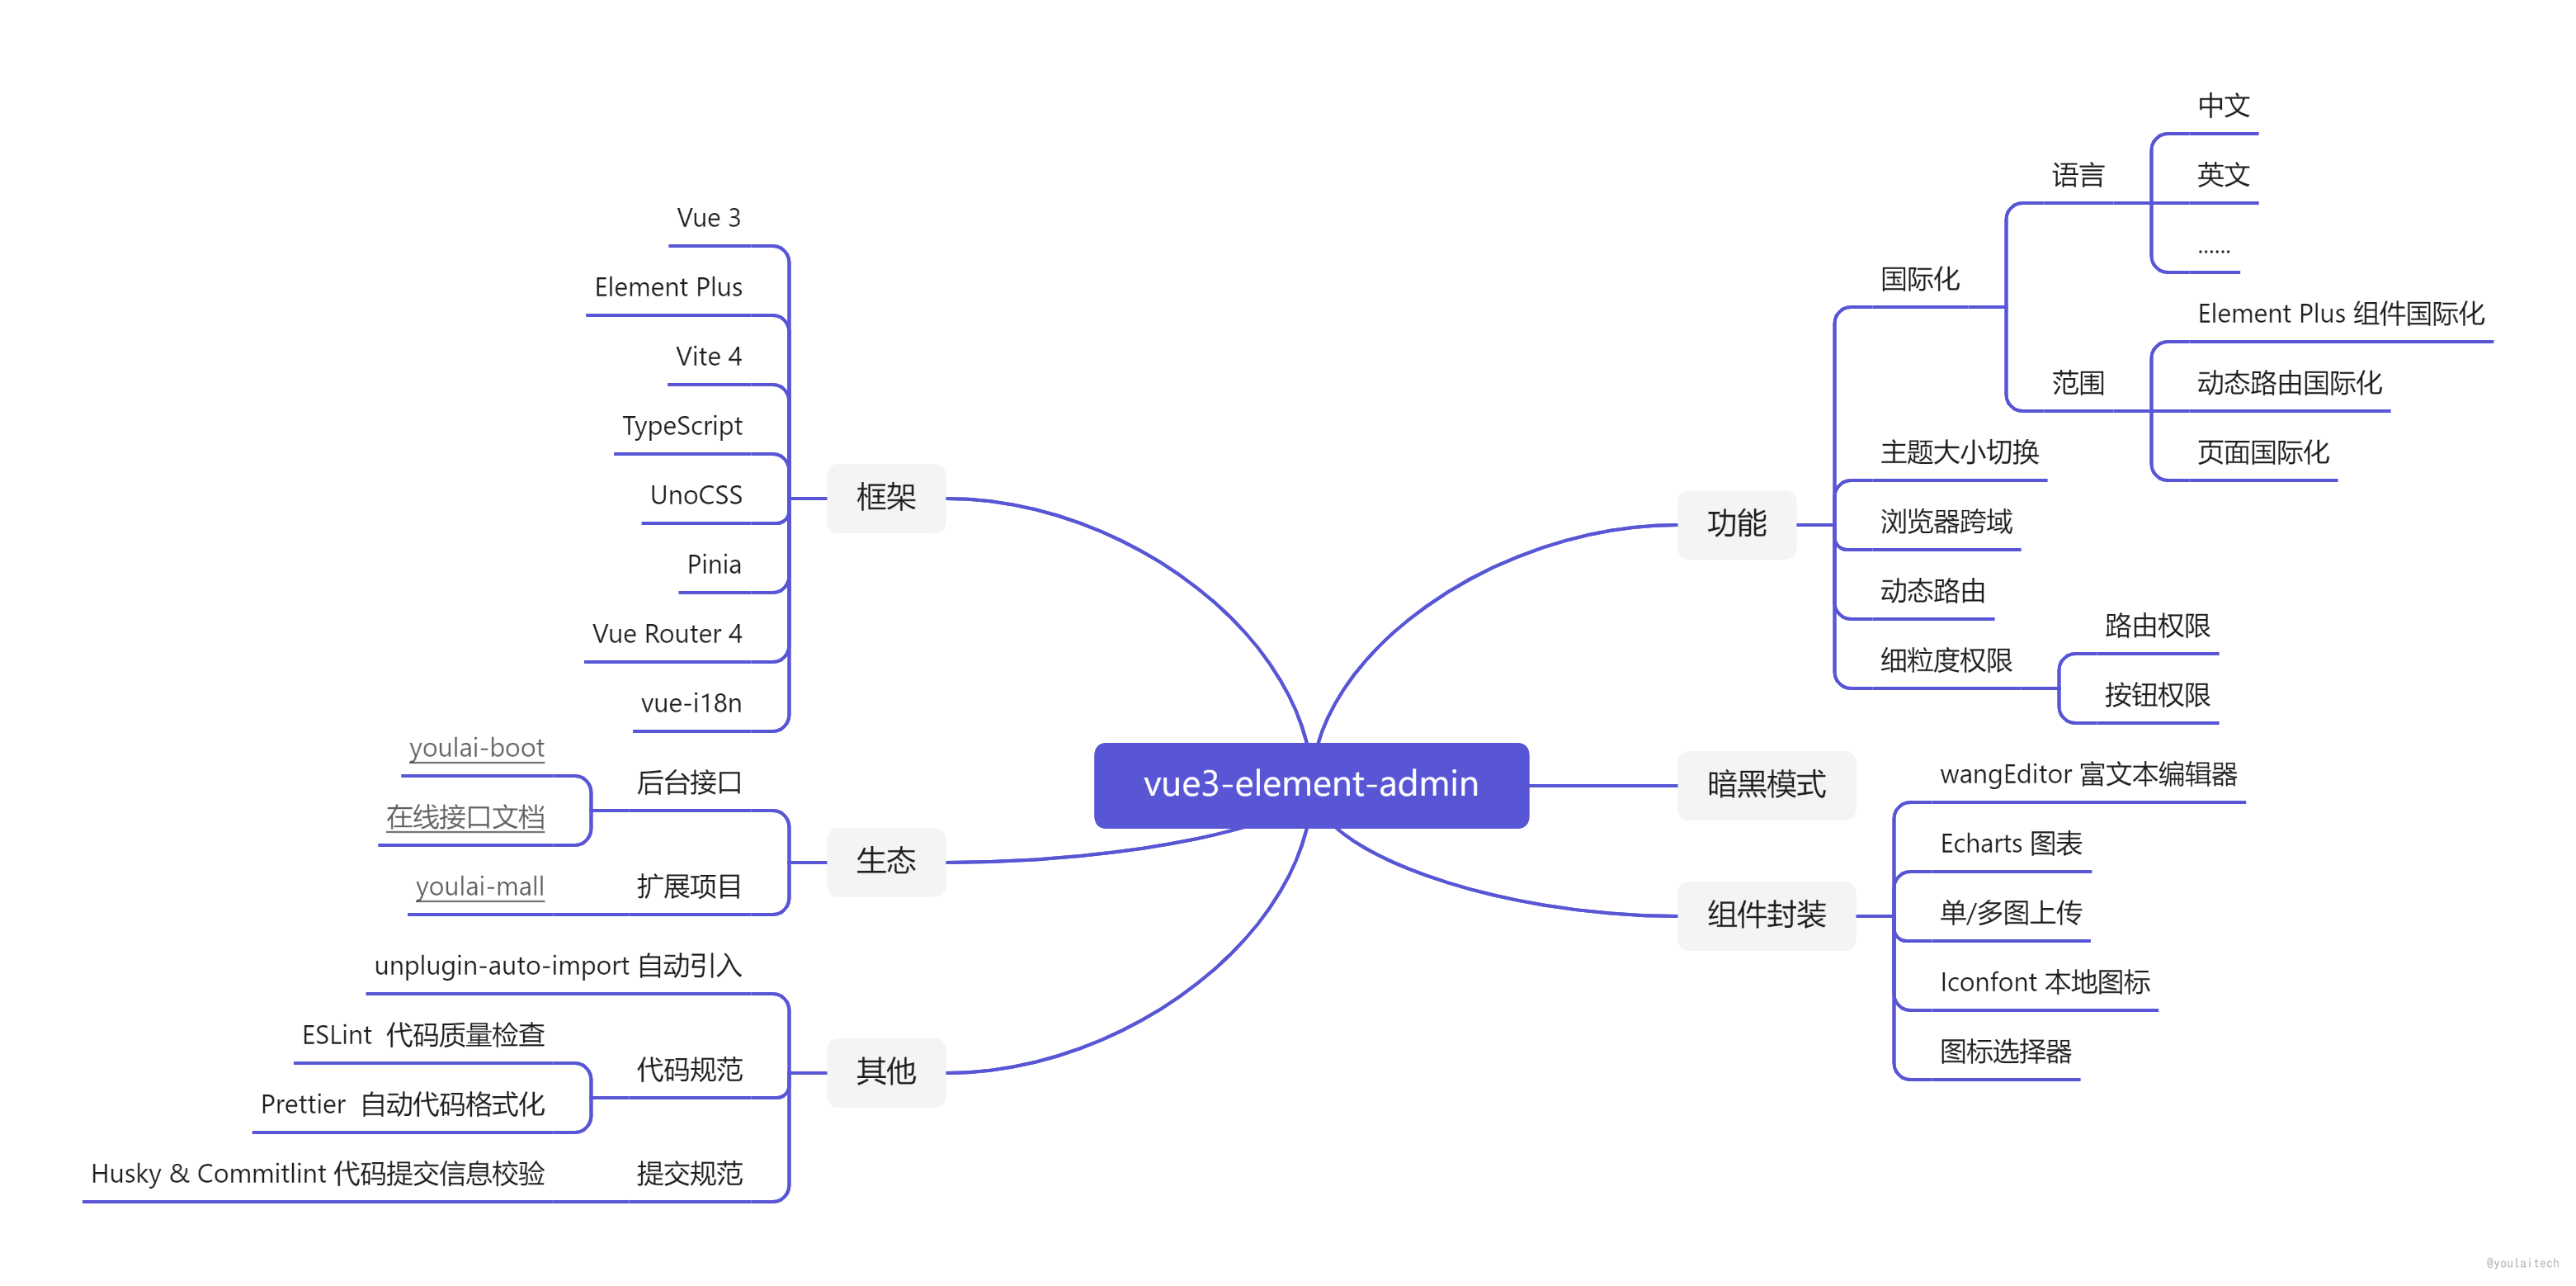
技术栈&官网
| 技术栈 | 描述 | 官网 |
|---|---|---|
| Vue3 | 渐进式 JavaScript 框架 | https://cn.vuejs.org/ |
| Element Plus | 基于 Vue 3,面向设计师和开发者的组件库 | https://element-plus.gitee.io/zh-CN/ |
| Vite | 前端开发与构建工具 | https://cn.vitejs.dev/ |
| TypeScript | 微软新推出的一种语言,是 JavaScript 的超集 | https://www.tslang.cn/ |
| Pinia | 新一代状态管理工具 | https://pinia.vuejs.org/ |
| Vue Router | Vue.js 的官方路由 | https://router.vuejs.org/zh/ |
| wangEditor | Typescript 开发的 Web 富文本编辑器 | https://www.wangeditor.com/ |
| Echarts | 一个基于 JavaScript 的开源可视化图表库 | https://echarts.apache.org/zh/ |
| vue-i18n | Vue 国际化多语言插件 | https://vue-i18n.intlify.dev/ |
| VueUse | 基于Vue组合式API的实用工具集(类比HuTool工具) | http://www.vueusejs.com/ |
前/后端源码
| Gitee | Github | |
|---|---|---|
| 前端 | vue3-element-admin | vue3-element-admin |
| 后端 | youlai-boot | youlai-boot |
接口文档
接口调用地址:https://vapi.youlai.tech
接口文档地址:在线接口文档
OpenAPI 3.0 文档地址:http://vapi.youlai.tech/v3/api-docs
环境准备
| 名称 | 备注 | |
|---|---|---|
| 开发工具 | VSCode 下载 | - |
| 运行环境 | Node 16+ 下载 |  |
| VSCode插件(必装) | 插件市场搜索 Vue Language Features (Volar) 和 TypeScript Vue Plugin (Volar) 安装,且禁用 Vetur | 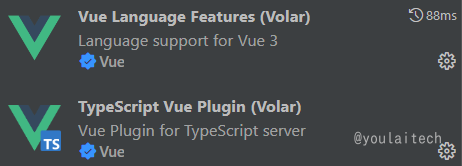 |
项目初始化
按照 【emoji】Vite 官方文档 - 搭建第一个 Vite 项目 说明,执行以下命令完成 vue 、typescirpt 模板项目的初始化
npm init vite@latest vue3-element-admin --template vue-ts
vue3-element-admin: 自定义的项目名称vue-ts:vue+typescript模板的标识,查看 create-vite 以获取每个模板的更多细节:vue,vue-ts,react,react-ts
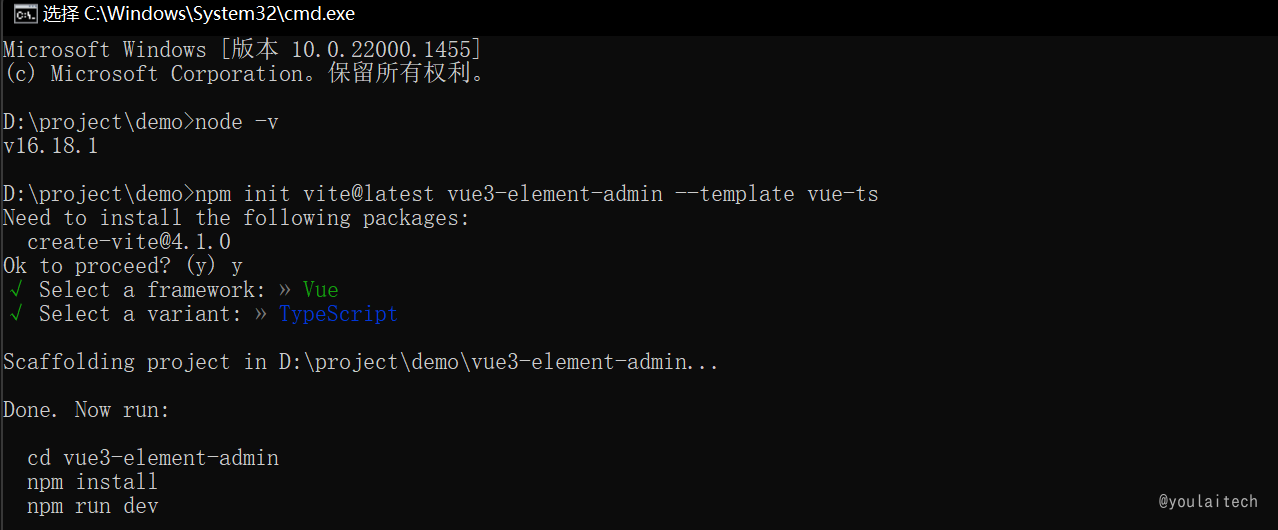
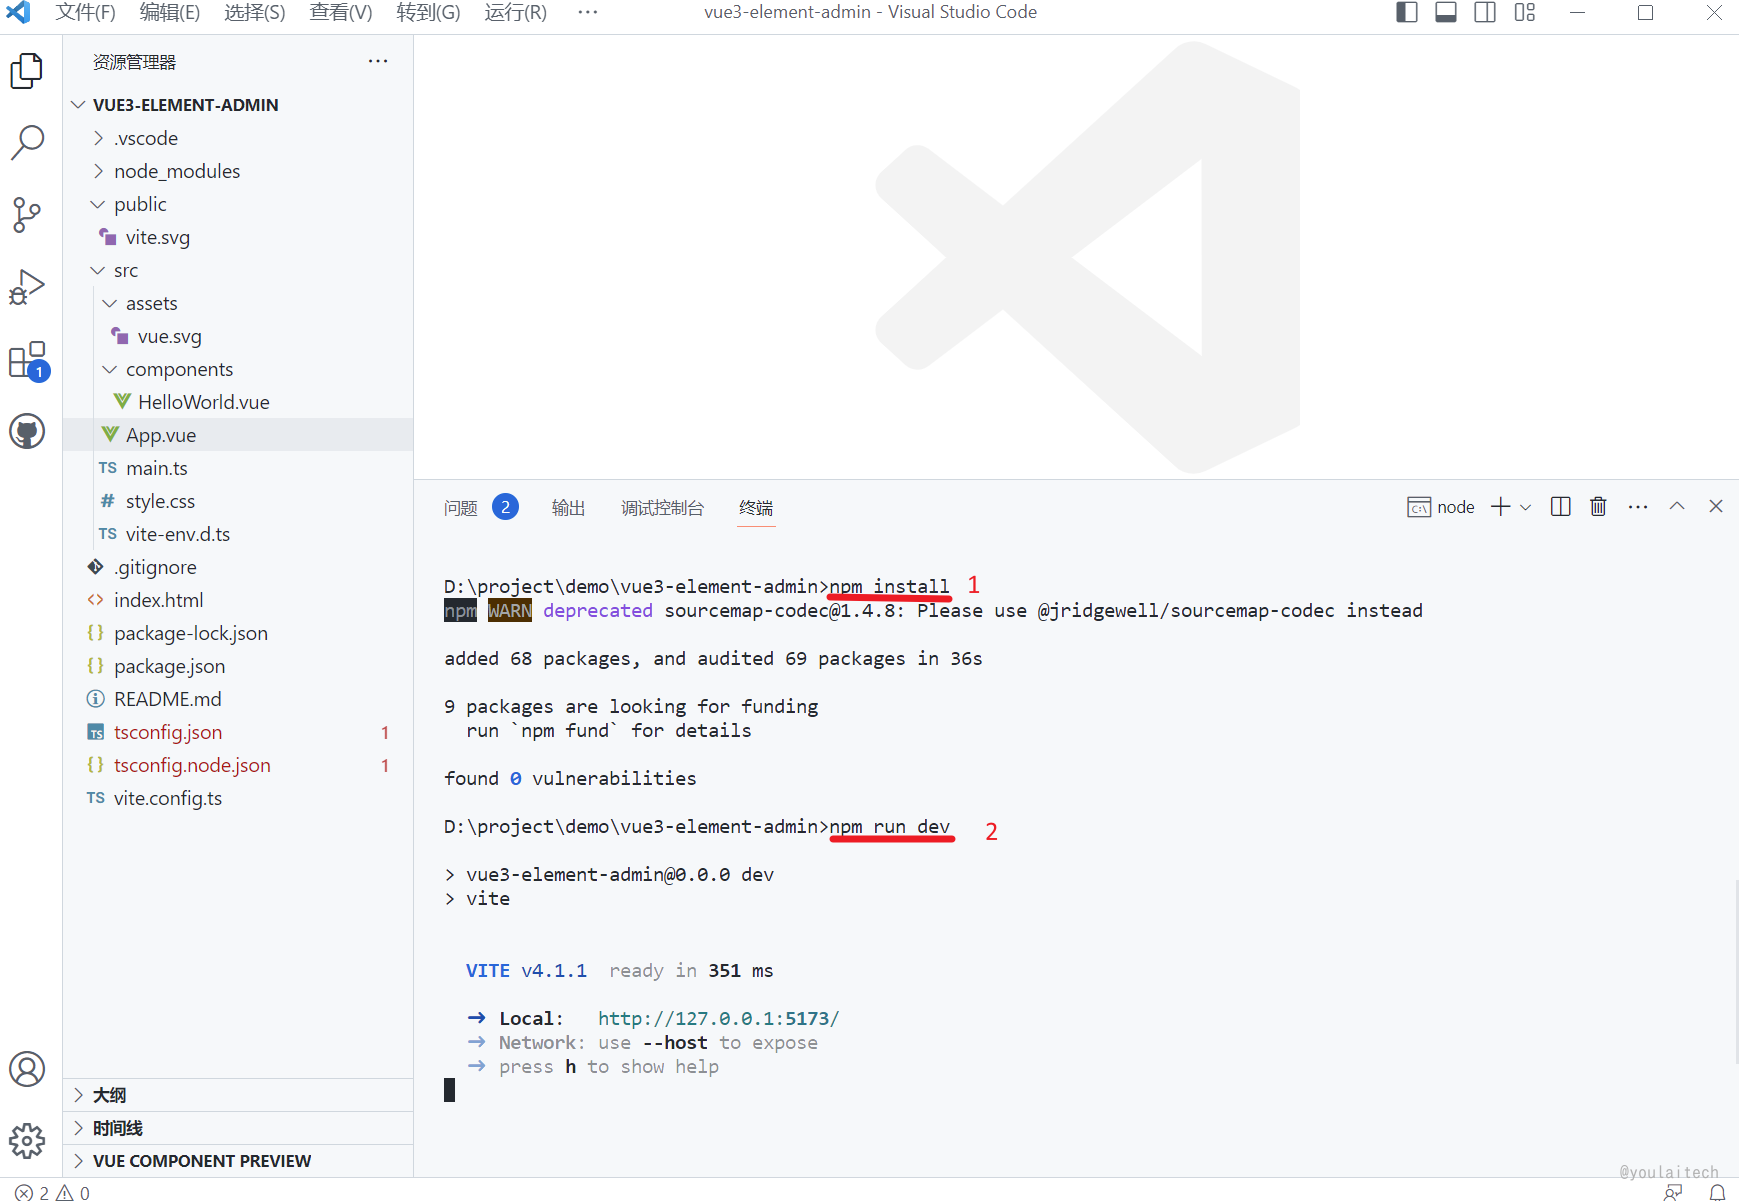
初始化完成项目位于 D:\project\demo\vue3-element-admin , 使用 VSCode 导入,执行以下命令启动:
npm install npm run dev
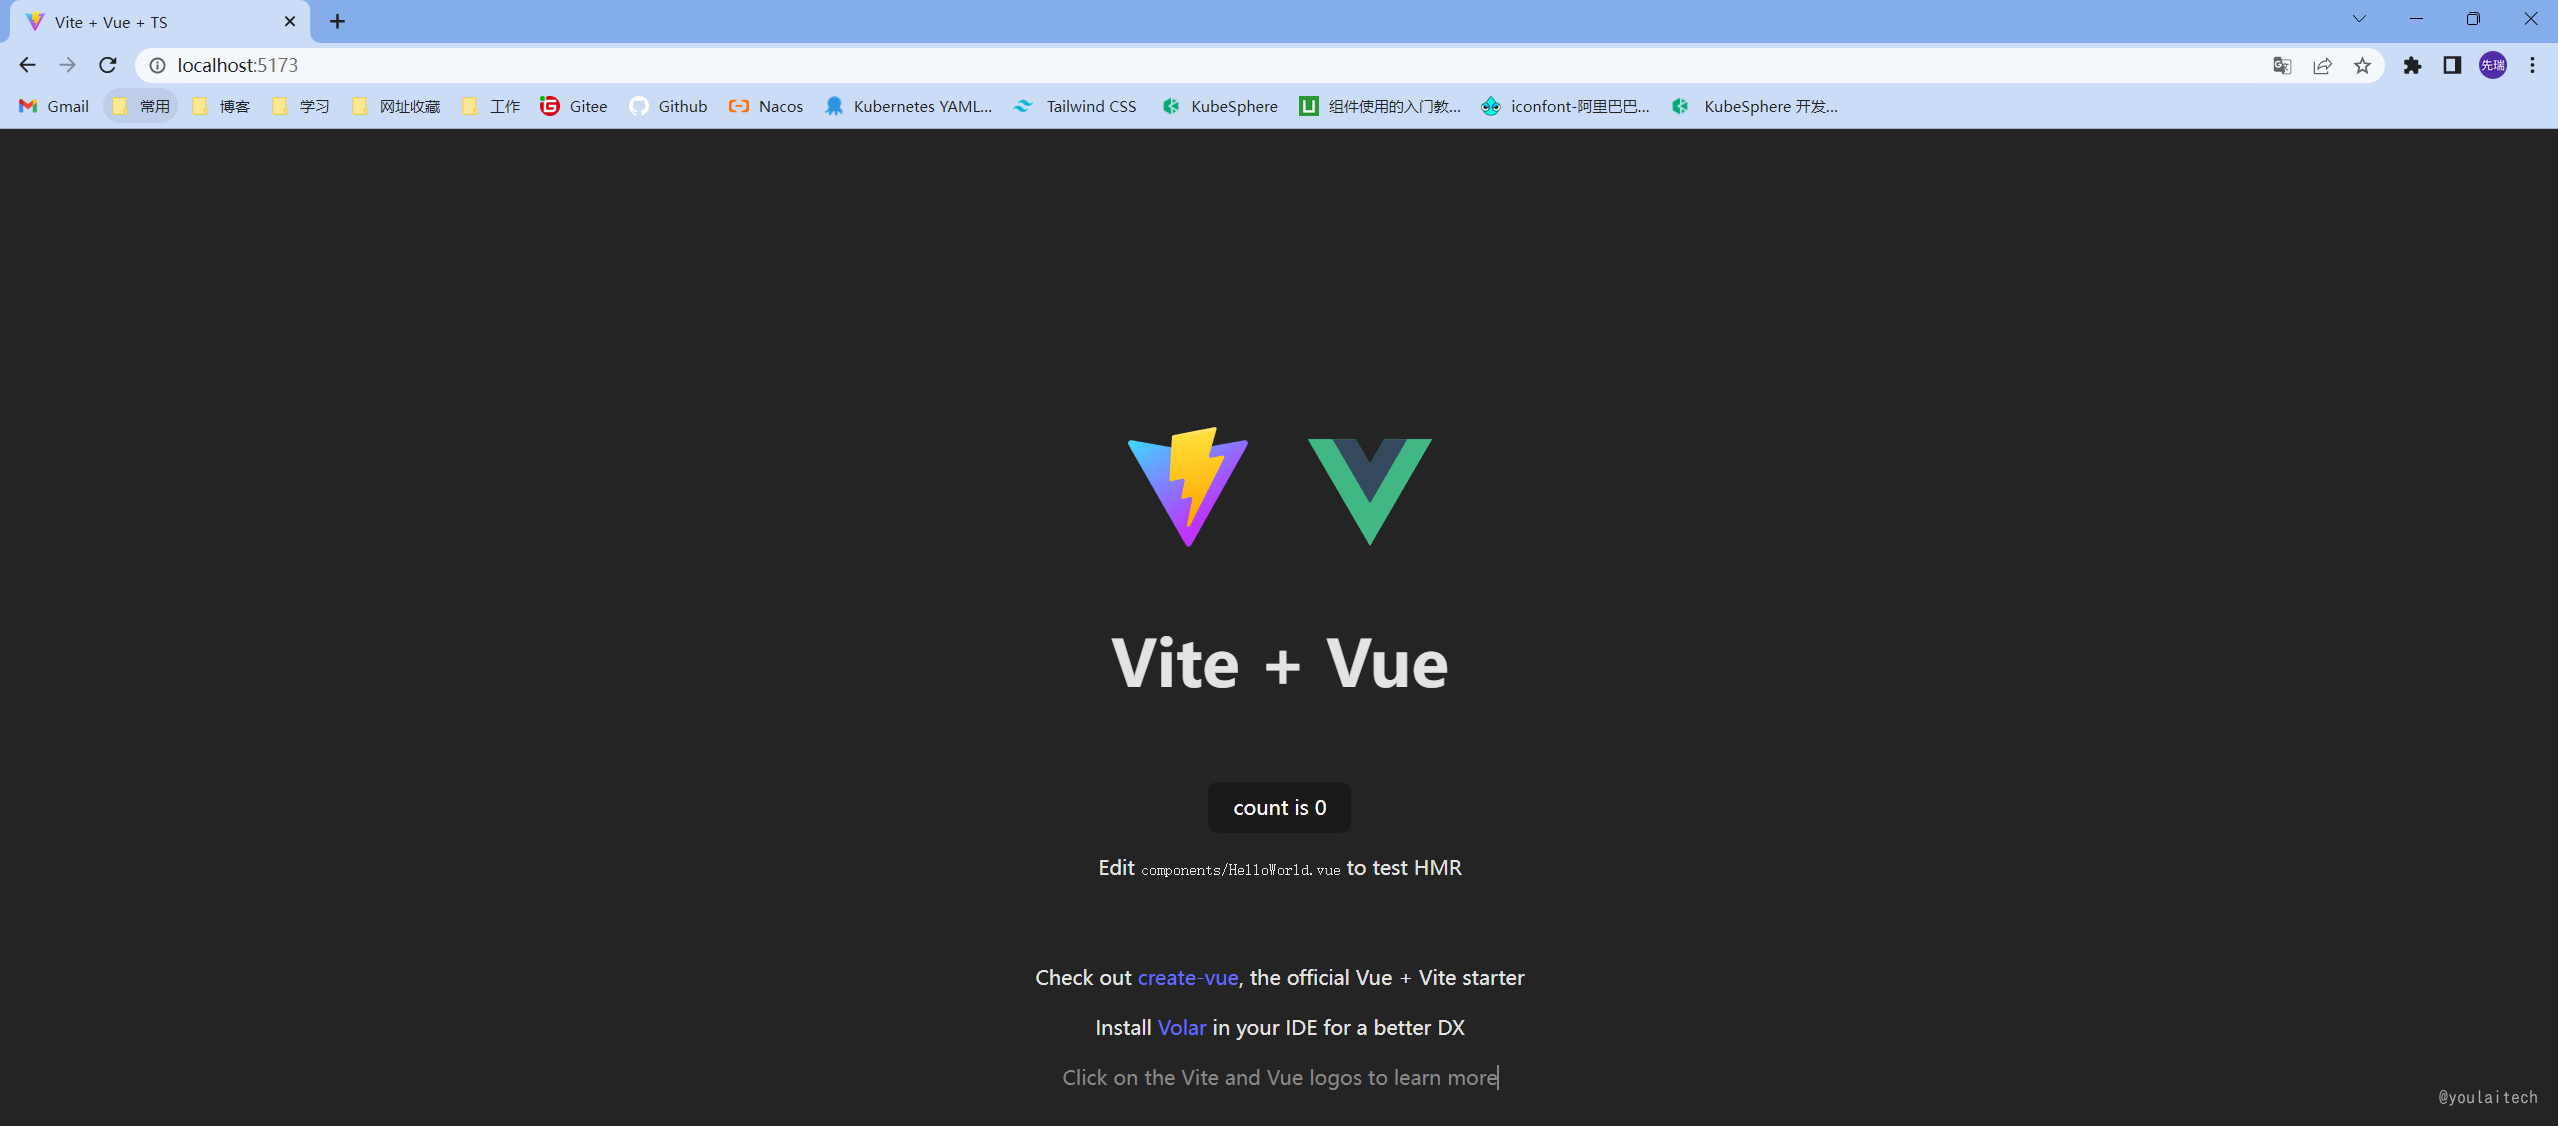
浏览器访问 localhost:5173 预览
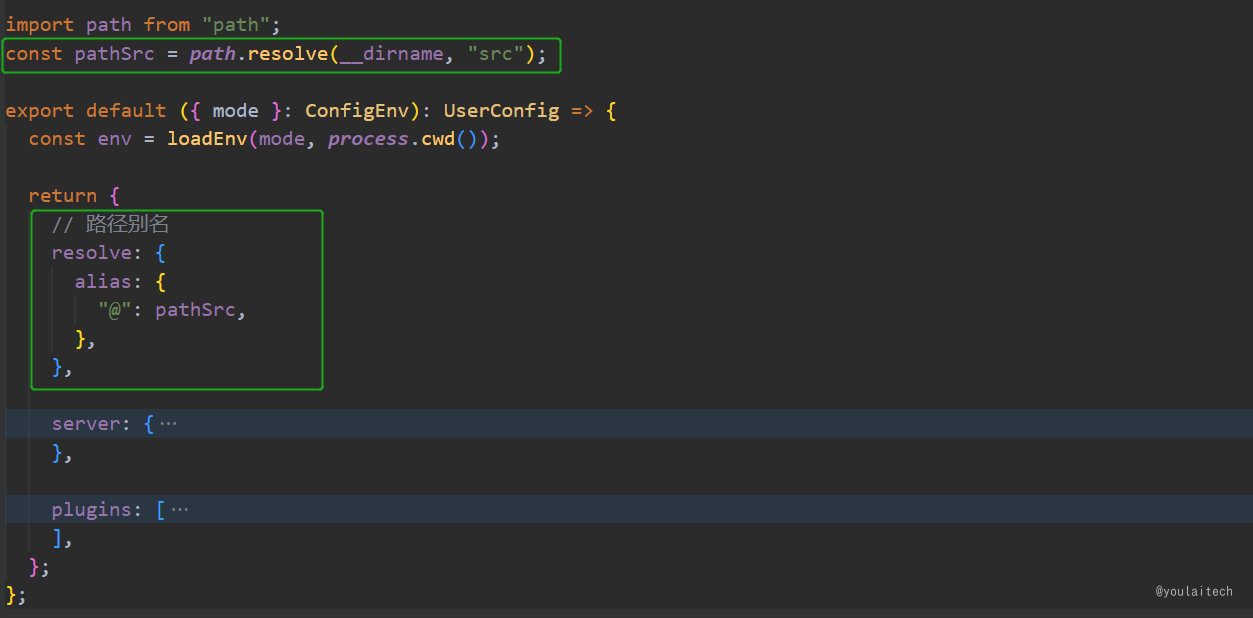
路径别名配置
相对路径别名配置,使用 @ 代替 src
Vite 配置
TypeScirpt 编译器配置
// tsconfig.json "compilerOptions": { ... "baseUrl": "./", // 解析非相对模块的基地址,默认是当前目录 "paths": { // 路径映射,相对于baseUrl "@/*": ["src/*"] } }路径别名使用
// src/App.vue import HelloWorld from '/src/components/HelloWorld.vue' ↓ import HelloWorld from '@/components/HelloWorld.vue'

安装自动导入
Element Plus 官方文档中推荐
按需自动导入的方式,而此需要使用额外的插件unplugin-auto-import和unplugin-vue-components来导入要使用的组件。所以在整合Element Plus之前先了解下自动导入的概念和作用
概念
为了避免在多个页面重复引入 API 或 组件,由此而产生的自动导入插件来节省重复代码和提高开发效率。
| 插件 | 概念 | 自动导入对象 |
|---|---|---|
| unplugin-auto-import | 按需自动导入API | ref,reactive,watch,computed 等API |
| unplugin-vue-components | 按需自动导入组件 | Element Plus 等三方库和指定目录下的自定义组件 |
看下自动导入插件未使用和使用的区别:
| 插件名 | 未使用自动导入 | 使用自动导入 |
|---|---|---|
| unplugin-auto-import | 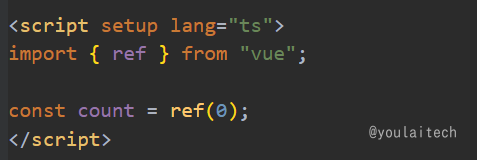 | 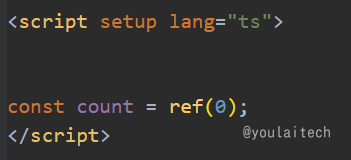 |
| unplugin-vue-components | 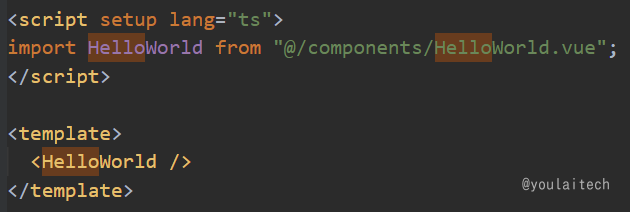 | 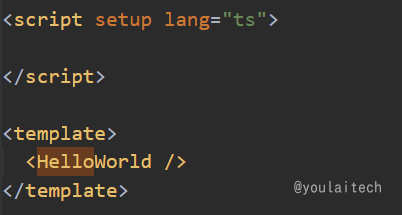 |
安装插件依赖
npm install -D unplugin-auto-import unplugin-vue-components
vite.config.ts - 自动导入配置
新建 /src/types 目录用于存放自动导入函数和组件的TS类型声明文件
import AutoImport from "unplugin-auto-import/vite"; import Components from "unplugin-vue-components/vite"; plugins: [ AutoImport({ // 自动导入 Vue 相关函数,如:ref, reactive, toRef 等 imports: ["vue"], eslintrc: { enabled: true, // 是否自动生成 eslint 规则,建议生成之后设置 false filepath: "./.eslintrc-auto-import.json", // 指定自动导入函数 eslint 规则的文件 }, dts: path.resolve(pathSrc, "types", "auto-imports.d.ts"), // 指定自动导入函数TS类型声明文件路径 }), Components({ dts: path.resolve(pathSrc, "types", "components.d.ts"), // 指定自动导入组件TS类型声明文件路径 }), ].eslintrc.cjs - 自动导入函数 eslint 规则引入
"extends": [ "./.eslintrc-auto-import.json" ],
tsconfig.json - 自动导入TS类型声明文件引入
{ "include": ["src/**/*.d.ts"] }自动导入效果
运行项目 npm run dev 自动
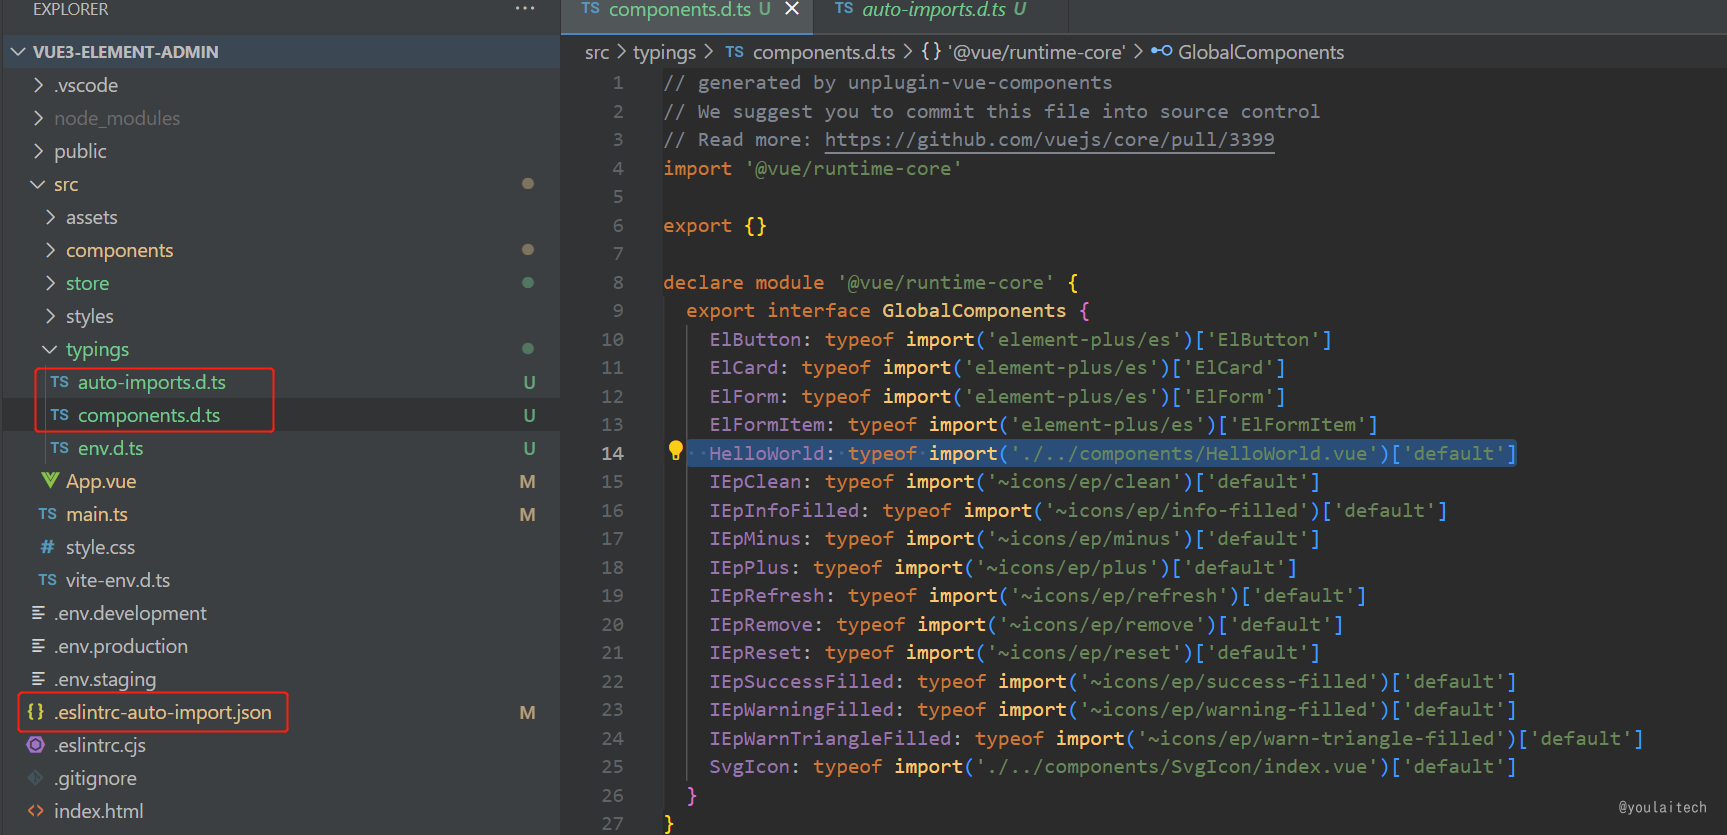
整合 Element Plus
需要完成上面一节的 自动导入 的安装和配置
安装 Element Plus
npm install element-plus
安装自动导入 Icon 依赖
npm i -D unplugin-icons
vite.config.ts 配置
参考: element-plus-best-practices - vite.config.ts
// vite.config.ts import { ElementPlusResolver } from "unplugin-vue-components/resolvers"; import Icons from "unplugin-icons/vite"; import IconsResolver from "unplugin-icons/resolve export default ({ mode }: ConfigEnv): UserConfig => { return { plugins: [ // ... AutoImport({ // ... resolvers: [ // 自动导入 Element Plus 相关函数,如:ElMessage, ElMessageBox... (带样式) ElementPlusResolver(), // 自动导入图标组件 IconsResolver({}), ] vueTemplate: true, // 是否在 vue 模板中自动导入 dts: path.resolve(pathSrc, 'types', 'auto-imports.d.ts') // 自动导入组件类型声明文件位置,默认根目录 }), Components({ resolvers: [ // 自动导入 Element Plus 组件 ElementPlusResolver(), // 自动注册图标组件 IconsResolver({ enabledCollections: ["ep"] // element-plus图标库,其他图标库 https://icon-sets.iconify.design/ }), ], dts: path.resolve(pathSrc, "types", "components.d.ts"), // 自动导入组件类型声明文件位置,默认根目录 }), Icons({ // 自动安装图标库 autoInstall: true, }), ], }; };示例代码
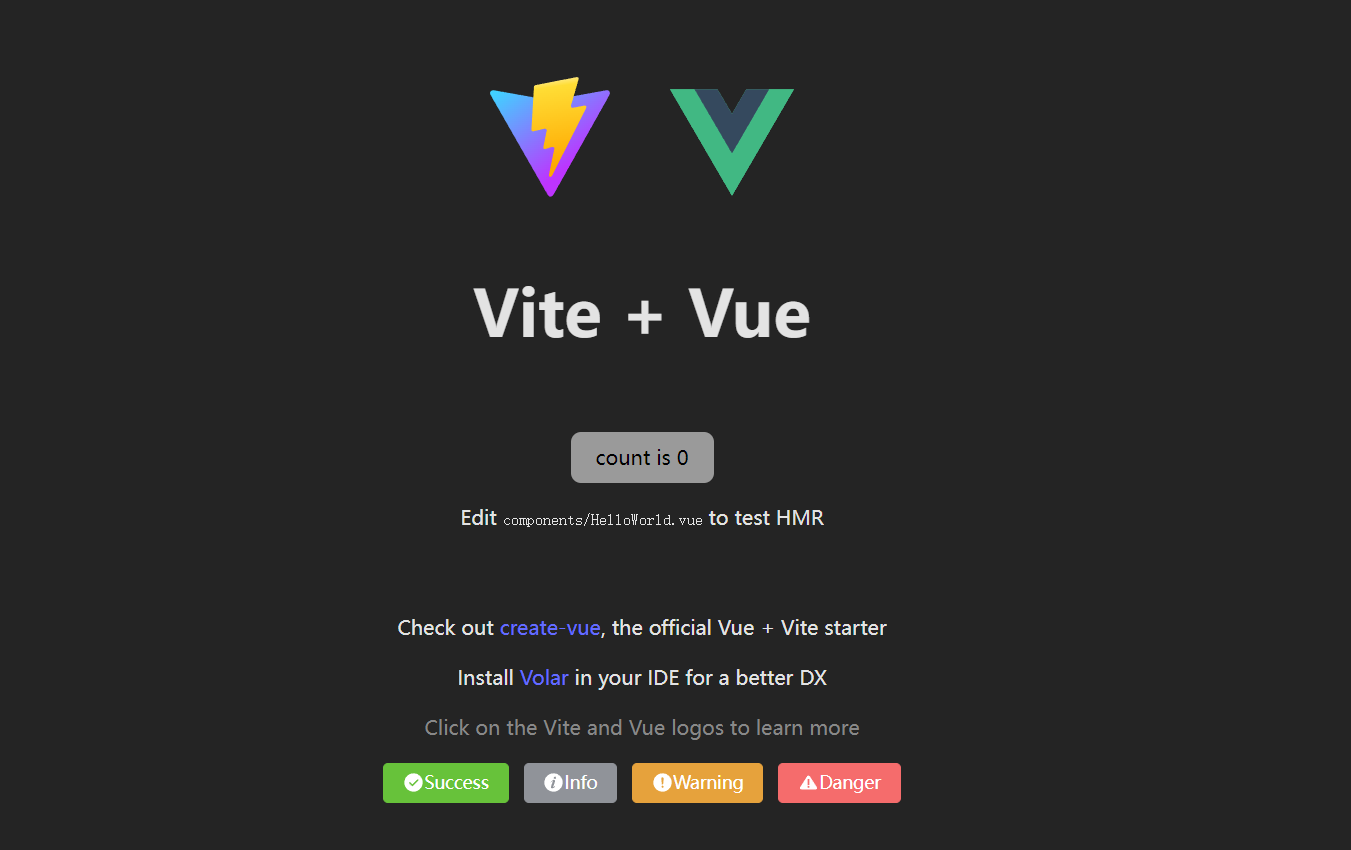
<!-- src/components/HelloWorld.vue --> <div> <el-button type="success"><i-ep-SuccessFilled />Success</el-button> <el-button type="info"><i-ep-InfoFilled />Info</el-button> <el-button type="warning"><i-ep-WarningFilled />Warning</el-button> <el-button type="danger"><i-ep-WarnTriangleFilled />Danger</el-button> </div>
效果预览
整合 SVG 图标
通过 vite-plugin-svg-icons 插件整合
Iconfont第三方图标库实现本地图标
参考: vite-plugin-svg-icons 安装文档
安装依赖
npm install -D fast-glob@3.2.11 npm install -D vite-plugin-svg-icons@2.0.1
创建 src/assets/icons 目录 , 放入从 Iconfont 复制的 svg 图标

main.ts 引入注册脚本
// src/main.ts import 'virtual:svg-icons-register';
vite.config.ts 配置插件
// vite.config.ts import { createSvgIconsPlugin } from 'vite-plugin-svg-icons'; export default ({command, mode}: ConfigEnv): UserConfig => { return ( { plugins: [ createSvgIconsPlugin({ // 指定需要缓存的图标文件夹 iconDirs: [path.resolve(process.cwd(), 'src/assets/icons')], // 指定symbolId格式 symbolId: 'icon-[dir]-[name]', }) ] } ) }SVG 组件封装
<!-- src/components/SvgIcon/index.vue --> <script setup lang="ts"> const props = defineProps({ prefix: { type: String, default: "icon", }, iconClass: { type: String, required: false, }, color: { type: String, }, size: { type: String, default: "1em", }, }); const symbolId = computed(() => `#${props.prefix}-${props.iconClass}`); </script> <template> <svg aria-hidden="true" class="svg-icon" :style="'width:' + size + ';height:' + size" > <use :xlink:href="symbolId" :fill="color" /> </svg> </template> <style scoped> .svg-icon { display: inline-block; outline: none; width: 1em; height: 1em; vertical-align: -0.15em; /* 因icon大小被设置为和字体大小一致,而span等标签的下边缘会和字体的基线对齐,故需设置一个往下的偏移比例,来纠正视觉上的未对齐效果 */ fill: currentColor; /* 定义元素的颜色,currentColor是一个变量,这个变量的值就表示当前元素的color值,如果当前元素未设置color值,则从父元素继承 */ overflow: hidden; } </style>组件使用
<!-- src/components/HelloWorld.vue --> <template> <el-button type="info"><svg-icon icon-class="block"/>SVG 本地图标</el-button> </template>

整合 SCSS
一款CSS预处理语言,SCSS 是 Sass 3 引入新的语法,其语法完全兼容 CSS3,并且继承了 Sass 的强大功能。
安装依赖
npm i -D sass
创建 variables.scss 变量文件,添加变量 $bg-color 定义,注意规范变量以 $ 开头
// src/styles/variables.scss $bg-color:#242424;
Vite 配置导入 SCSS 全局变量文件
// vite.config.ts css: { // CSS 预处理器 preprocessorOptions: { //define global scss variable scss: { javascriptEnabled: true, additionalData: `@use "@/styles/variables.scss" as *;` } } }style 标签使用SCSS全局变量
<!-- src/components/HelloWorld.vue --> <template> <div class="box" /> </template> <style lang="scss" scoped> .box { width: 100px; height: 100px; background-color: $bg-color; } </style>上面导入的 SCSS 全局变量在 TypeScript 不生效的,需要创建一个以 .module.scss 结尾的文件
// src/styles/variables.module.scss // 导出 variables.scss 文件的变量 :export{ bgColor:$bg-color }TypeScript 使用 SCSS 全局变量
<!-- src/components/HelloWorld.vue --> <script setup> import variables from "@/styles/variables.module.scss"; console.log(variables.bgColor) </script> <template> <div style="width:100px;height:100px" :style="{ 'background-color': variables.bgColor }" /> </template>整合 UnoCSS
UnoCSS 是一个具有高性能且极具灵活性的即时原子化 CSS 引擎 。
安装依赖
npm install -D unocss
vite.config.ts 配置
// vite.config.ts import UnoCSS from 'unocss/vite' export default { plugins: [ UnoCSS({ /* options */ }), ], }main.ts 引入 uno.css
// src/main.ts import 'uno.css'
VSCode 安装 UnoCSS 插件

再看下具体使用方式和实际效果:
| 代码 | 效果 |
|---|---|
 |  |
如果UnoCSS 插件智能提示不生效,请参考:VSCode插件UnoCSS智能提示不生效解决 。
整合 Pinia
Pinia 是 Vue 的专属状态管理库,它允许你跨组件或页面共享状态。
参考:Pinia 官方文档
安装依赖
npm install pinia
main.ts 引入 pinia
// src/main.ts import { createPinia } from "pinia"; import App from "./App.vue"; createApp(App).use(createPinia()).mount("#app");定义 Store
根据 Pinia 官方文档-核心概念 描述 ,Store 定义分为选项式和组合式 , 先比较下两种写法的区别:
| 选项式 Option Store | 组合式 Setup Store |
|---|---|
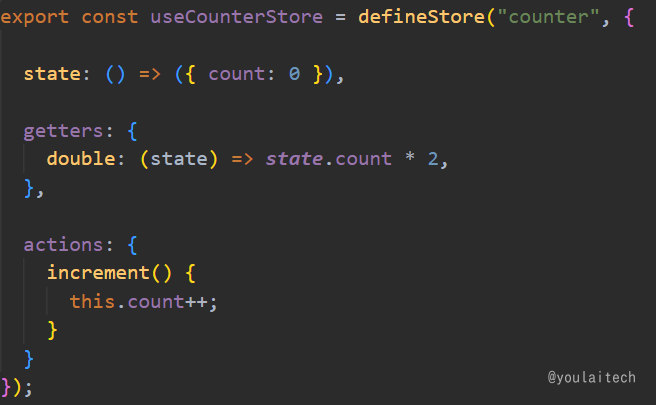 | 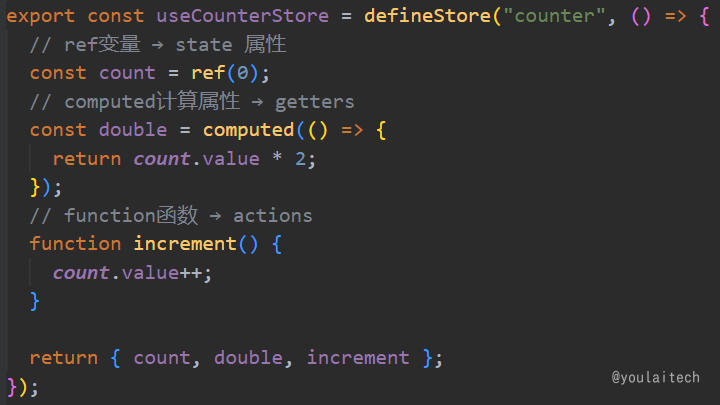 |
至于如何选择,官方给出的建议 :选择你觉得最舒服的那一个就好 。
这里选择组合式,新建文件 src/store/counter.ts
// src/store/counter.ts import { defineStore } from "pinia"; export const useCounterStore = defineStore("counter", () => { // ref变量 → state 属性 const count = ref(0); // computed计算属性 → getters const double = computed(() => { return count.value * 2; }); // function函数 → actions function increment() { count.value++; } return { count, double, increment }; });父组件
<!-- src/App.vue --> <script setup> import HelloWorld from "@/components/HelloWorld.vue"; import { useCounterStore } from "@/store/counter"; const counterStore = useCounterStore(); </script> <template> <h1>vue3-element-admin-父组件</h1> <el-button type="primary" @click="counterStore.increment">count++</el-button> <HelloWorld /> </template>子组件
<!-- src/components/HelloWorld.vue --> <script setup> import { useCounterStore } from "@/store/counter"; const counterStore = useCounterStore(); </script> <template> <el-card class="text-left text-white border-white border-1 border-solid mt-10 bg-[#242424]" > <template #header> 子组件 HelloWorld.vue</template> <el-form> <el-form-item label="数字:"> {{ counterStore.count }}</el-form-item> <el-form-item label="加倍:"> {{ counterStore.double }}</el-form-item> </el-form> </el-card> </template>效果预览
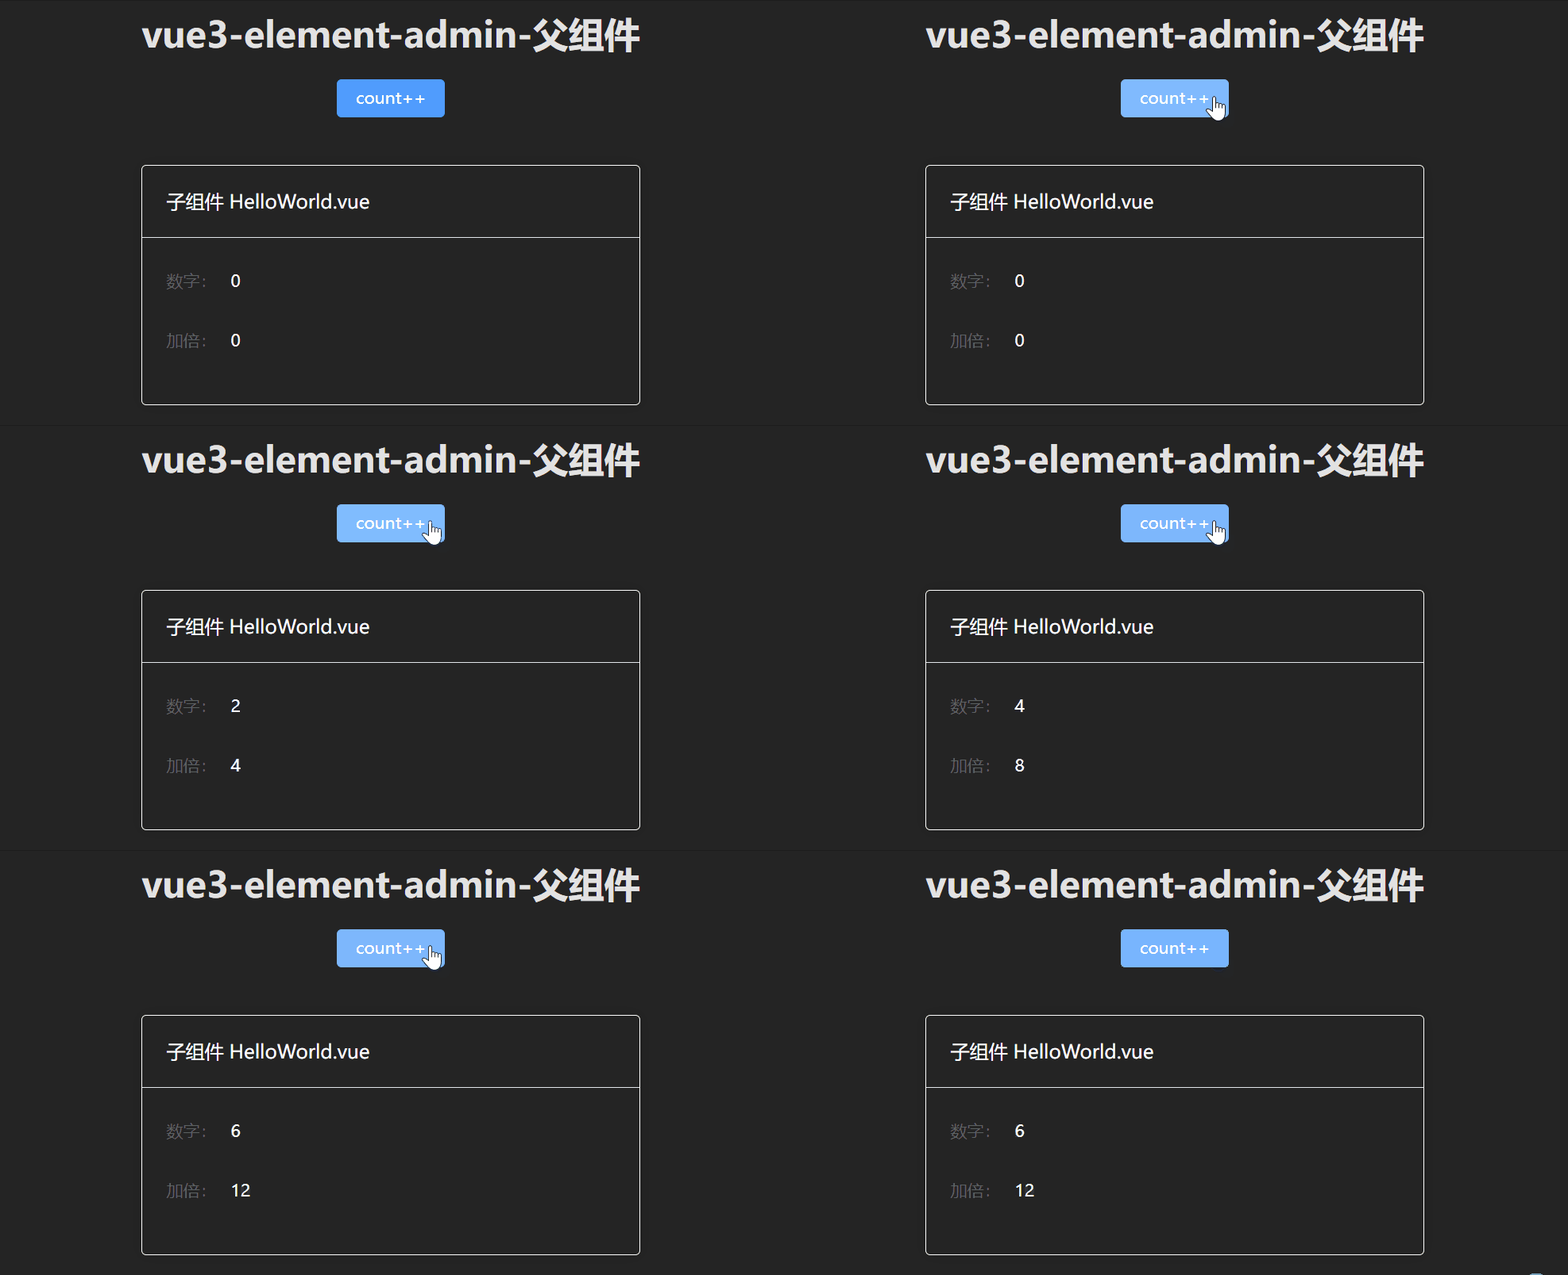
环境变量
Vite 环境变量主要是为了区分开发、测试、生产等环境的变量
参考: Vite 环境变量配置官方文档
env配置文件
项目根目录新建 .env.development 、.env.production
开发环境变量配置:.env.development
# 变量必须以 VITE_ 为前缀才能暴露给外部读取 VITE_APP_TITLE = 'vue3-element-admin' VITE_APP_PORT = 3000 VITE_APP_BASE_API = '/dev-api'
生产环境变量配置:.env.production
VITE_APP_TITLE = 'vue3-element-admin' VITE_APP_PORT = 3000 VITE_APP_BASE_API = '/prod-api'
环境变量智能提示
新建 src/types/env.d.ts文件存放环境变量TS类型声明
// src/types/env.d.ts interface ImportMetaEnv { /** * 应用标题 */ VITE_APP_TITLE: string; /** * 应用端口 */ VITE_APP_PORT: number; /** * API基础路径(反向代理) */ VITE_APP_BASE_API: string; } interface ImportMeta { readonly env: ImportMetaEnv; }使用自定义环境变量就会有智能提示,环境变量的读取和使用请看下一节的跨域处理中的 vite.config.ts的配置。

跨域处理
跨域原理
浏览器同源策略: 协议、域名和端口都相同是同源,浏览器会限制非同源请求读取响应结果。
本地开发环境通过 Vite 配置反向代理解决浏览器跨域问题,生产环境则是通过 nginx 配置反向代理 。
vite.config.ts 配置代理
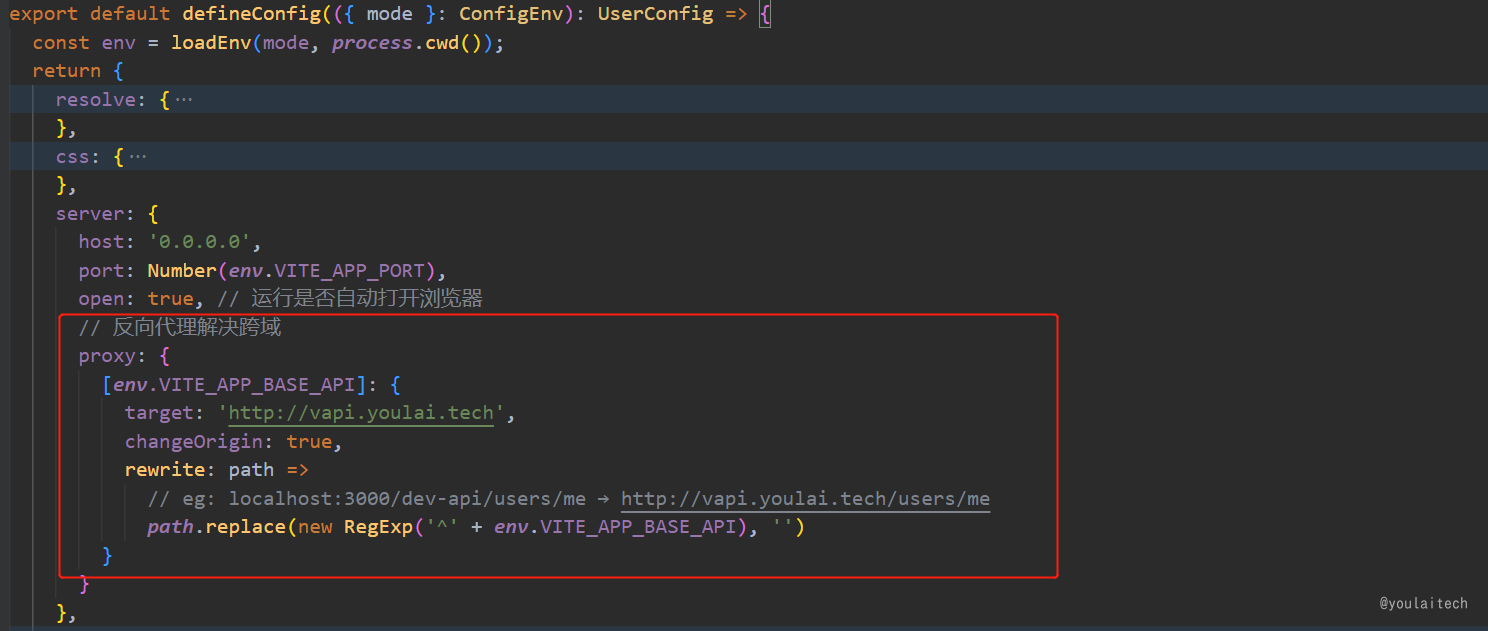
表面肉眼看到的请求地址: http://localhost:3000/dev-api/api/v1/users/me
真实访问的代理目标地址: http://vapi.youlai.tech/api/v1/users/me

整合 Axios
Axios 基于promise可以用于浏览器和node.js的网络请求库
参考: Axios 官方文档
安装依赖
npm install axios
Axios 工具类封装
// src/utils/request.ts import axios, { InternalAxiosRequestConfig, AxiosResponse } from 'axios'; import { useUserStoreHook } from '@/store/modules/user'; // 创建 axios 实例 const service = axios.create({ baseURL: import.meta.env.VITE_APP_BASE_API, timeout: 50000, headers: { 'Content-Type': 'application/json;charset=utf-8' } }); // 请求拦截器 service.interceptors.request.use( (config: InternalAxiosRequestConfig) => { const userStore = useUserStoreHook(); if (userStore.token) { config.headers.Authorization = userStore.token; } return config; }, (error: any) => { return Promise.reject(error); } ); // 响应拦截器 service.interceptors.response.use( (response: AxiosResponse) => { const { code, msg } = response.data; // 登录成功 if (code === '00000') { return response.data; } ElMessage.error(msg || '系统出错'); return Promise.reject(new Error(msg || 'Error')); }, (error: any) => { if (error.response.data) { const { code, msg } = error.response.data; // token 过期,跳转登录页 if (code === 'A0230') { ElMessageBox.confirm('当前页面已失效,请重新登录', '提示', { confirmButtonText: '确定', type: 'warning' }).then(() => { localStorage.clear(); // @vueuse/core 自动导入 window.location.href = '/'; }); }else{ ElMessage.error(msg || '系统出错'); } } return Promise.reject(error.message); } ); // 导出 axios 实例 export default service;登录接口实战
访问 vue3-element-admin 在线接口文档, 查看登录接口请求参数和响应数据类型
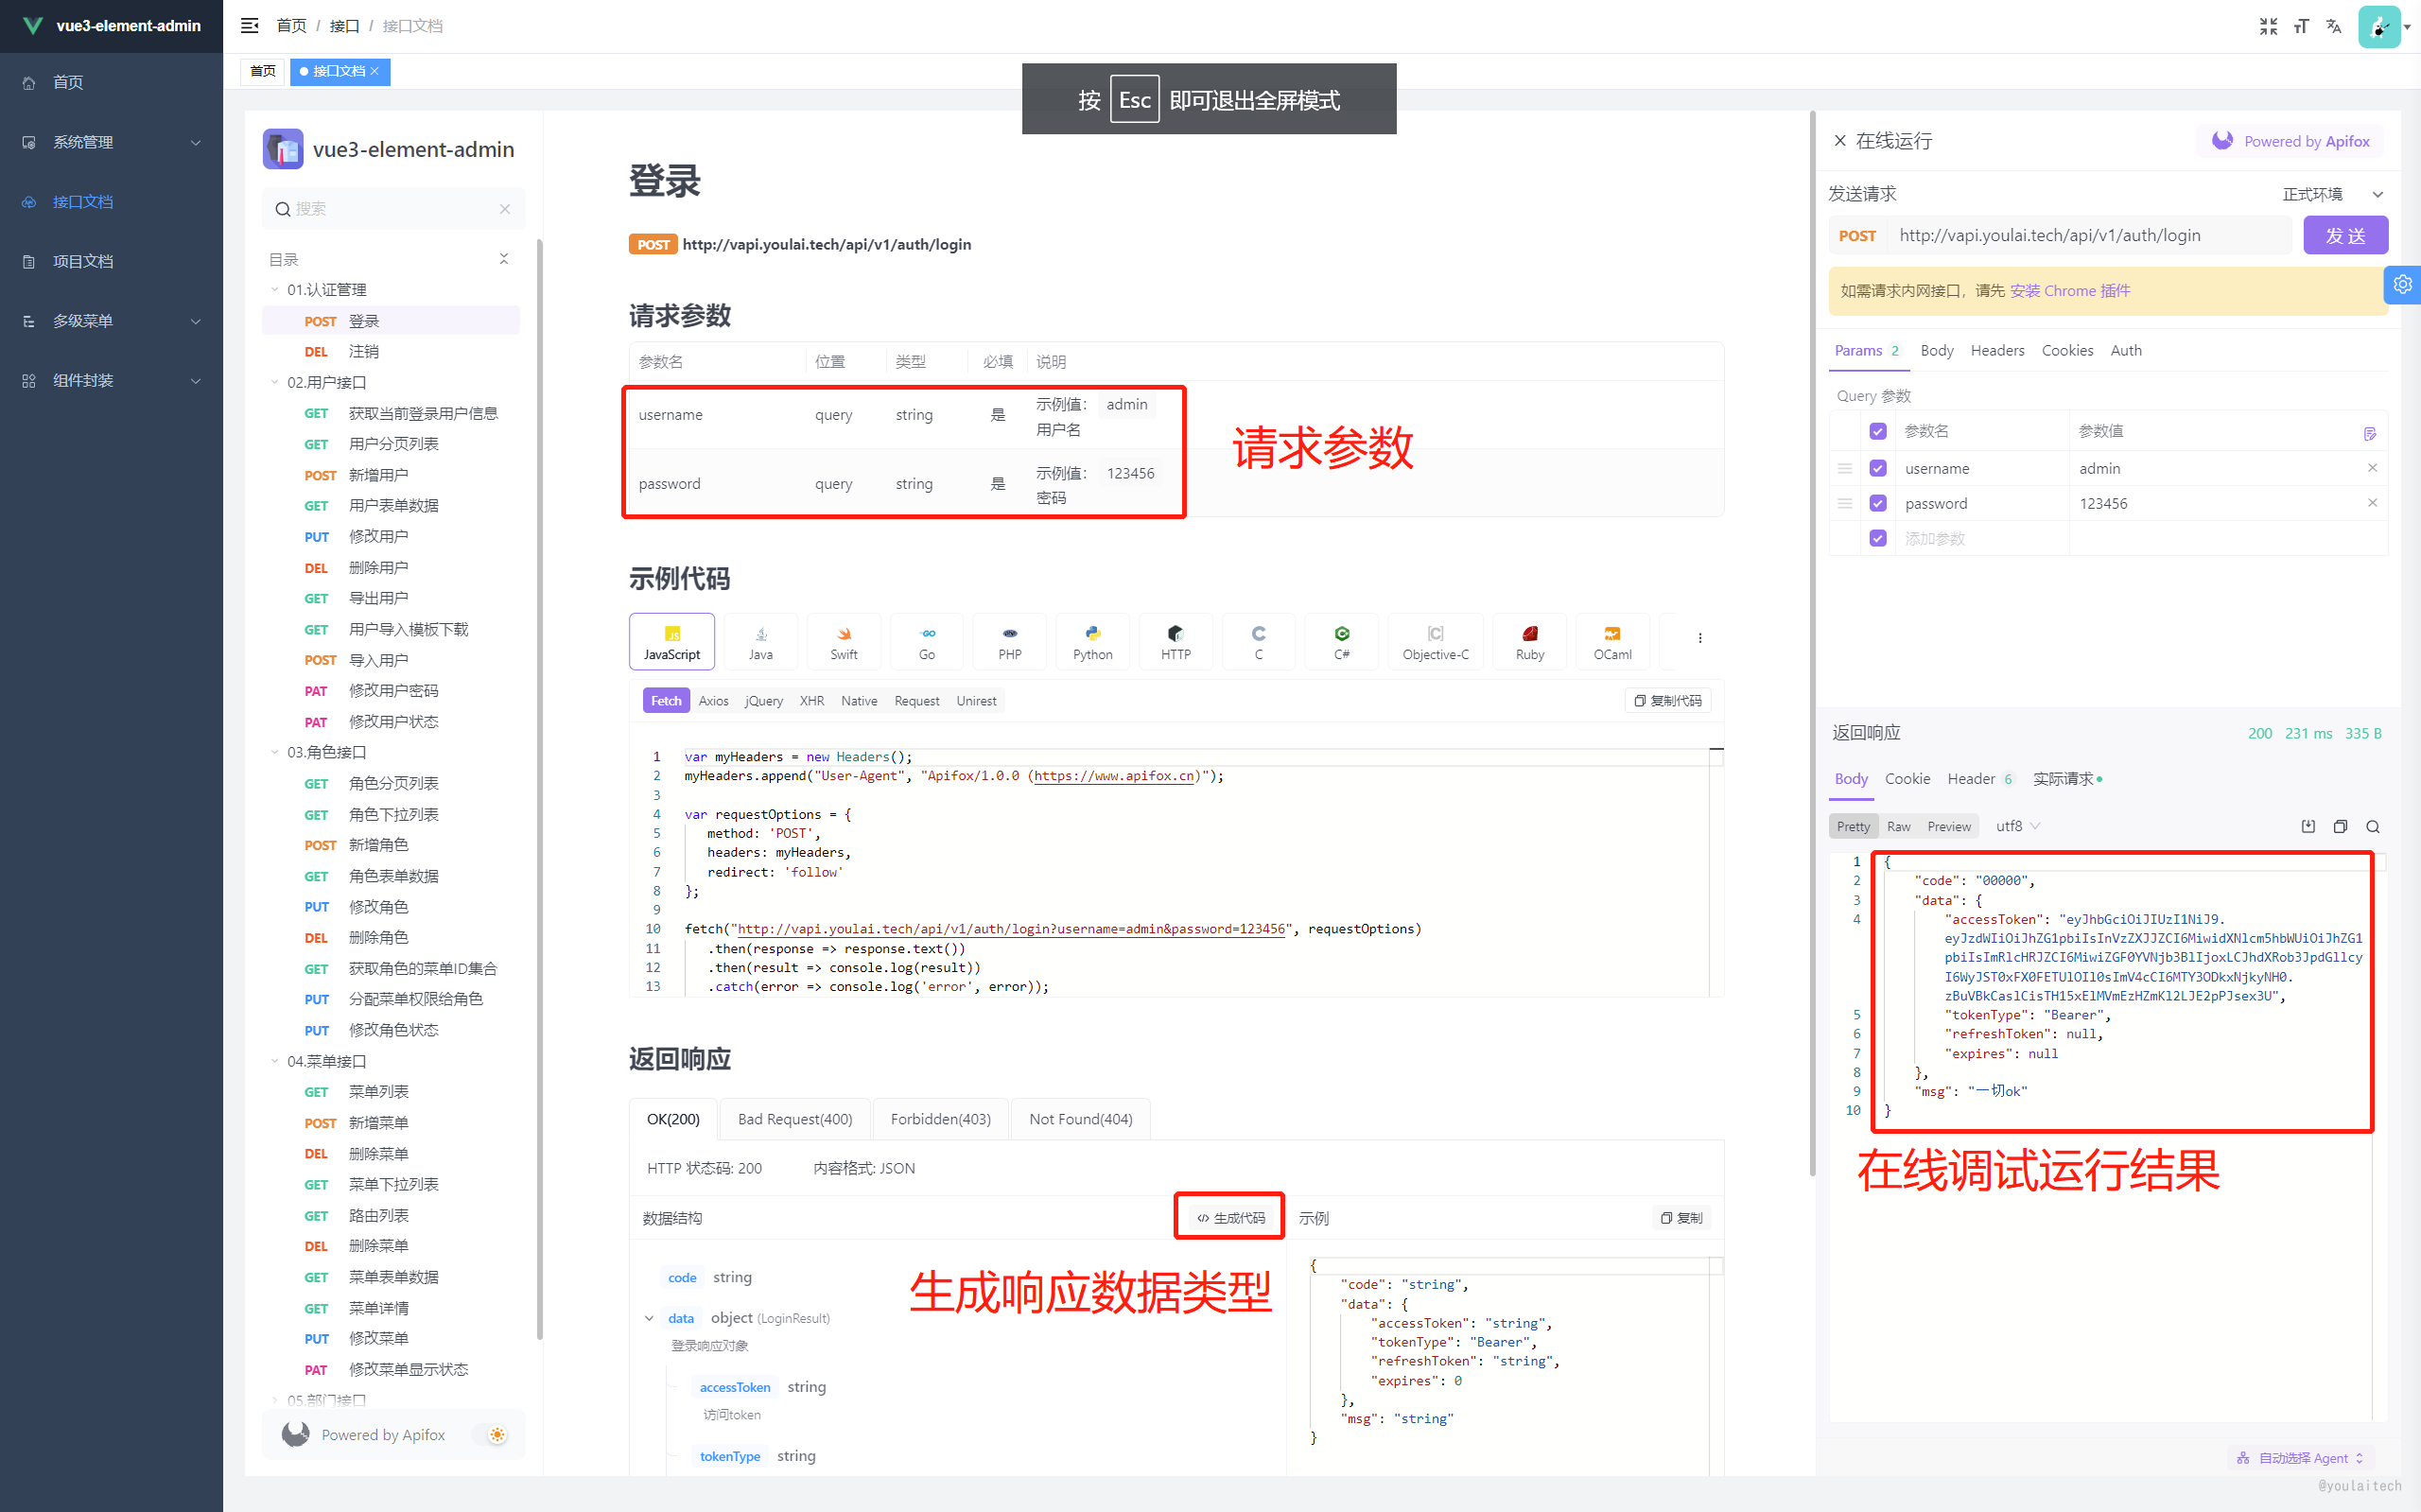
点击 生成代码 获取登录响应数据 TypeScript 类型定义
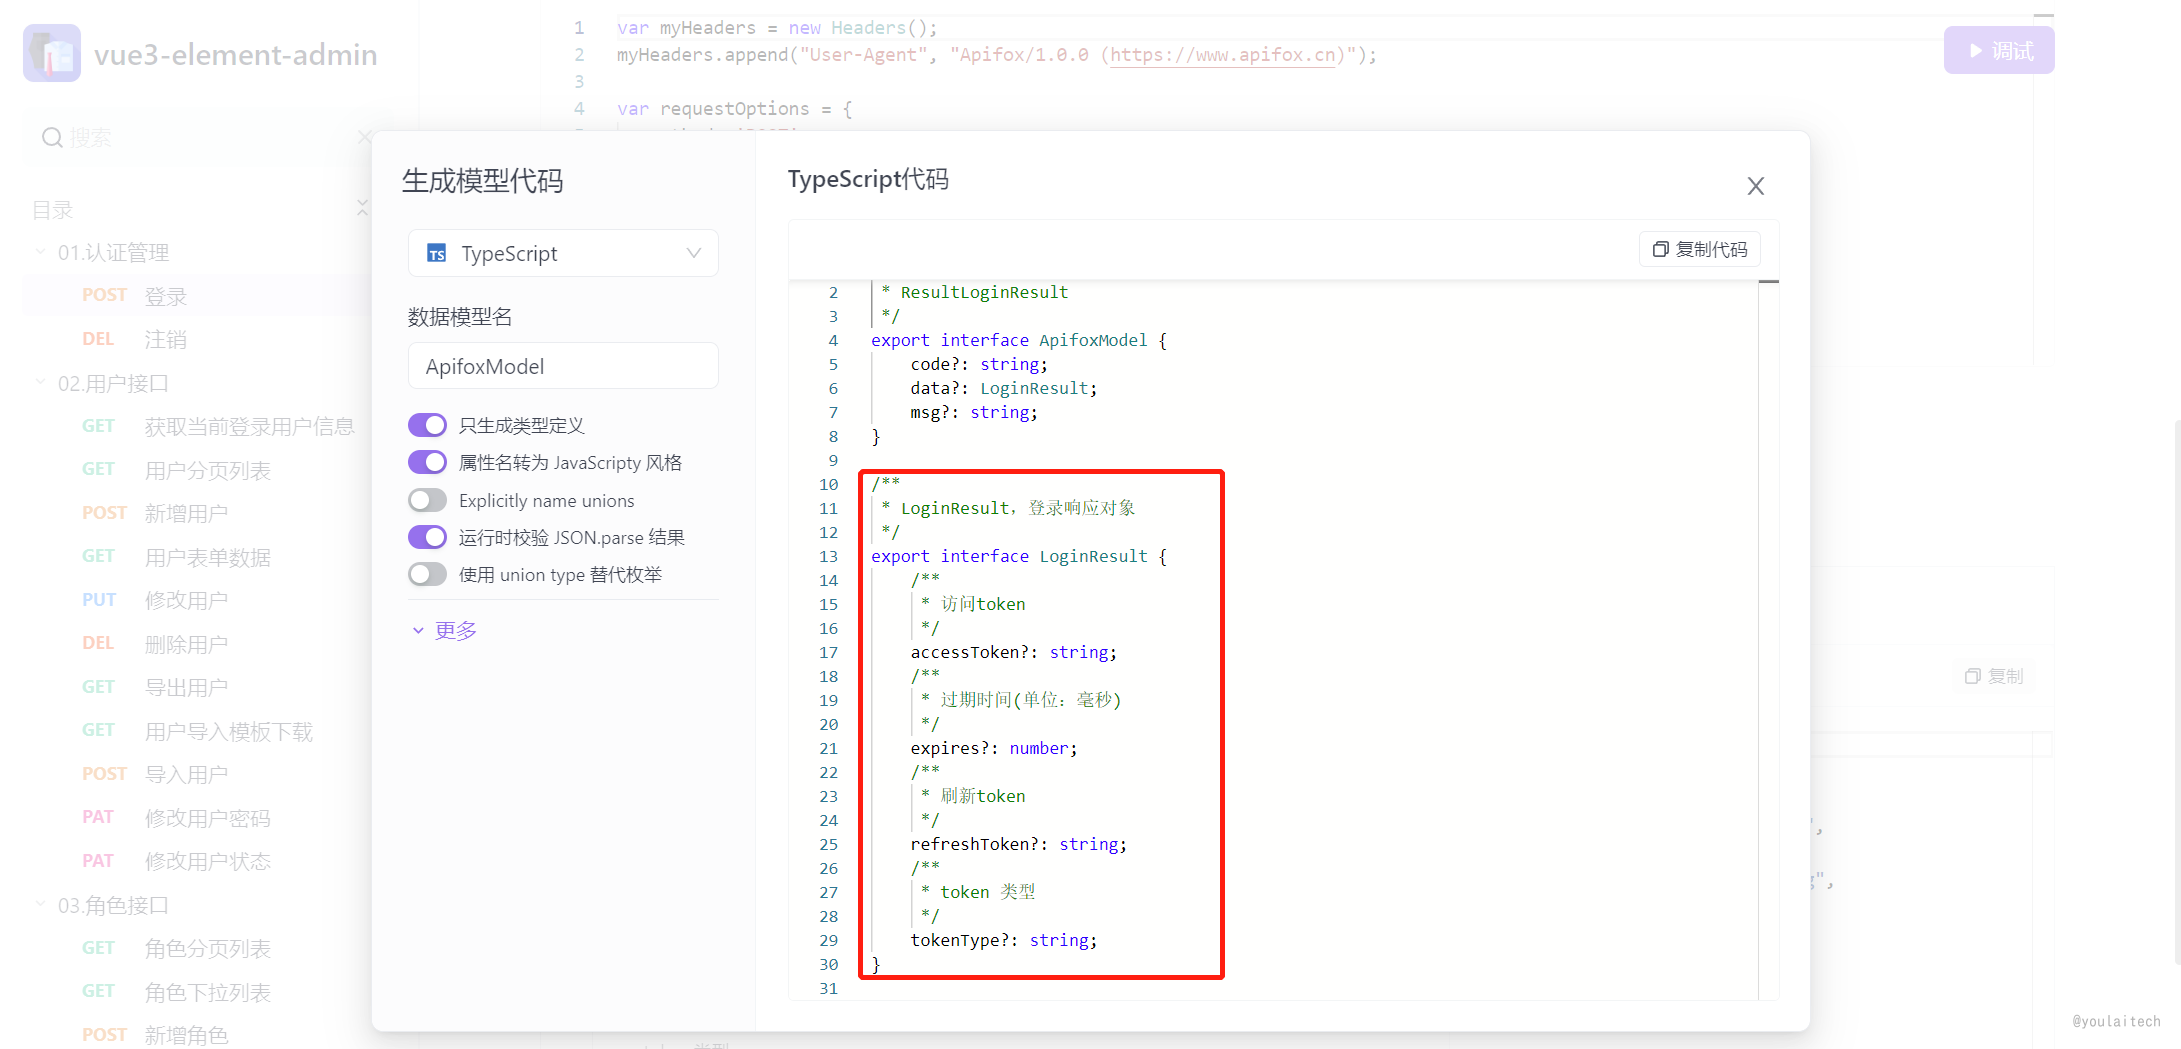
将类型定义复制到 src/api/auth/types.ts 文件中
/** * 登录请求参数 */ export interface LoginData { /** * 用户名 */ username: string; /** * 密码 */ password: string; } /** * 登录响应 */ export interface LoginResult { /** * 访问token */ accessToken?: string; /** * 过期时间(单位:毫秒) */ expires?: number; /** * 刷新token */ refreshToken?: string; /** * token 类型 */ tokenType?: string; }登录 API 定义
// src/api/auth/index.ts import request from '@/utils/request'; import { AxiosPromise } from 'axios'; import { LoginData, LoginResult } from './types'; /** * 登录API * * @param data {LoginData} * @returns */ export function loginApi(data: LoginData): AxiosPromise<LoginResult> { return request({ url: '/api/v1/auth/login', method: 'post', params: data }); }登录 API 调用
// src/store/modules/user.ts import { loginApi } from '@/api/auth'; import { LoginData } from '@/api/auth/types'; /** * 登录调用 * * @param {LoginData} * @returns */ function login(loginData: LoginData) { return new Promise<void>((resolve, reject) => { loginApi(loginData) .then(response => { const { tokenType, accessToken } = response.data; token.value = tokenType + ' ' + accessToken; // Bearer eyJhbGciOiJIUzI1NiJ9.xxx.xxx resolve(); }) .catch(error => { reject(error); }); }); }动态路由
安装 vue-router
npm install vue-router@next
路由实例
创建路由实例,顺带初始化静态路由,而动态路由需要用户登录,根据用户拥有的角色进行权限校验后进行初始化
// src/router/index.ts import { createRouter, createWebHashHistory, RouteRecordRaw } from 'vue-router'; export const Layout = () => import('@/layout/index.vue'); // 静态路由 export const constantRoutes: RouteRecordRaw[] = [ { path: '/redirect', component: Layout, meta: { hidden: true }, children: [ { path: '/redirect/:path(.*)', component: () => import('@/views/redirect/index.vue') } ] }, { path: '/login', component: () => import('@/views/login/index.vue'), meta: { hidden: true } }, { path: '/', component: Layout, redirect: '/dashboard', children: [ { path: 'dashboard', component: () => import('@/views/dashboard/index.vue'), name: 'Dashboard', meta: { title: 'dashboard', icon: 'homepage', affix: true } } ] } ]; /** * 创建路由 */ const router = createRouter({ history: createWebHashHistory(), routes: constantRoutes as RouteRecordRaw[], // 刷新时,滚动条位置还原 scrollBehavior: () => ({ left: 0, top: 0 }) }); /** * 重置路由 */ export function resetRouter() { router.replace({ path: '/login' }); location.reload(); } export default router;全局注册路由实例
// main.ts import router from "@/router"; app.use(router).mount('#app')动态权限路由
路由守卫 src/permission.ts ,获取当前登录用户的角色信息进行动态路由的初始化
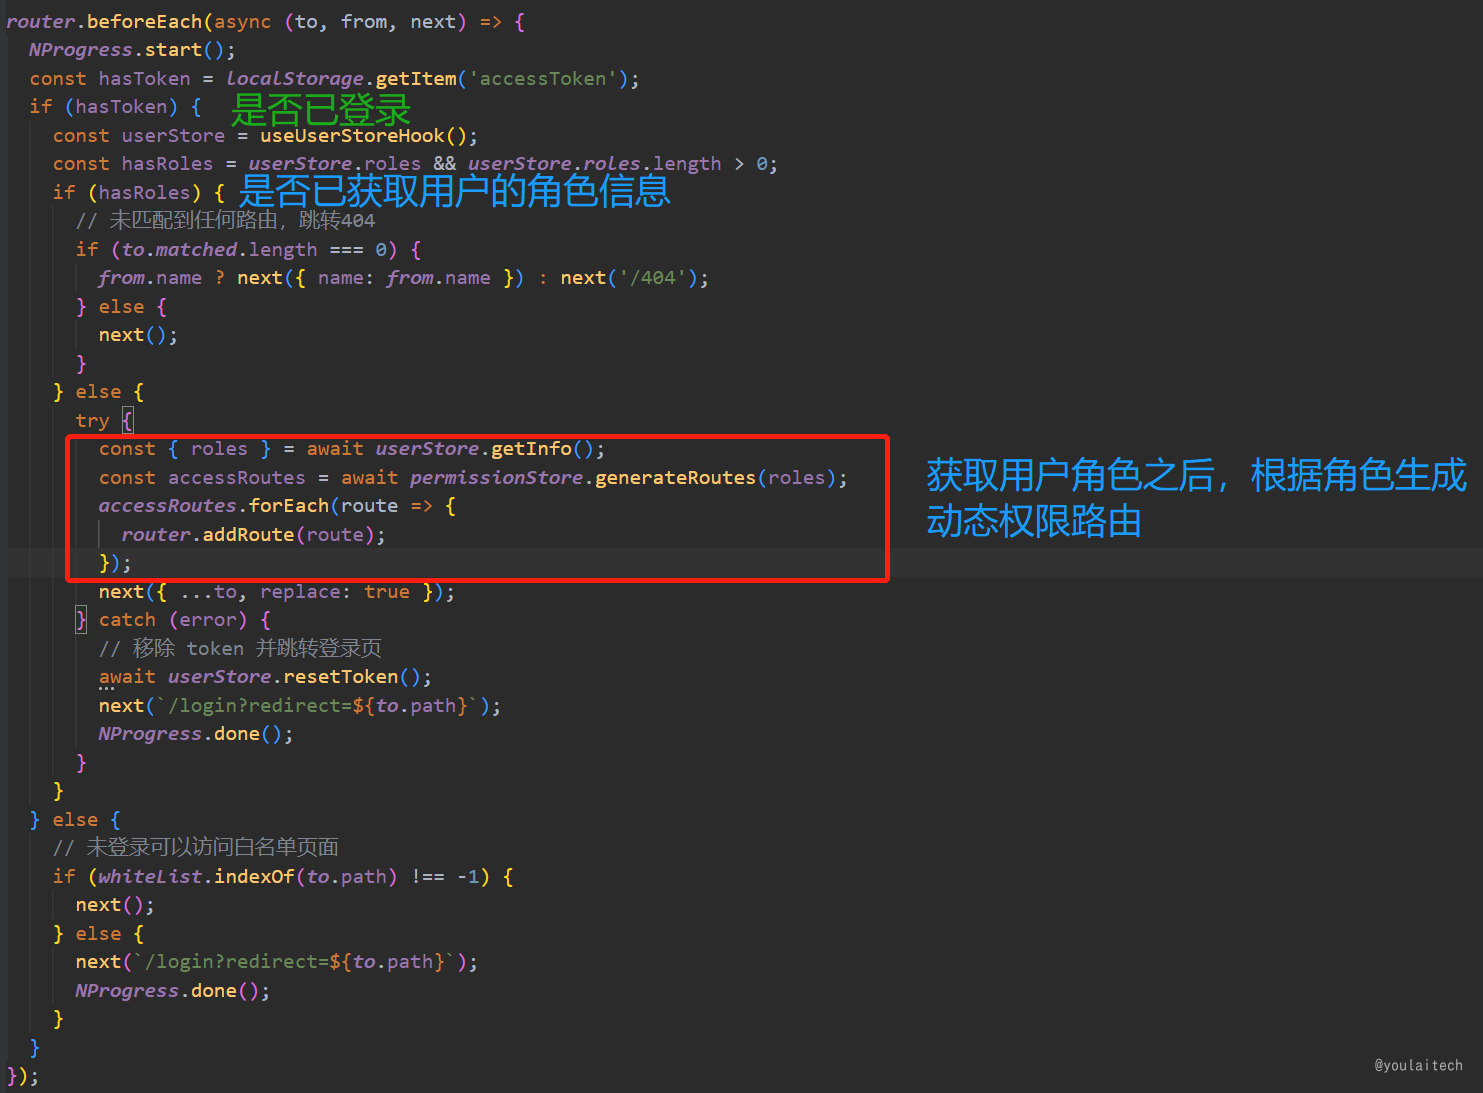
最终调用 permissionStore.generateRoutes(roles) 方法生成动态路由
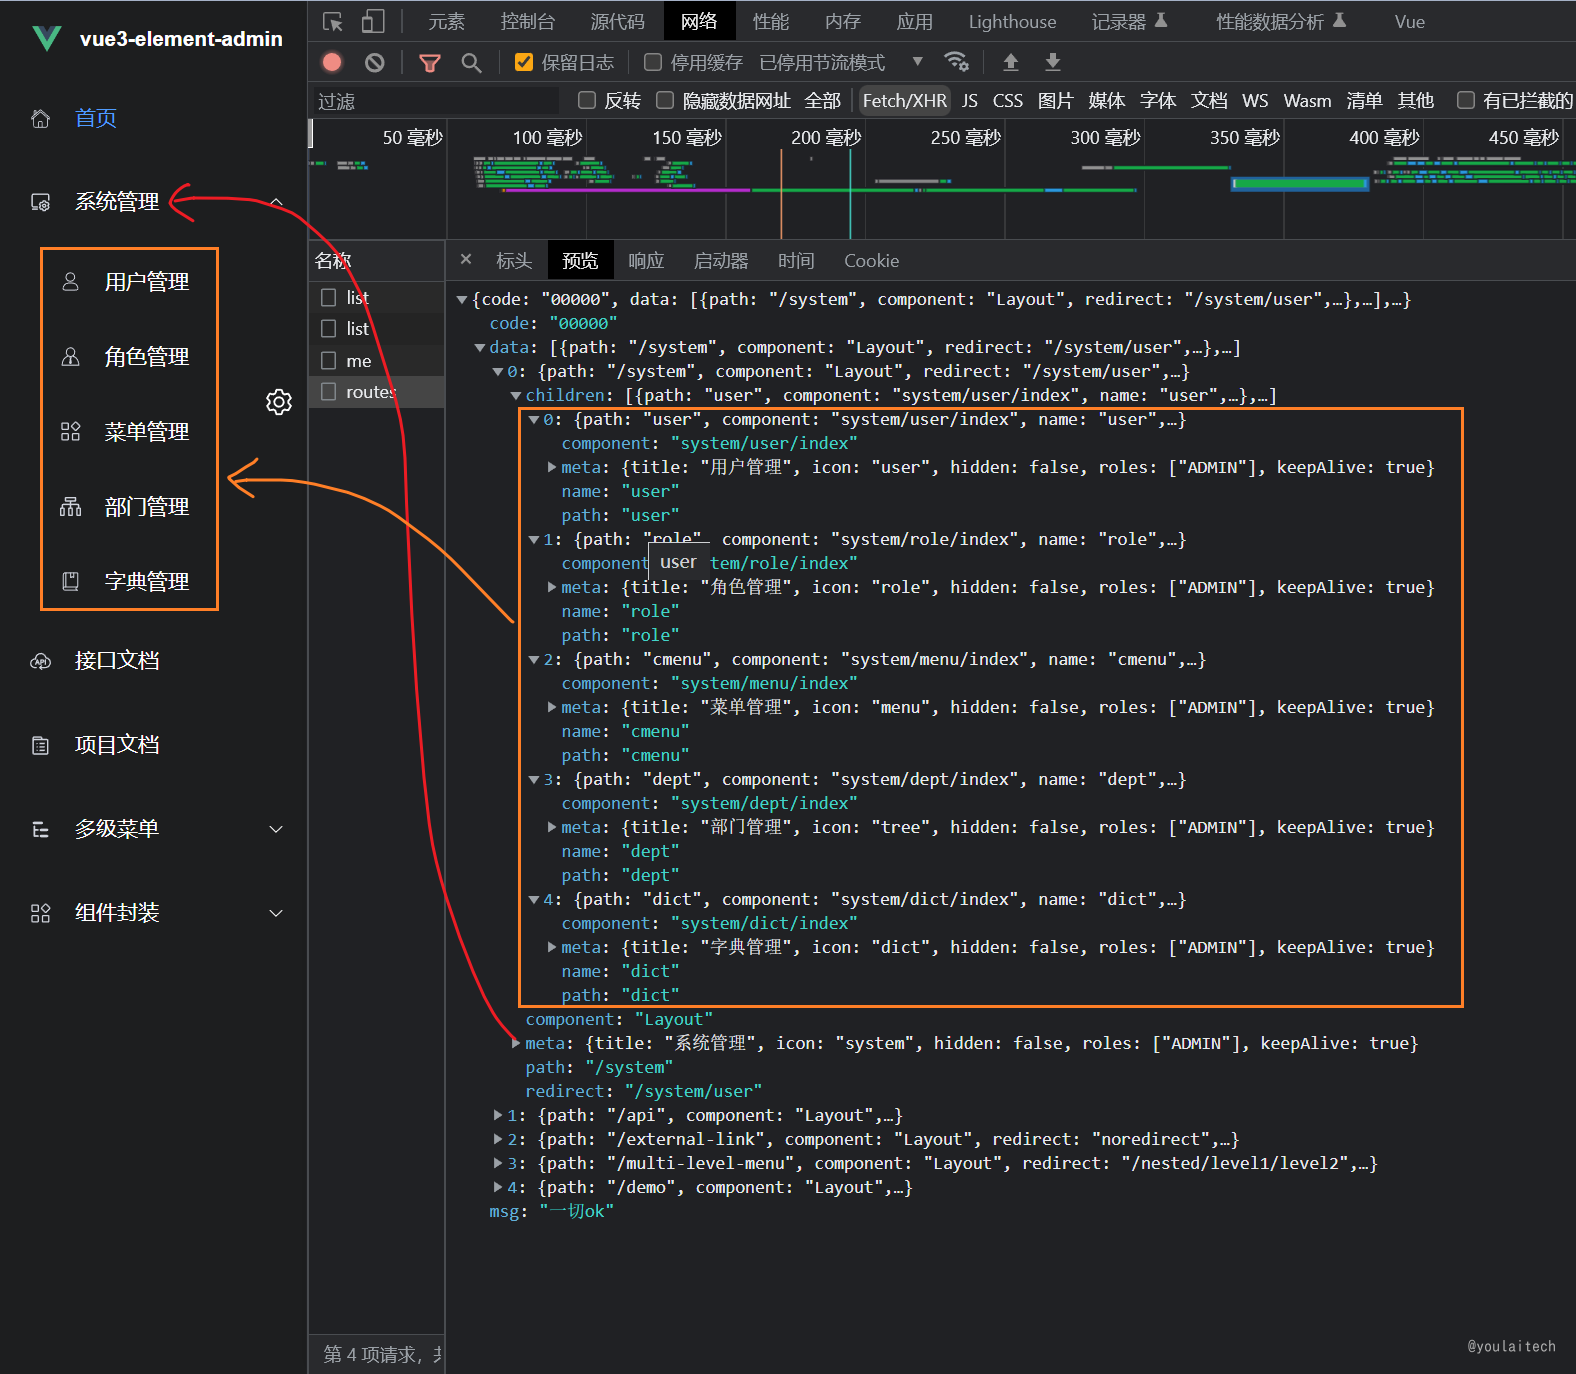
// src/store/modules/permission.ts import { listRoutes } from '@/api/menu'; export const usePermissionStore = defineStore('permission', () => { const routes = ref<RouteRecordRaw[]>([]); function setRoutes(newRoutes: RouteRecordRaw[]) { routes.value = constantRoutes.concat(newRoutes); } /** * 生成动态路由 * * @param roles 用户角色集合 * @returns */ function generateRoutes(roles: string[]) { return new Promise<RouteRecordRaw[]>((resolve, reject) => { // 接口获取所有路由 listRoutes() .then(({ data: asyncRoutes }) => { // 根据角色获取有访问权限的路由 const accessedRoutes = filterAsyncRoutes(asyncRoutes, roles); setRoutes(accessedRoutes); resolve(accessedRoutes); }) .catch(error => { reject(error); }); }); } // 导出 store 的动态路由数据 routes return { routes, setRoutes, generateRoutes }; });接口获取得到的路由数据
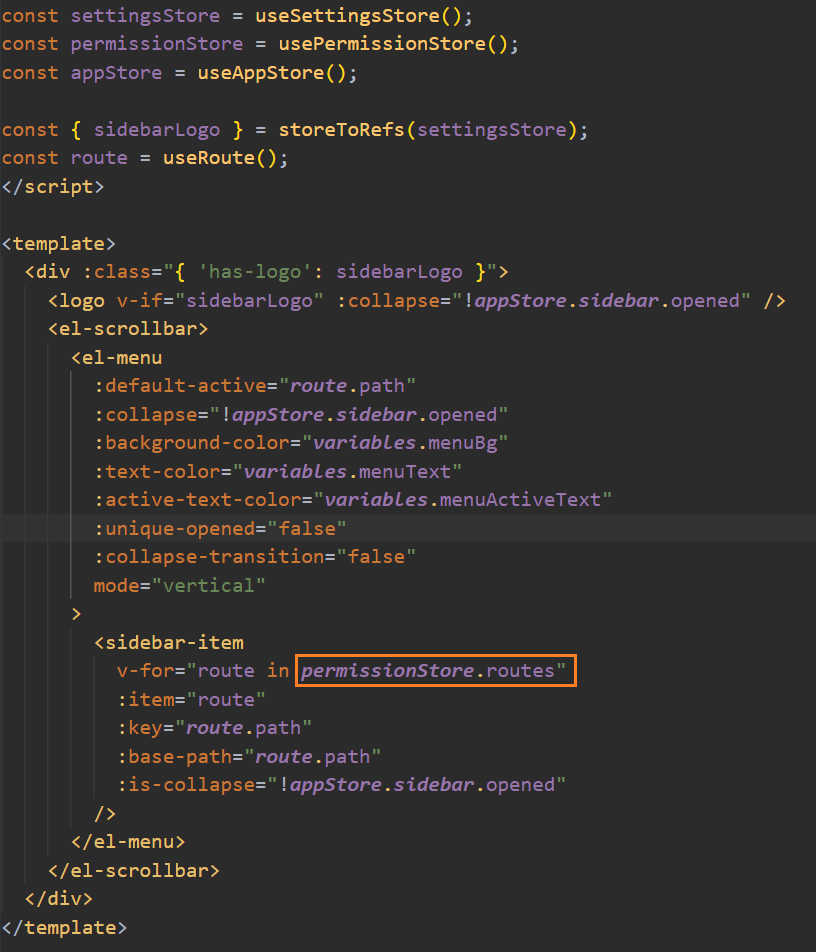
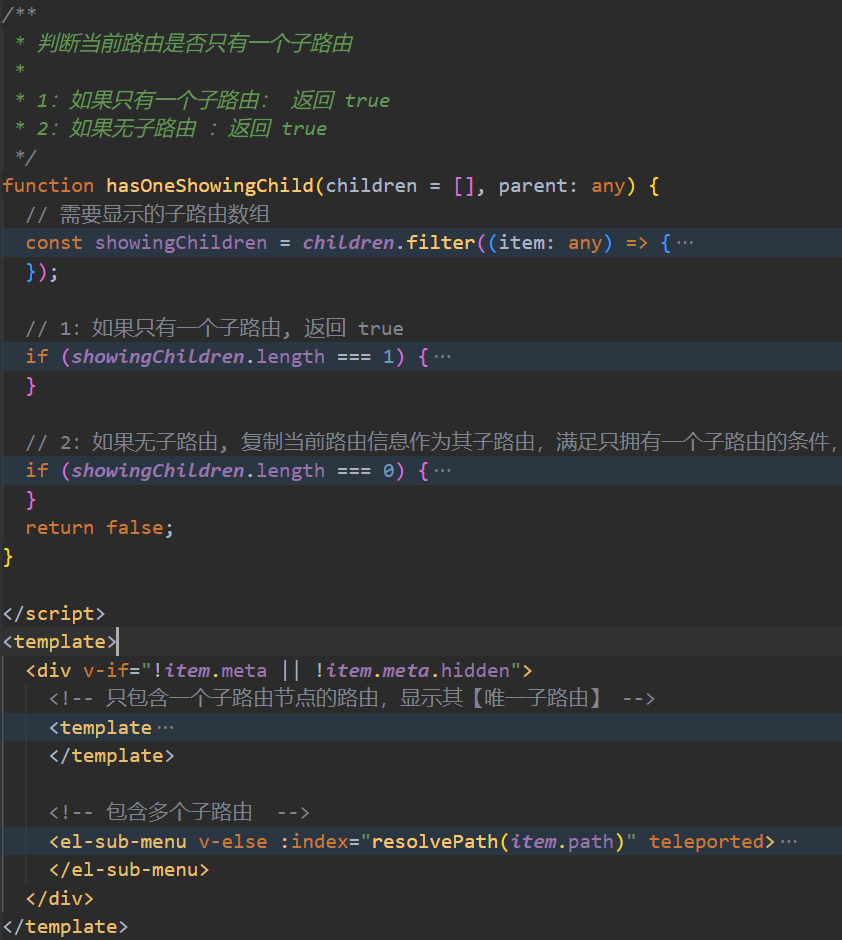
根据路由数据 (routes)生成菜单的关键代码
| src/layout/componets/Sidebar/index.vue | src/layout/componets/Sidebar/SidebarItem.vue |
|---|---|
 |  |
按钮权限
除了 Vue 内置的一系列指令 (比如 v-model 或 v-show) 之外,Vue 还允许你注册自定义的指令 (Custom Directives),以下就通过自定义指令的方式实现按钮权限控制。
**自定义指令 **
// src/directive/permission/index.ts import { useUserStoreHook } from '@/store/modules/user'; import { Directive, DirectiveBinding } from 'vue'; /** * 按钮权限 */ export const hasPerm: Directive = { mounted(el: HTMLElement, binding: DirectiveBinding) { // 「超级管理员」拥有所有的按钮权限 const { roles, perms } = useUserStoreHook(); if (roles.includes('ROOT')) { return true; } // 「其他角色」按钮权限校验 const { value } = binding; if (value) { const requiredPerms = value; // DOM绑定需要的按钮权限标识 const hasPerm = perms?.some(perm => { return requiredPerms.includes(perm); }); if (!hasPerm) { el.parentNode && el.parentNode.removeChild(el); } } else { throw new Error( "need perms! Like v-has-perm=\"['sys:user:add','sys:user:edit']\"" ); } } };全局注册自定义指令
// src/directive/index.ts import type { App } from 'vue'; import { hasPerm } from './permission'; // 全局注册 directive 方法 export function setupDirective(app: App<Element>) { // 使 v-hasPerm 在所有组件中都可用 app.directive('hasPerm', hasPerm); }// src/main.ts import { setupDirective } from '@/directive'; const app = createApp(App); // 全局注册 自定义指令(directive) setupDirective(app);组件使用自定义指令
// src/views/system/user/index.vue <el-button v-hasPerm="['sys:user:add']">新增</el-button> <el-button v-hasPerm="['sys:user:delete']">删除</el-button>
国际化
国际化分为两个部分,Element Plus 框架国际化(官方提供了国际化方式)和自定义国际化(通过 vue-i18n 国际化插件)
Element Plus 国际化
简单的使用方式请参考 Element Plus 官方文档-国际化示例,以下介绍 vue3-element-admin 整合 pinia 实现国际化语言切换。
Element Plus 提供了一个 Vue 组件 ConfigProvider 用于全局配置国际化的设置。
<!-- src/App.vue --> <script setup> import { ElConfigProvider } from 'element-plus'; import { useAppStore } from '@/store/modules/app'; const appStore = useAppStore(); </script> <template> <el-config-provider :locale="appStore.locale" > <router-view /> </el-config-provider> </template>定义 store
// src/store/modules/app.ts import { defineStore } from 'pinia'; import { useStorage } from '@vueuse/core'; import defaultSettings from '@/settings'; // 导入 Element Plus 中英文语言包 import zhCn from 'element-plus/es/locale/lang/zh-cn'; import en from 'element-plus/es/locale/lang/en'; // setup export const useAppStore = defineStore('app', () => { const language = useStorage('language', defaultSettings.language); /** * 根据语言标识读取对应的语言包 */ const locale = computed(() => { if (language?.value == 'en') { return en; } else { return zhCn; } }); /** * 切换语言 */ function changeLanguage(val: string) { language.value = val; } return { language, locale, changeLanguage }; });切换语言组件调用
<!-- src/components/LangSelect/index.vue --> <script setup> import { useI18n } from 'vue-i18n'; import SvgIcon from '@/components/SvgIcon/index.vue'; import { useAppStore } from '@/store/modules/app'; const appStore = useAppStore(); const { locale } = useI18n(); function handleLanguageChange(lang: string) { locale.value = lang; appStore.changeLanguage(lang); if (lang == 'en') { ElMessage.success('Switch Language Successful!'); } else { ElMessage.success('切换语言成功!'); } } </script> <template> <el-dropdown trigger="click" @command="handleLanguageChange"> <div> <svg-icon icon-class="language" /> </div> <template #dropdown> <el-dropdown-menu> <el-dropdown-item :disabled="appStore.language === 'zh-cn'" command="zh-cn" > 中文 </el-dropdown-item> <el-dropdown-item :disabled="appStore.language === 'en'" command="en"> English </el-dropdown-item> </el-dropdown-menu> </template> </el-dropdown> </template>从 Element Plus 分页组件看下国际化的效果


vue-i18n 自定义国际化
i18n 英文全拼 internationalization ,国际化的意思,英文 i 和 n 中间18个英文字母
参考:vue-i18n 官方文档 - installation
安装 vue-i18n
npm install vue-i18n@9
自定义语言包
创建 src/lang/package 语言包目录,存放自定义的语言文件
| 中文语言包 zh-cn.ts | 英文语言包 en.ts |
|---|---|
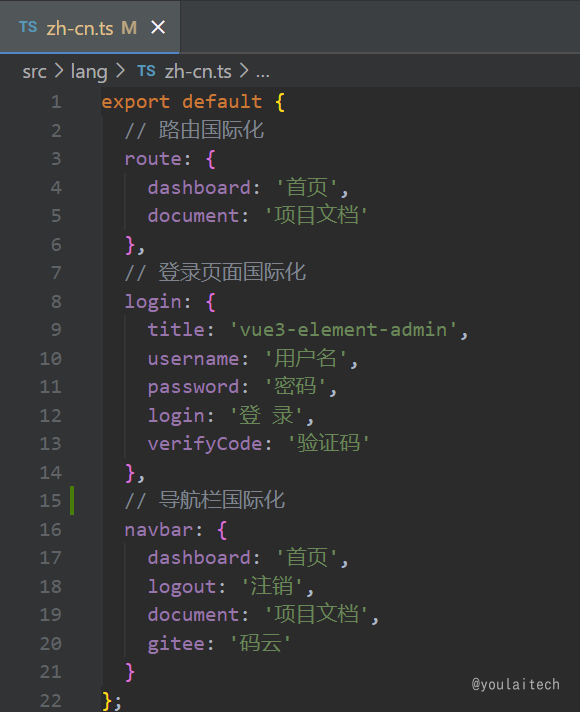 | 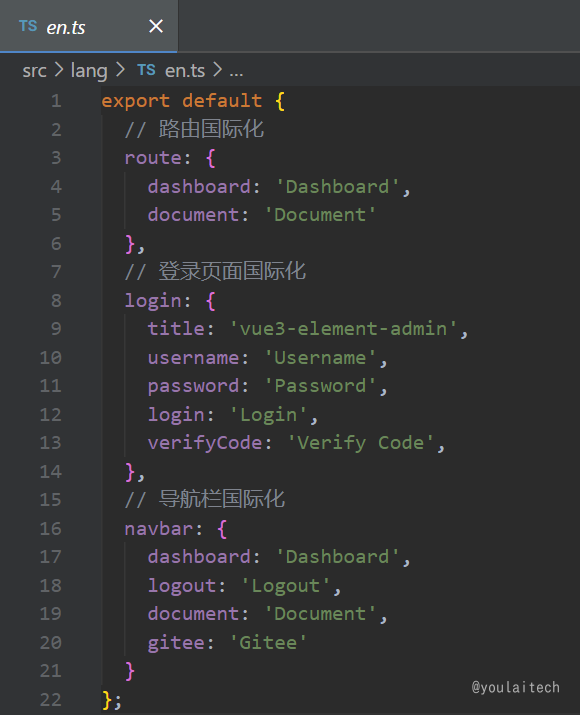 |
创建 i18n 实例
// src/lang/index.ts import { createI18n } from 'vue-i18n'; import { useAppStore } from '@/store/modules/app'; const appStore = useAppStore(); // 本地语言包 import enLocale from './package/en'; import zhCnLocale from './package/zh-cn'; const messages = { 'zh-cn': { ...zhCnLocale }, en: { ...enLocale } }; // 创建 i18n 实例 const i18n = createI18n({ legacy: false, locale: appStore.language, messages: messages }); // 导出 i18n 实例 export default i18n;i18n 全局注册
// main.ts // 国际化 import i18n from '@/lang/index'; app.use(i18n).mount('#app');登录页面国际化使用
$t 是 i18n 提供的根据 key 从语言包翻译对应的 value 方法
<span>{{ $t("login.title") }}</span>在登录页面 src/view/login/index.vue 查看如何使用
效果预览
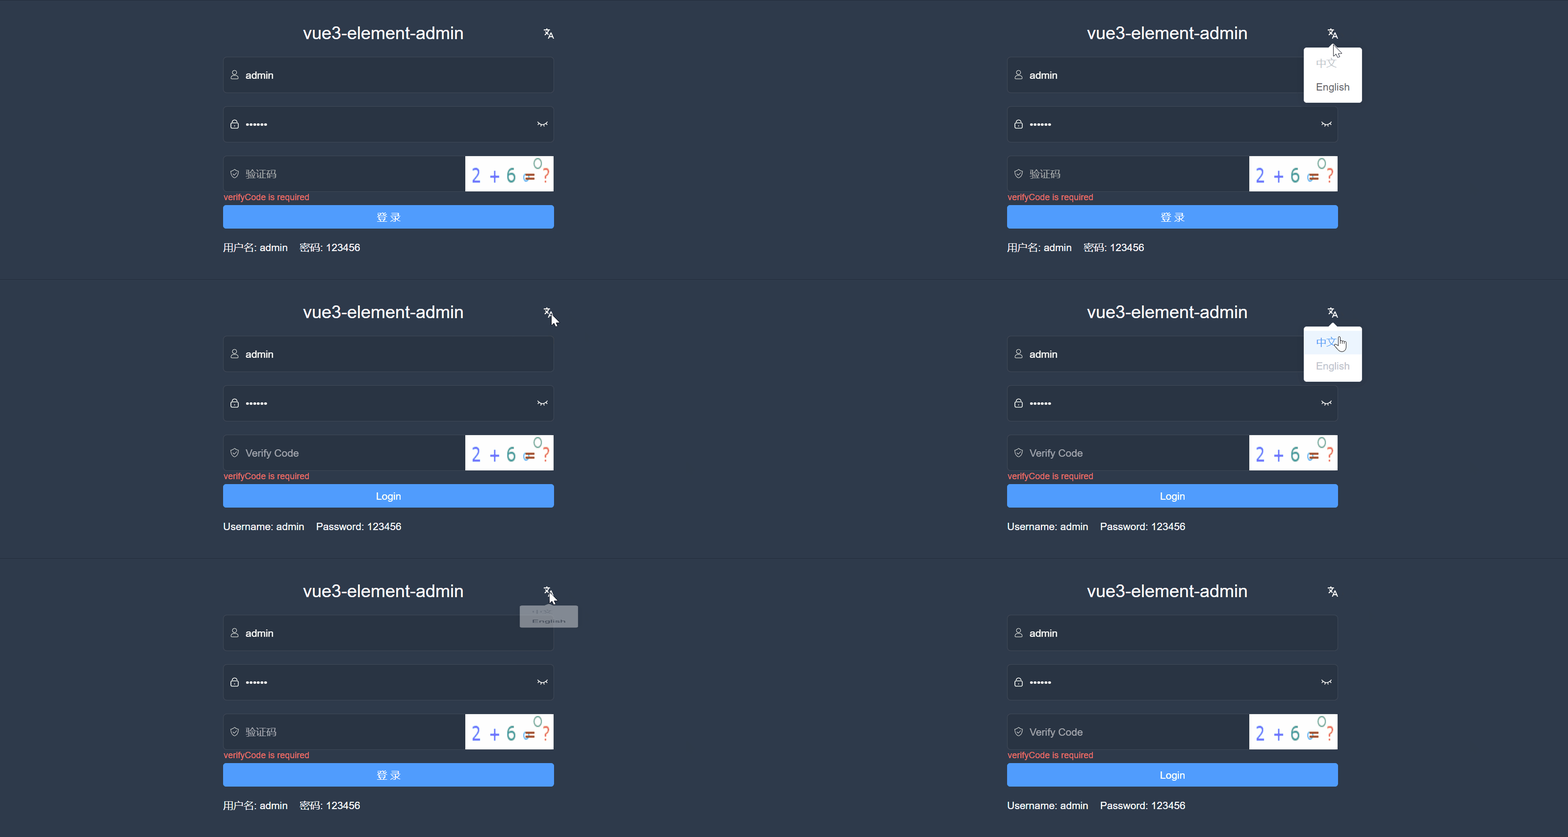
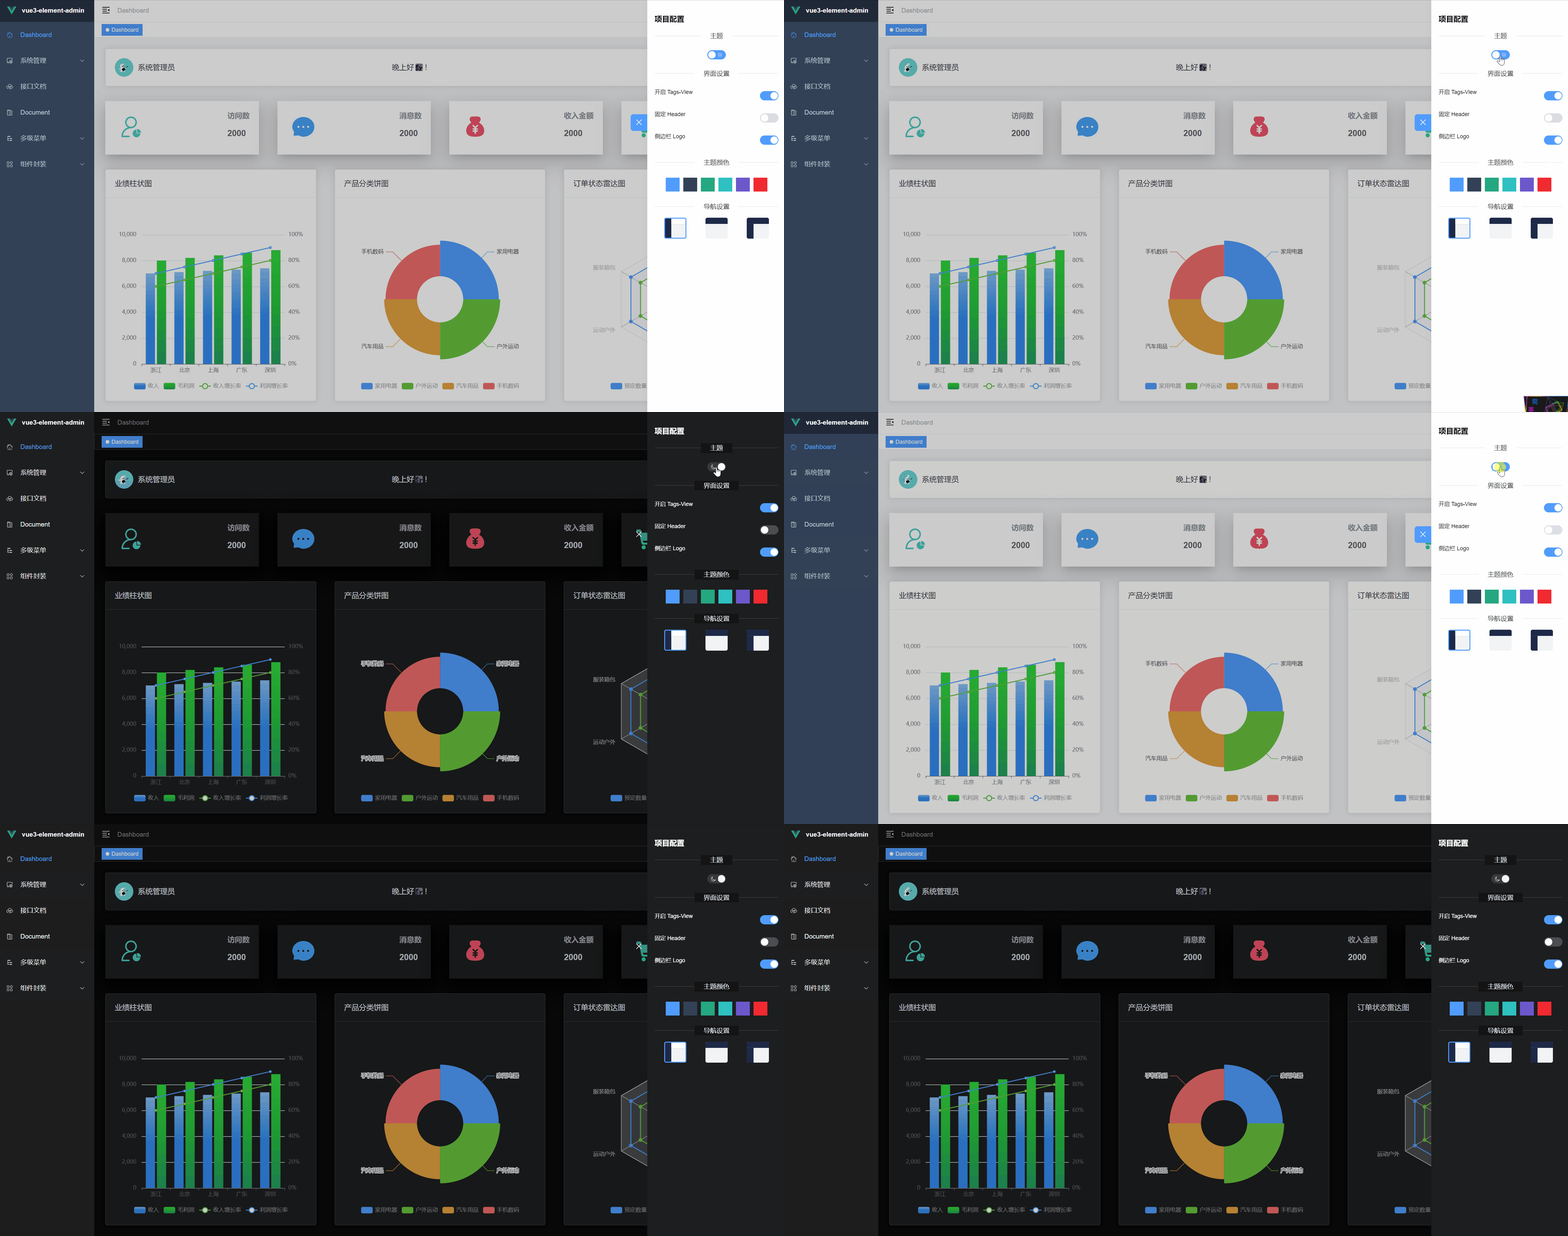
暗黑模式
Element Plus 2.2.0 版本开始支持暗黑模式,启用方式参考 Element Plus 官方文档 - 暗黑模式, 官方也提供了示例 element-plus-vite-starter 模版 。
这里根据官方文档和示例讲述 vue3-element-admin 是如何使用 VueUse 的 useDark 方法实现暗黑模式的动态切换。
导入 Element Plus 暗黑模式变量
// src/main.ts import 'element-plus/theme-chalk/dark/css-vars.css'
切换暗黑模式设置
<!-- src/layout/components/Settings/index.vue --> <script setup> import IconEpSunny from '~icons/ep/sunny'; import IconEpMoon from '~icons/ep/moon'; /** * 暗黑模式 */ const settingsStore = useSettingsStore(); const isDark = useDark(); const toggleDark = () => useToggle(isDark); </script> <template> <div> <h3 class="text-base font-bold">项目配置</h3> <el-divider>主题</el-divider> <div class="flex justify-center" @click.stop> <el-switch v-model="isDark" @change="toggleDark" inline-prompt :active-icon="IconEpMoon" :inactive-icon="IconEpSunny" active-color="var(--el-fill-color-dark)" inactive-color="var(--el-color-primary)" /> </div> </div> </template>
自定义变量
除了 Element Plus 组件样式之外,应用中还有很多自定义的组件和样式,像这样的:
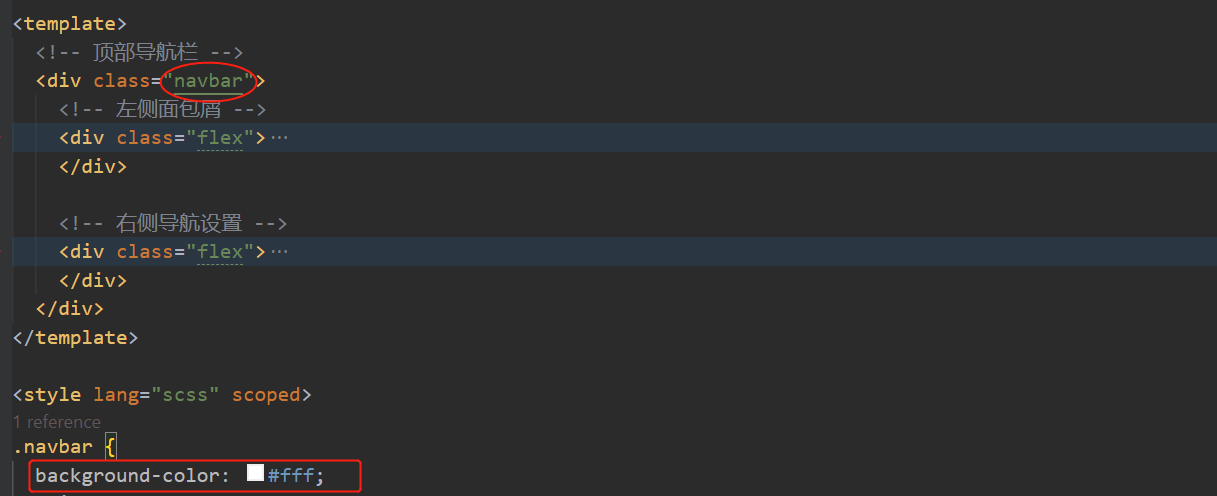
应对自定义组件样式实现暗黑模式步骤如下:
新建 src/styles/dark.scss
html.dark { /* 修改自定义元素的样式 */ .navbar { background-color: #141414; } }在 Element Plus 的样式之后导入它
// main.ts import 'element-plus/theme-chalk/dark/css-vars.css' import '@/styles/dark.scss';
效果预览
组件封装
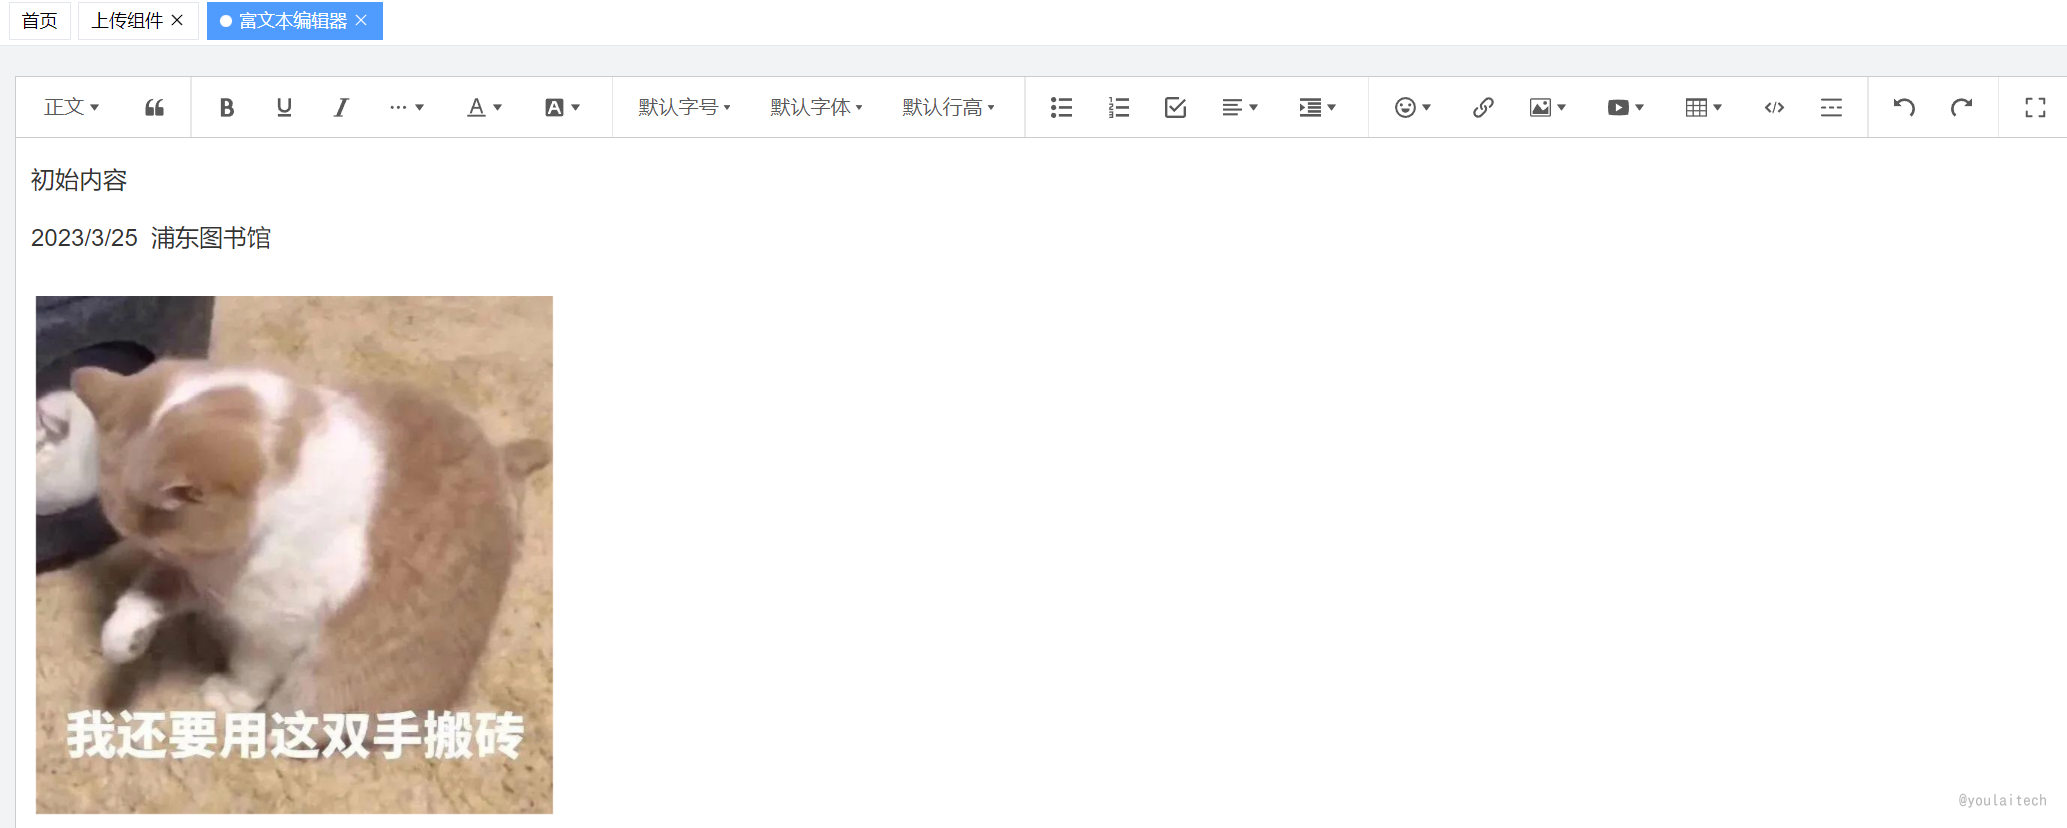
wangEditor 富文本
参考: wangEditor 官方文档
安装 wangEditor
npm install @wangeditor/editor @wangeditor/editor-for-vue@next
wangEditor 组件封装
<!-- src/components/WangEditor/index.vue --> <template> <div style="border: 1px solid #ccc"> <!-- 工具栏 --> <Toolbar :editor="editorRef" :defaultConfig="toolbarConfig" style="border-bottom: 1px solid #ccc" :mode="mode" /> <!-- 编辑器 --> <Editor :defaultConfig="editorConfig" v-model="defaultHtml" @onChange="handleChange" style="height: 500px; overflow-y: hidden" :mode="mode" @onCreated="handleCreated" /> </div> </template> <script setup lang="ts"> import { Editor, Toolbar } from "@wangeditor/editor-for-vue"; // API 引用 import { uploadFileApi } from "@/api/file"; const props = defineProps({ modelValue: { type: [String], default: "", }, }); const emit = defineEmits(["update:modelValue"]); const defaultHtml = useVModel(props, "modelValue", emit); const editorRef = shallowRef(); // 编辑器实例,必须用 shallowRef const mode = ref("default"); // 编辑器模式 const toolbarConfig = ref({}); // 工具条配置 // 编辑器配置 const editorConfig = ref({ placeholder: "请输入内容...", MENU_CONF: { uploadImage: { // 自定义图片上传 async customUpload(file: any, insertFn: any) { uploadFileApi(file).then((response) => { const url = response.data.url; insertFn(url); }); }, }, }, }); const handleCreated = (editor: any) => { editorRef.value = editor; // 记录 editor 实例,重要! }; function handleChange(editor: any) { emit("update:modelValue", editor.getHtml()); } // 组件销毁时,也及时销毁编辑器 onBeforeUnmount(() => { const editor = editorRef.value; if (editor == null) return; editor.destroy(); }); </script> <style src="@wangeditor/editor/dist/css/style.css"></style>使用案例
<!-- wangEditor富文本编辑器示例 --> <script setup lang="ts"> import Editor from '@/components/WangEditor/index.vue'; const value = ref('初始内容'); </script> <template> <div class="app-container"> <editor v-model="value" style="height: 600px" /> </div> </template>效果预览
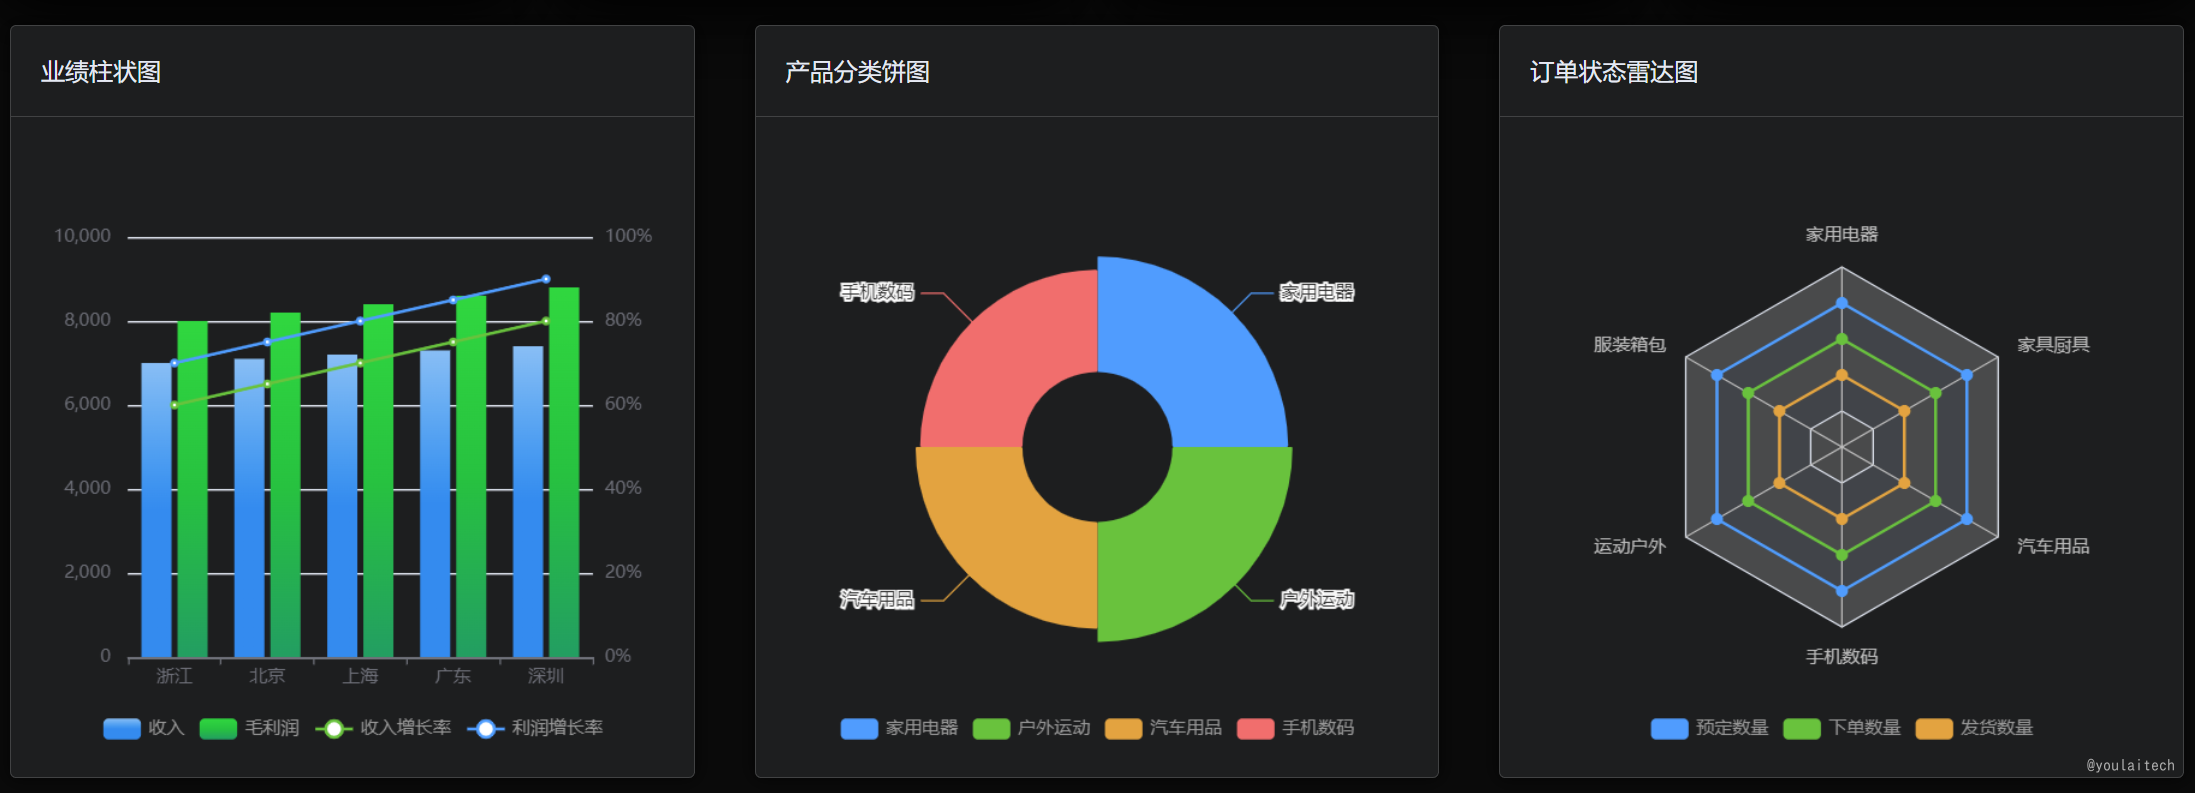
Echarts 图表
安装 Echarts
npm install echarts
组件封装
<!-- src/views/dashboard/components/Chart/BarChart.vue --> <template> <el-card> <template #header> 线 + 柱混合图 </template> <div :id="id" :class="className" :style="{ height, width }" /> </el-card> </template> <script setup lang="ts"> import * as echarts from 'echarts'; const props = defineProps({ id: { type: String, default: 'barChart' }, className: { type: String, default: '' }, width: { type: String, default: '200px', required: true }, height: { type: String, default: '200px', required: true } }); const options = { grid: { left: '2%', right: '2%', bottom: '10%', containLabel: true }, tooltip: { trigger: 'axis', axisPointer: { type: 'cross', crossStyle: { color: '#999' } } }, legend: { x: 'center', y: 'bottom', data: ['收入', '毛利润', '收入增长率', '利润增长率'], textStyle: { color: '#999' } }, xAxis: [ { type: 'category', data: ['浙江', '北京', '上海', '广东', '深圳'], axisPointer: { type: 'shadow' } } ], yAxis: [ { type: 'value', min: 0, max: 10000, interval: 2000, axisLabel: { formatter: '{value} ' } }, { type: 'value', min: 0, max: 100, interval: 20, axisLabel: { formatter: '{value}%' } } ], series: [ { name: '收入', type: 'bar', data: [7000, 7100, 7200, 7300, 7400], barWidth: 20, itemStyle: { color: new echarts.graphic.LinearGradient(0, 0, 0, 1, [ { offset: 0, color: '#83bff6' }, { offset: 0.5, color: '#188df0' }, { offset: 1, color: '#188df0' } ]) } }, { name: '毛利润', type: 'bar', data: [8000, 8200, 8400, 8600, 8800], barWidth: 20, itemStyle: { color: new echarts.graphic.LinearGradient(0, 0, 0, 1, [ { offset: 0, color: '#25d73c' }, { offset: 0.5, color: '#1bc23d' }, { offset: 1, color: '#179e61' } ]) } }, { name: '收入增长率', type: 'line', yAxisIndex: 1, data: [60, 65, 70, 75, 80], itemStyle: { color: '#67C23A' } }, { name: '利润增长率', type: 'line', yAxisIndex: 1, data: [70, 75, 80, 85, 90], itemStyle: { color: '#409EFF' } } ] }; onMounted(() => { // 图表初始化 const chart = echarts.init( document.getElementById(props.id) as HTMLDivElement ); chart.setOption(options); // 大小自适应 window.addEventListener('resize', () => { chart.resize(); }); }); </script>组件使用
<script setup lang="ts"> import BarChart from './components/BarChart.vue'; </script> <template> <BarChart id="barChart" height="400px"width="300px" /> </template>
效果预览
图标选择器
组件封装
<!-- src/components/IconSelect/index.vue --> <script setup lang="ts"> const props = defineProps({ modelValue: { type: String, require: false } }); const emit = defineEmits(['update:modelValue']); const inputValue = toRef(props, 'modelValue'); const visible = ref(false); // 弹窗显示状态 const iconNames: string[] = []; // 所有的图标名称集合 const filterValue = ref(''); // 筛选的值 const filterIconNames = ref<string[]>([]); // 过滤后的图标名称集合 const iconSelectorRef = ref(null); /** * 加载 ICON */ function loadIcons() { const icons = import.meta.glob('../../assets/icons/*.svg'); for (const icon in icons) { const iconName = icon.split('assets/icons/')[1].split('.svg')[0]; iconNames.push(iconName); } filterIconNames.value = iconNames; } /** * 筛选图标 */ function handleFilter() { if (filterValue.value) { filterIconNames.value = iconNames.filter(iconName => iconName.includes(filterValue.value) ); } else { filterIconNames.value = iconNames; } } /** * 选择图标 */ function handleSelect(iconName: string) { emit('update:modelValue', iconName); visible.value = false; } /** * 点击容器外的区域关闭弹窗 VueUse onClickOutside */ onClickOutside(iconSelectorRef, () => (visible.value = false)); onMounted(() => { loadIcons(); }); </script> <template> <div class="iconselect-container" ref="iconSelectorRef"> <el-input v-model="inputValue" readonly @click="visible = !visible" placeholder="点击选择图标" > <template #prepend> <svg-icon :icon-class="inputValue" /> </template> </el-input> <el-popover shadow="none" :visible="visible" placement="bottom-end" trigger="click" width="400" > <template #reference> <div @click="visible = !visible" class="cursor-pointer text-[#999] absolute right-[10px] top-0 height-[32px] leading-[32px]" > <i-ep-caret-top v-show="visible"></i-ep-caret-top> <i-ep-caret-bottom v-show="!visible"></i-ep-caret-bottom> </div> </template> <!-- 下拉选择弹窗 --> <el-input class="p-2" v-model="filterValue" placeholder="搜索图标" clearable @input="handleFilter" /> <el-divider border-style="dashed" /> <el-scrollbar height="300px"> <ul class="icon-list"> <li class="icon-item" v-for="(iconName, index) in filterIconNames" :key="index" @click="handleSelect(iconName)" > <el-tooltip :content="iconName" placement="bottom" effect="light"> <svg-icon color="var(--el-text-color-regular)" :icon-class="iconName" /> </el-tooltip> </li> </ul> </el-scrollbar> </el-popover> </div> </template>组件使用
<!-- src/views/demo/IconSelect.vue --> <script setup> const iconName = ref('edit'); </script> <template> <div> <icon-select v-model="iconName" /> </div> </template>效果预览

规范配置
代码统一规范
【vue3-element-admin】ESLint+Prettier+Stylelint+EditorConfig 约束和统一前端代码规范
Eslint: JavaScript 语法规则和代码风格检查;
Stylelint: CSS 统一规范和代码检测;
Prettier:全局代码格式化。
Git 提交规范
【vue3-element-admin】Husky + Lint-staged + Commitlint + Commitizen + cz-git 配置 Git 提交规范
Husky + Lint-staged 整合实现 Git 提交前代码规范检测/格式化;
Husky + Commitlint + Commitizen + cz-git 整合实现生成规范化且高度自定义的 Git commit message。
启动部署
项目启动
# 安装 pnpm npm install pnpm -g # 安装依赖 pnpm install # 项目运行 pnpm run dev
项目部署
# 项目打包 pnpm run build:prod
生成的静态文件在工程根目录 dist 文件夹
FAQ
1: defineProps is not defined
问题描述
'defineProps' is not defined.eslint no-undef

解决方案
根据 Eslint 官方解决方案描述,解析器使用
vue-eslint-parserv9.0.0 + 版本
安装
vue-eslint-parser解析器npm install -D vue-eslint-parser

.eslintrc.js关键配置(v9.0.0及以上版本无需配置编译宏vue/setup-compiler-macros)如下 :parser: 'vue-eslint-parser', extends: [ 'eslint:recommended', // ... ],
重启
VSCode已无报错提示
2: Vite 首屏加载慢(白屏久)
问题描述
Vite 项目启动很快,但首次打开界面加载慢?
参考文章:为什么有人说 vite 快,有人却说 vite 慢
vite 启动时,并不像 webpack 那样做一个全量的打包构建,所以启动速度非常快。启动以后,浏览器发起请求时,
Dev Server要把请求需要的资源发送给浏览器,中间需要经历预构建、对请求文件做路径解析、加载源文件、对源文件做转换,然后才能把内容返回给浏览器,这个时间耗时蛮久的,导致白屏时间较长。解决方案1
//vite.config.ts optimizeDeps: { include: [ 'vue', 'vue-router', 'pinia', 'axios', 'element-plus/es/components/form/style/css', 'element-plus/es/components/form-item/style/css' ] }解决方案2
参考文章:服务冷启动性能提升
vite-plugin-optimize-persist通过持久化方式记录Dev Server运行时扫描到的依赖,从而让首次构建便可感知到,避免二次预构建的发生。【emoji】 vite 2.9.x 有效,vite 4.x 验证无效npm i -D vite-plugin-optimize-persist vite-plugin-package-config
// vite.config.ts import OptimizationPersist from 'vite-plugin-optimize-persist' import PkgConfig from 'vite-plugin-package-config' export default { plugins: [ PkgConfig(), OptimizationPersist() ] }解决方案3
解决方案4
放弃。你没看错,因为只有首次加载界面慢,忍一时风平浪静,Vite 的优势在于快速的冷启动、即时热更新和按需编译,瑕不掩瑜。
推荐阅读

